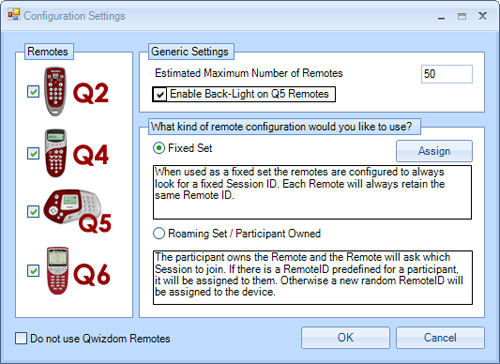
Please Note: Available Question Slide options are based on type of Remotes selected in the Configuration Settings window.
Multiple Choice Slides
- Click the
 Insert Slide drop-down menu and choose the appropriate multiple choice option. The template appears on the slide.
 - Enter content onto the slide.
- Click the Answer drop-down menu and select the correct answer.
- Click the
 Advanced Options button to view advanced grading options and/or to send question text to Q6RF remotes, while in presentation mode.
 - Click the Points drop-down menu and select the point value or type in the desired point value and press the Enter key on the keyboard to apply the point value to the slide.
- Click the Timer drop-down menu and select the time or type in the desired time limit and press the Enter key on the keyboard to apply the time to the slide.
Yes/No & True/False Slides
- Click the Insert Slide drop-down menu and select the type of slide you want to create. The template appears on the slide.
- Enter content onto the slide.
- Select the answer from the drop-down menu.
- Click the Advanced Options button to send question text to Q6RF remotes, while in presentation mode.
- Click the Points drop-down menu and select the point value or type in the desired point value and press the Enter key on the keyboard to apply the point value to the slide.
- Click the Timer drop-down menu and select the time or type in the desired time limit and press the Enter key on the keyboard to apply the time to the slide.
Numeric Slides
- Click the Insert Slide drop-down menu and select Numeric. The template appears on the slide.
- Enter content onto the slide.
- Click the Advanced Options button. This brings up the Question Properties window.
- Enter the answer/s and point value.
Send Question Text to Remotes – check to send text to Q6RF remotes.
Numeric – Select Numeric to add in standard numeric answer/s. (Optional) Enter in multiple answers and point values to give students partial credit. (Optional) Check the Convert fractions to numbers box to allow both fraction and decimal answers to be counted as correct. If this box is unchecked only the answer that is typed into the above field will be counted as correct.
Numeric Range – Select Numeric Range to add an answer for rounding, number set, algebraic and other problems with a varying answer range.
Require Precision – Sets a place value to which answer/s need to be rounded. - Click the Timer drop-down menu and select the time or type in the desired time limit and press the Enter key on the keyboard to apply the time to the slide.
Sequence Slides
- Click the Insert Slide drop-down menu and select the appropriate Sequence option. The template appears on the slide.
- Enter content onto the slide.
- Click the Advanced Options button. This brings up the Question Properties window.
- Check the Send Question Text to Remotes box to send question text to Q6RF remotes.
- Enter in answer and point value.
- Check the Give 1 Point for every item in the correct position box, to apply partial grading.
- Click OK when finished.
- Click the Timer drop-down menu and select the time or type in the desired time limit and press the Enter key on the keyboard to apply the time to the slide.
Multiple Mark Slides
- Click the Insert Slide drop-down menu and select the appropriate Multiple Mark . The template appears on the slide.
- Enter content onto the slide.
- Click the Advanced Options button. This brings up the Question Properties window.
- Check the Send Question Text to Remotes box to send question text to Q6RF remotes.
- Select the correct answers and enter a point value.
- Check the Give 1 Point for every item in the correct position box, to apply partial grading.
- Click OK when finished.
- Click the Timer drop-down menu and select the time or type in the desired time limit and press the Enter key on the keyboard to apply the time to the slide.
Please Note: Use the Multiple Mark option to tally results by exact answer. For instance the results graph will show all participants who answered AB, BC, etc. Use the Vote Multiple Mark to tally results by total votes cast for each option. For instance, the results graph will show that 200 participants voted for A, 100 for B, etc.
Rating Scale Slides
- Click the Insert Slide drop-down menu and select the appropriate Rating Scale option. The template appears on the slide.
- Enter content onto the slide.
- You can set a correct answer by clicking in the Answer field and typing in the correct answer and pressing Enter when finished.
- Click the Advanced Options button. To send text to Q6 participant remotes.
- Click the Points drop-down menu and select the point value or type in the desired point value and press the Enter key on the keyboard to apply the point value to the slide.
- Click the Timer drop-down menu and select the time or type in the desired time limit and press the Enter key on the keyboard to apply the time to the slide.
Text Input (For Q5RF & Q6RF remotes and QVR App )
- Click the Insert Slide drop-down menu and select Text Input. The template appears on the slide.
- Enter content onto the slide.
- Click in the Answer field and type in correct answer. Press Enter when finished.
- Click the Advanced Options button to send question text to Q6RF remotes and set advanced grading options.
- Click the Points drop-down menu and select the point value or type in the desired point value and press the Enter key on the keyboard to apply the point value to the slide.
- Click the Timer drop-down menu and select the time or type in the desired time limit and press the Enter key on the keyboard to apply the time to the slide.
Please Note: Best used for single word responses where capitalization does not matter.
Text Response, Text Edit, and Equation (For Q6RF remotes and QVR App)
- Click the Insert Slide drop-down menu and select the type of slide you want to create. The template appears on the slide.
- Enter content onto the slide.
- Click the Advanced Options button to enter answer, send question text to Q6RF remotes while in presentation mode, and set grading options.
- Click the Timer drop-down menu and select the time or type in the desired time limit and press the Enter key on the keyboard to apply the time to the slide.
Please Note: Best used for short phrase responses, feature allows for punctuation, spacing, and other advance grading options.
Demographic Slides
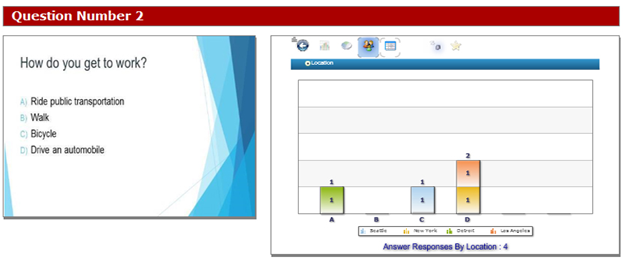
These slides allow you to categorize results based on location, ethnicity, gender and more.
- Add a Demographic slide to the beginning of your PowerPoint presentation. Click the Insert Slide drop-down menu and select Demographic . Using the drop-down menu, select the appropriate demographic. The template appears on the slide.
- Enter content on slide.
Sample:

- Set timer, if needed.
- Start a presentation. Participants will input their demographic data by selecting the appropriate numeric choice.
- Pose a question slide. Once participants have responded, click on the public graph button on an instructor device or
 the Reports icon on the Qwizdom Toolbar to bring up the results graph. Click the
  Demographics icon to view responses to question slides based on set demographic.
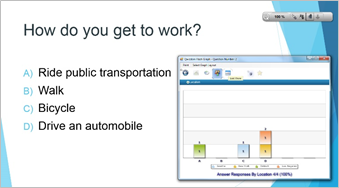
Sample
Note: Toggle between multiple demographics by using the ratio buttons on the results graph. - Post-session, click the
 Reports icon and select the Question Summary Report (with Answer) or Question Summary Report (without Answer) report.
 - Click the
 Demographics icon to view responses to question slides based on set demographic.

Report Sample