Grade class worksheets, paper-based tests and textbook material in the Answer Key application.
Creating an Answer Key
- Click on the Content tab, and select
 Add File and then Create and Add Answer Key File.
 - Enter a name for the activity and click Done.
- The activity appears in the Content Tree on the left.
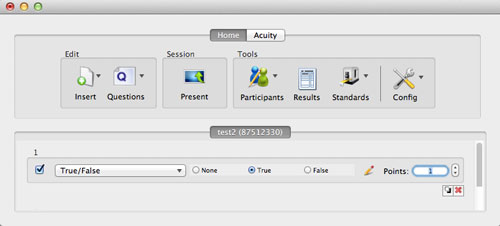
- Double-click the newly created activity. The Answer Key window will open.
- Click
 Insert, then choose a question type.
 - Enter correct answer and point value, if desired.
- Click the
 Advanced Options button to send question text to Q6 participant remotes or add partial grading options , if desired.
 - Click Insert again to choose another question type or
 Copy to add the next question. Set answer and points. Repeat until all questions have been added.
 - When finished, click Close at the top of the window, then choose Save.
Presenting an Answer Key
- Click the
 Present button. The Presentation Setup window appears.
 - Select a participant list.
- Select how you would like to save the results. (Recommend) Save to Results Manager.
- Select the options you would like available during presentation.
- Click Present to begin.
- The Paper-Based Activity Monitor window appears.
- The participants will turn on their remotes at this time.
- The answer key will load into the remotes and participants will begin to answer.
- Student progress can be tracked by following the activity in the Paper-Based Activity Monitor window.
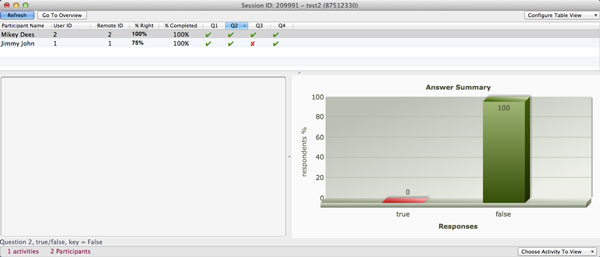
– Click on a question column to view a Answer Summary graph.
– Use the Configure Table drop-down to add and remove columns.
– Use the Choose Activity To View menu to toggle between the Activity View (shown above) and the Overview window (below).
- When all answer keys have been completed, click Close at the top of the window, then choose Stop.
- The saved results will save in the location you selected.
Presenting Odd-Numbered Questions
- Double-click the answer key. The Answer Key window appears.
- Click the
 Questions menu and select Select Odd Numbered Questions. Only the odd-numbered questions will be checked.
 - Click the Present button.
- Participants will only see and answer the odd-numbered questions during their answer key.
Presenting Even-Numbered Questions
- Double-click the answer key. The Answer Key window opens the answer key.
- Click the Questions menu and select Select Even Numbered Questions. Only the even-numbered questions will be checked.
- Click the Present button.
- Participants will only see and answer the even-numbered questions during their answer key.
Presenting Selected Question Numbers
- Double-click the answer key. The Answer Key window opens the answer key.
- Check the question numbers you want to present.
- Click the Present button.
- Participants will only see and answer the selected question numbers during their answer key.
Presenting Multiple Answer Keys
- In the Content tab, double-click an Answer Key file to open.
- When the answer key opens, write down the test number (activity ID) located to the right of the title. Participants will need to enter this number into their remotes in order to join the session.

- Open another answer key and do the same.
- With both files open, click Present.
- Click the Present All button.
- The Presentation Setup window opens.
- Select a Participant List.
- Select how results will be saved.
- Select your presentation settings.
- Click Present to begin.
- Activity ID appears on the participant’s remote LCD screen.
- Enter the test number (activity ID) of the answer key into the remote and press the Send key.
- The answer key will load into the remote.
- When all answer keys have been completed, click Close, at the top of the window and then Stop.
- The results will be saved in the location you selected.