Getting Started

Installing Qwizdom Connect

System Requirements
OS x 10.11–10.14
Open USB Port


MAC CONNECT CUSTOMERS, PLEASE NOTE:

We will not be converting Qwizdom Mac Connect to 64-bit, so unfortunately it will not be compatible with macOS Catalina (10.15). The PC version of Connect will continue to be available and supports the latest Windows OS. Or switch to Qwizdom OKTOPUS with Actionpoint Suite for Mac (which will be converted to 64-bit for macOS 10.15). For more information on this software, please see: https://qwizdomoktopus.com/


Installing Qwizdom Mac Connect

  1. Download the latest version of the software from our website at
    http://qwizdom.com/support/qwizdom-connect/#Downloads
  2. Open the file. If you have an older version of Connect on your computer, double-click
    Uninstall Qwizdom Connect then restart the computer when the process
    finishes.
  3. In the Qwizdom Connect .dmg file, double-click Qwizdom Tools. This will open the
    Installer.
  4. Once the installation is complete, click Close and restart your computer (if
    necessary).
  5. Carefully read instructions and follow the installation wizard.
  6. The following applications will appear in the Qwizdom Connect Folder, under
    Applications.
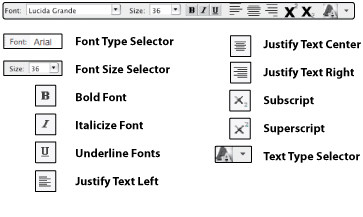
  • Actionpoint: Allows you to create interactive PowerPoint presentations.
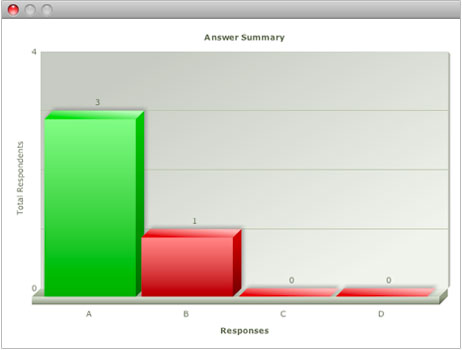
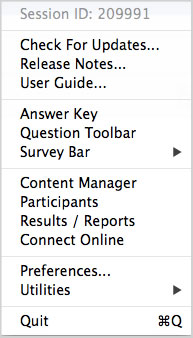
  • Answer Key: Is for presenting and grading paper tests and activities.
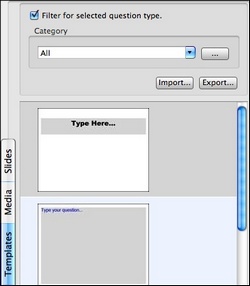
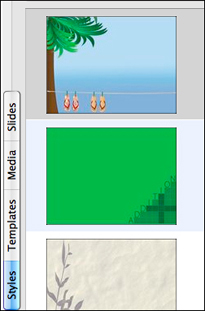
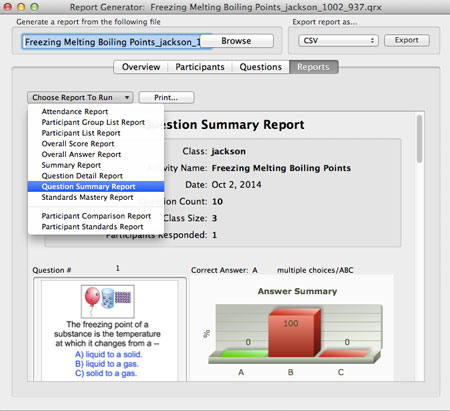
  • Content Manager: Organize and present Qwizdom activities.
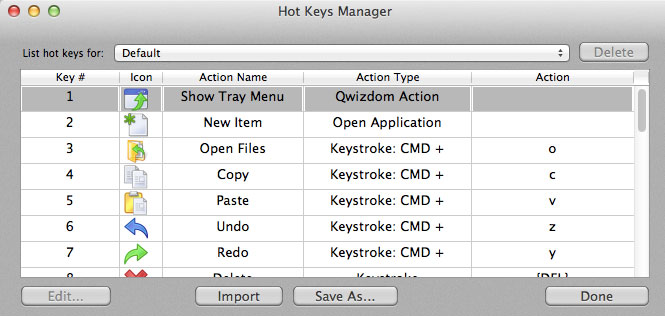
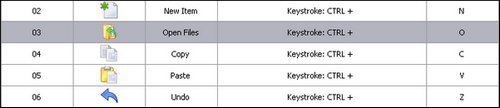
  • Hot-Key Editor: Q7 Tablet users can customize soft key actions.
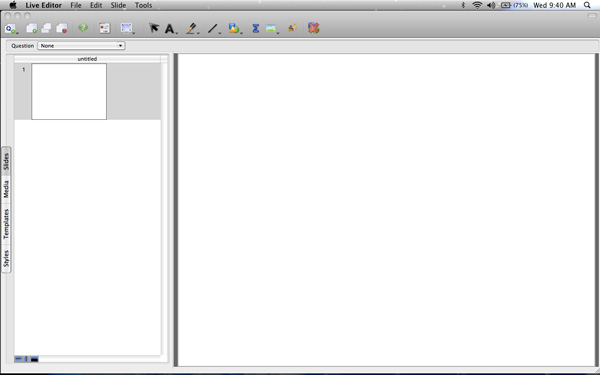
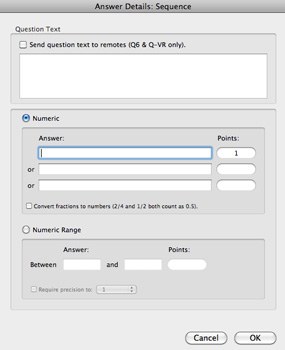
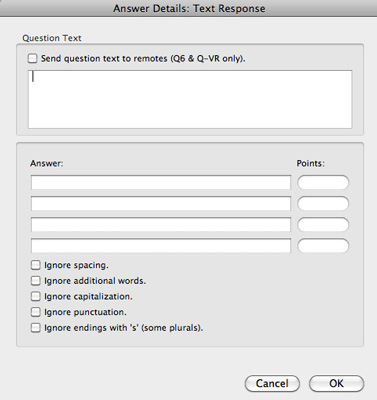
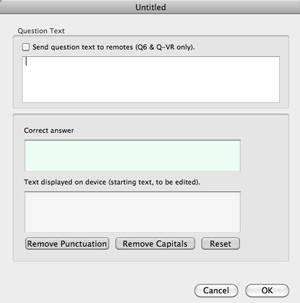
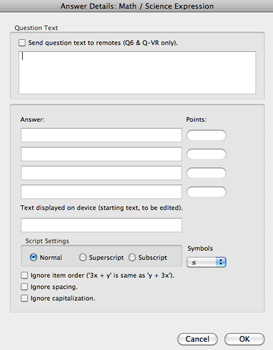
  • Live Editor: Create and edit Qwizdom activities.
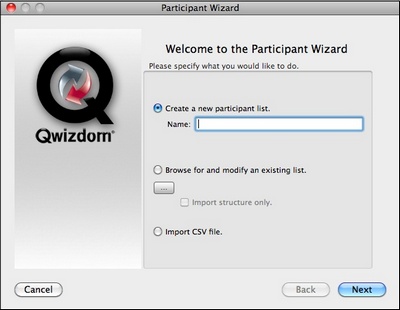
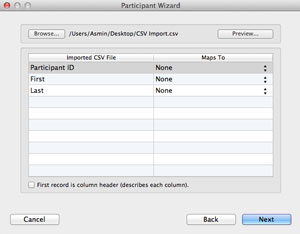
  • Participant Service: Create and edit class lists.
  • Qwizdom Tools: Launch Qwizdom applications.
  • Survey Bar: Allows you to quickly poll your audience using an application of
    your choice.

0 people did not find this helpful

Back To Top

Online Registration

Registration must be completed in order to use any of Qwizdom Connect’s online features
including Qwizdom ReadySet curriculum, free online curriculum packages, Qwizdom QVR
Response App, online classes and reporting.

  1. Check to see if there is a Safe Senders List and add @qwizdom.com. If not, after you
    register, check your Junk or Spam folder for emails sent by Qwizdom.
  2. Click on the  Qwizdom Connect icon to open Qwizdom Connect.
  3. Go to the Qwizdom Online menu and select Login to Qwizdom Online.
  4. Click the New User button. This will bring you to the Online Registration form. Fill out
    the required fields, apply license key (for ReadySet, QVR, etc) or select Qwizdom
    Connect Free Content if you would like to register for the free online resources and click
    Submit.
  5. You will receive a confirmation email.
  6. In Qwizdom Connect, go to the Qwizdom Online menu and select Login to Qwizdom
    Online. Login to with your username and password.

0 people did not find this helpful

Back To Top

Hardware Setup

  1. Q2 Remotes-place two AAA batteries and insert the screw (optional) into the back
    of the remote.
  2. Q4, Q6 and QVOTE Remotes-place two AA batteries and insert the screw (optional) into the back
    of the remote.
  3. Q5 Remotes-plug the Q5RF participant and instructor remotes into the multi-charger
    and/or single charger for 24 hours
    before first use.
  4. Q7 Presenter Tablet-the tablet needs to be charged a full 24 hours for the first
    time or after a long period of inactivity. The pen may take slightly longer to fully
    charge. Generally, the tablet will only need to be charged about 6 hours to be fully
    charged after the initial charge. To charge the pen and tablet, place the pen into
    the pen tray located at the top of the Q7RF Tablet. Using the USB cable, plug the
    tablet into the computer. The battery icon will be full when the tablet is fully
    charged.


Please Note: If your computer goes into power saving mode, the charging of the Q7RF
Tablet may be interrupted.


Installing the HID (Black) Host

  1. The HID Host is located in the back compartment of the Q7RF Tablet or in the front
    pocket if remote bag.
  2. Plug the HID Host into an open USB port on the computer.
  3. The computer will automatically detect and configure the new hardware device.


Installing the (Red) RF Host

We do not recommend using the red host with Qwizdom Mac Actionpoint or Mac Connect software. Email support at support@qwizdom.com for details.

0 people did not find this helpful

Back To Top

Hardware

Remote Setup

Follow the steps below to set up remotes. Be sure the HID or RF host* is properly installed before proceeding.
* v.938 host or higher is required for Qwizdom Connect. If the host is not v.938 host or higher, please contact Technical Support.

  1. Click the Remotes menu.
  2. Select Configuration Preferences. The Remote Preferences window opens.
  3. Type in the number of remotes in your set(s).
  4. Select only the remote types you are using.
  5. Select your preferred configuration. Use Fixed Set unless the remotes are participant-owned. See below for details.
  6. Newer remotes, received in 2012 or later, already come with pre-assigned numbers, matching their affixed stickers, so no further action is required. Click OK to finish.

Please Note: If you received your set in 2011 or earlier, click the Assign Fixed Remote IDs button. Read the dialog box, and click Continue to start assigning Remote ID numbers. (See Assign Remote IDs below for details. )

Other Settings & Explanations:

  • Enable Backlight – activates the backlight on the Q5RF participant and Q5RF Instructor Remotes.
  • Using Q4 remotes older – check this to assign Remotes ID numbers to older Q4s. To check the version number, turn on a Q4 remote by holding down the Menu key. The version number will appear on screen.
  • RF host (Red Base)
  • HID RF host (Black Base) – most Commonly used host.
  • Roaming Set or Participant Owned–  check this option if the participants own the remotes. This mode is best-suited for Higher Ed/University settings. Participants are required to either enter a session ID and participant ID to join a presentation.

Assign Remote IDs
Remotes received in 2011 or earlier need to be set up once, prior to use, with computer-assigned ID numbers. Newer remotes, received in 2012 or later, already come with pre-assigned numbers, matching their affixed stickers, so no additional setup is required.

  1. Plug in your host.
  2. In the Remote Preferences window, select Set with remote IDs and click the Assigned Fixed IDs button.
  3. In the Remote Assignment window, check Auto-Increment Remote Number to assign numbers in the order in which remotes are turned on.
  4. Click Start.
  5. Begin turning on your remotes. When a remote connects with the host, its assigned ID number will appear on the remote’s LCD screen.
  6. This process only needs done once—the assigned number will remain fixed with that remote. If desired, use a marker, or affix a sticker, to designate the number that has been assigned to that remote.
  7. If your remotes do not connect, they are not configured with the correct Session ID. See Changing Session IDs, below for details.
  8. Click Stop when all remotes have been assigned. Click Done to close the window. Remotes will turn off automatically.

Assign Remote IDs – Q4 Remotes with Firmware Older than Version 1.34
The following directions only apply for customers using Q4 remotes older than version 1.34. (The Q4 firmware number is displayed on the remote’s screen when the remote is first turned on.)

  1. Insert host into the USB port of your computer.
  2. Open Qwizdom Connect, click on the Remotes menu, and select Configuration Preferences.
  3. In the Remote Preferences window, check the box for Using Q4 Remotes Older Than Version 1.34.
  4. Select Set with remote IDs and click the Assigned Fixed IDs button.
  5. Turn the remotes on. When the remotes communicate with the host, the serial number and the remote’s assigned ID number will appear in the window. If the remotes are prompting for the session ID, enter the session ID that is displayed at the bottom of the Assign Fixed Remote ID window.
  6. After all the remotes have been assigned, click Done to exit the Assigned Fixed Remote IDs window.

Please Note: You only have to assign fixed numbers once, unless you change computers or hosts.


Changing Session IDs
If the RF remote or tablet displays No Net, Not Found, Not Active, or Inactive, it could be that the session ID is not correct.

  • For Q2RF remotes: wait for the remote to time out and turn off. When you turn it back on, press the Help key. When you see –S on the display, it is prompting you for the session ID. Enter it and press the Send key to confirm.
  • For Q4RF remotes: press the Menu key, use the right arrow to scroll to Sess. ID., and press the Send (double arrows) key to select the option. You will see the current session ID and will be asked if you want to change the session ID. Press T (Yes) to change. Enter the session ID and press the Send (double arrows) key to send.
  • For Q5RF remotes: wait for the remote to display No Net, Not Active, or Not Found. Press the Menu key and select Enter Session ID using the Send (double arrows) key or the circle key on the thumb pad. Enter the session ID and press the Send (double arrows) key.
  • For QVOTE and Q6RF remotes: press the Menu key, scroll to Enter Session ID, press the Menu Select key, reenter the Session ID, and press Join to submit.
  • For Q7 tablet: press the Menu key and use the Scroll button to select Enter Session ID. Press the Enter key to select it and enter the session ID. Press the Enter key to confirm.


What is a Session ID?
Each host/receiver has a unique six-digit called a Session ID number. Session IDs “assign” the remote to the host, allowing the remote to only communicate with that specific host.

The Session IDs can be found:

  • For both HID (Black) and RF (Red) host, the session ID can be found in the Assigned Fixed Remote IDs window, the Login tab in the Presentation Setup window, and the Login tab during a presentation in the Qwizdom Tool. See Presentation Features for details.
  • For the HID (Black) Host, click  Qwizdom Tools, found in the top right-hand corner of your computer screen. The Session ID will be displayed at the top of the menu.
  • For the RF host, the session ID can be found on the bottom of the device on a white sticker.

You can also create your own Session ID in the Presentation Setup window. Creating your own Session ID does not change the host’s default Session ID. See Presentation Setup for details. The Session ID must be unique because if there are other hosts in the same building, the remotes will not know which host to connect with.

0 people did not find this helpful

Back To Top

Notice

Notices of Compliance for Qwizdom’s RF Response Devices

Note: This equipment has been tested and found to comply with the limits for a Class B digital device, pursuant to part 15 of the FCC Rules. These limits are designed to provide reasonable protection against harmful interference in a residential installation. This equipment generates, uses, and can radiate radio frequency energy and, if not installed and used in accordance with the instructions, may cause harmful interference to radio communications. However, there is no guarantee that interference will not occur in a particular installation. If this equipment does cause harmful interference to radio or television reception, which can be determined by turning the equipment off and on, the user is encouraged to try to correct the interference by one or more of the following measures:


  • Reorient or relocate the receiving antenna.
  • Increase the separation between the equipment and receiver.
  • Connect the equipment into an outlet on a circuit different from that to which the receiver is connected.
  • Consult the dealer or an experienced radio/TV technician for help.


Caution: Changes or modifications to Qwizdom’s RF hardware that are not expressly approved by Qwizdom could void the user’s authority to operate the equipment.

CE Mark

This product is designed for the 2.4 Ghz WLAN network throughout the EC region and Switzerland with restrictions in France.


FCC 15.19:

(3) All other devices shall bear the following statement in a conspicuous location on the device.

This device complies with Part 15 of the FCC Rules. Operation is subject to the following two conditions: (1) this device may not cause harmful interference, and (2) this device must accept any interference received, including interference that may cause undesired operation.

FCC 15.21:

The user’s manual or instruction manual for an intentional or unintentional radiator shall caution the user that changes or modifications not expressly approved by the party responsible for compliance could void the user’s authority to operate the equipment. In cases where the manual is provided only in a form other than paper, such as on a computer disk or over the Internet, the information required by this section may be included in the manual in that alternative form, provided the user can reasonably be expected to have the capability to access information in that form.

FCC 15.105:

(b) For a Class B digital device or peripheral, the instructions furnished the user shall include the following or similar statement, placed in a prominent location in the text of the manual:

NOTE: This equipment has been tested and found to comply with the limits for a Class B digital device, pursuant to Part 15 of the FCC Rules. These limits are designed to provide reasonable protection against harmful interference in a residential installation. This equipment generates, uses and can radiate radio frequency energy and, if not installed and used in accordance with the instructions, may cause harmful interference to radio communications. However, there is not guarantee that interference will not occur in a particular installation. If this equipment does cause harmful interference to radio or television reception, which can be determined by turning the equipment off and on, the user is encouraged to try to correct the interference by one or more of the following measures:


0 people did not find this helpful

Back To Top

Q2RF Participant Clicker

apQ2med 

  1. E inkTM display – displays the remote’s ID number when it is turned off; displays remote’s ID number and battery icon when it is turned on.
  2. Navigation arrows apq2leftarrowapq2rightarrow – scroll through questions when taking an Answer Key. Left arrow apq2leftarrow is also used as a backspace.
  3. True/Yes, False/No – use to answer True/False and Yes/No questions
  4. Multiple Choice and Numeric keypad – answer multiple choice and numeric questions (with single digit answers).
  5. Join apq2send  – press to turn remote on/off or confirm Session and/or User IDs.
  6. Help apq2help – press to request assistance or press to change Session ID when the remote cannot find the host.


Q2 Common Screen Displays
_ _ S : Enter Session ID. See Remote Setup for details.
_ _U : The remote is asking for a Participant ID. See Remote Login for details.
_ _ A : Displays when the remote is requesting an Answer Key activity number. Prompt only appears when Multiple Answer Keys are being presented. See Answer Key for details.
– – – : Remote cannot find host and will power down.
– – : Remote is searching for the host.
Q2Bat: Battery icon indicates battery charge when remote is on.


Supports the Following Question Types:
Multiple Choice
True/False
Yes/No
Single Digit Numeric
Rating Scale (1-5 ) and (1-7)

This device complies with part 15 of the FCC Rules. Operation is subject to the following two conditions: (1) This device may not cause harmful interference, and (2) this device must accept any interference received, including interference that may cause undesired operation.

0 people did not find this helpful

Back To Top

Q4RF Participant Clicker

new Q4 remote

  1. Send send key – press to submit answer or select menu options.
  2. Menu [power] – hold the Menu key for two seconds to turn the remote on or off. Turn off remotes if they are not in use. Remotes automatically turn off at the end of a presentation. Press the Menu key and use the scroll keys to view options. Press Send to select an option such as Search, Sess. ID, User ID, and Exit. When presenting, the menu items are Help, Login, User Id, and Exit. To request help during presentation, press the Menu key, scroll to select Help, and press the Send key to select it.
  3. Scroll scroll keys– scroll through menu options, answer choices, or questions.
  4. Clear [C] – press to delete response or change answers if instructor has enabled the feature.
  5. True/Yes and False/No – use to answer True/False and Yes/No questions


Q4 Common Screen Displays

  • Qwizdom: Remote has found the host and is ready for a question slide.
  • Activity ID: Displays when the remote is requesting an Answer Key activity number. Prompt only appears when Multiple Answer Keys are being presented. See Answer Key for details.
  • Sess. ID: Your remote may ask you to enter the Session ID. See Remote Setup for details.
  • User ID: The remote is asking for a Participant ID. See Remote Login for details.
  • Loading: An Answer Key is loading; may take a few moments.
  • Push Key: Remote is idle. Press any key, (except MENU) to reactivate.
  • Inactive: Remote senses the host is not in use or does not recognize the session. If remote remains inactive after starting a presentation, re-enter Session ID by pressing MENU, scrolling right to “Sess.ID,” and pressing SEND. When prompted, re-enter the Session ID and press SEND.
  • No Net: Remote cannot find the host. Re-enter the Session ID.
  • Denied: User denied due to incorrect User ID or a duplicate User ID. Re-enter User ID. Press MENU, scroll to “User ID,” press SEND, enter the User ID, and press SEND again.


Supports the Following Question Types:
Multiple Choice
True/False
Yes/No
Single and Multi-Digit Numeric
Rating Scale
Negative Number
Fractions
Decimal
Multiple Mark
Vote Multiple Mark
Sequence

This device complies with part 15 of the FCC Rules. Operation is subject to the following two conditions: (1) This device may not cause harmful interference, and (2) this device must accept any interference received, including interference that may cause undesired operation.

0 people did not find this helpful

Back To Top

QVOTE Participant Clicker

  1. Q# – displays the current question number.
  2. Help Request  -indicates your requested help.
  3. Battery Power – displays battery charge.
  4. ID# – displays the remote ID number.
  5. Menu/Power – press and hold on to power remote on/off. Press to view menu options: Help, Search, Sess. ID, User ID, Adjust Contrast, and Exit.
  6. Right/Wrong Feedback – displays check mark for correct answer, X for incorrect answer, and both check mark/X for response received.
  7. Send / Change / Join – press to send or change an answer. Also press to join or search for a session.
  8. Directional Arrows and Select – press to navigate between menu options, answer choices, and questions. Press the MenuSelectKey to make a selection.
  9. True / Yes / Decimal – press to select True, Yes, or enter a decimal depending on question.
  10. False/No/Negative – press to select False, No, or enter a negative number depending on question.
  11. Fraction – use to enter a fraction answer.
  12. Delete – press to delete the last character.


QVOTE Common Screen Displays

  • Searching for Session ID: Remote is searching for the host.
  • Ready: Remote has found the host and is ready for a question slide.
  • Power Save Mode: Remote is idle. Click RESUME, to reactivate.
  • Help: First available Menu option. With Help selected, press the menu select key MenuSelectKey to privately ask for help or scroll to “EXIT” and press MenuSelectKey.
  • Session ID Not Found: Remote cannot find the host. Re-enter the “Session ID.” Press MENU, scroll to “Enter Session ID,” click MenuSelectKey, enter the Session ID, and press SEARCH AGAIN.
  • Session ID Login Denied: User denied due to incorrect User ID, or a duplicate ID. Re-enter User ID. Press MENU, scroll to “Enter User ID,” click MenuSelectKey, re-enter the User ID, and press JOIN.
  • Enter User ID: The remote is asking for a Participant ID. See Remote Login for details.
  • Loading: Loading an Answer Key; may take a few moments.
  • Enter Activity ID: Requesting an Answer Key activity number. Prompt only appears when Multiple Answer Keys are being presented. See Answer Key for details.


Supports the Following Question Types:
Multiple Choice
Yes/No
True/False
Numeric
Fractions
Decimals
Negative
Sequence
Multiple Mark
Vote Multiple Mark
Rating Scale

This device complies with part 15 of the FCC Rules. Operation is subject to the following two conditions: (1) This device may not cause harmful interference, and (2) this device must accept any interference received, including interference that may cause undesired operation.

0 people did not find this helpful

Back To Top

Q6RF Participant Clicker

Q6-Complete4weba

  1. Menu/Power – press and hold on to power remote on/off. Press to view menu options: Help, Search, Sess. ID, User ID, Adjust Contrast, and Exit.
  2. Enter – press to submit commands from LCD menu choices.
  3. Directional Arrows – press to navigate between menu options, answer choices, and questions.
  4. Multi-function – serves as multi-function for Send/Change.
  5. Symbols – select to enter fraction, punctuation, etc.
  6. Delete – press to delete the last character.
  7. Q# – displays the current question number.
  8. Help Request  -indicates your requested help.
  9. Battery Power – displays battery charge.
  10. ID# – displays the remote ID number.
  11. Right/Wrong Feedback – displays check mark for correct answer, X for incorrect answer, and both check mark/X for response received.
  12. Shift – changes case options: ABC/Abc/abc/123/Superscript/Subscript.


Q6 Common Screen Displays

  • Searching for Session ID: Remote is searching for the host.
  • Ready: Remote has found the host and is ready for a question slide.
  • Power Save Mode: Remote is idle. Click RESUME, to reactivate.
  • Help: First available Menu option. With Help selected, press the menu select key MenuSelectKey to privately ask for help or scroll to “EXIT” and press MenuSelectKey.
  • Session ID Not Found: Remote cannot find the host. Re-enter the “Session ID.” Press MENU, scroll to “Enter Session ID,” click MenuSelectKey, enter the Session ID, and press SEARCH AGAIN.
  • Session ID Login Denied: User denied due to incorrect User ID, or a duplicate ID. Re-enter User ID. Press MENU, scroll to “Enter User ID,” click MenuSelectKey, re-enter the User ID, and press JOIN.
  • Enter User ID: The remote is asking for a Participant ID. See Remote Login for details.
  • Loading: Loading an Answer Key; may take a few moments.
  • Enter Activity ID: Requesting an Answer Key activity number. Prompt only appears when Multiple Answer Keys are being presented. See Answer Key for details.

Please Note: To send question text to Q6RF remotes click on the edit2Advanced Options button and check Send Question Text to Remotes. See Creating Slides for details.


Supports the Following Question Types:
Multiple Choice
Yes/No
True/False
Numeric
Sequence
Multiple Mark
Vote Multiple Mark
Rating Scale
Text Input
Text Response
Text Edit
Equation

This device complies with part 15 of the FCC Rules. Operation is subject to the following two conditions: (1) This device may not cause harmful interference, and (2) this device must accept any interference received, including interference that may cause undesired operation.

0 people did not find this helpful

Back To Top

Instructor Remotes

Q6iRF Instructor Remote

Q6i01-sm-UserGuide

  1. On/Off: Press and hold to turn remote on/off. Press to view men options: Enter Sess. ID, Enter User ID, and Backlight.
  2. Directional Arrows: Press to navigate between slides and press  to select LCD menu choices.
  3. Full List: View all available actions including Play/Pause Media, pull up window shade and more.
  4. Pick: Randomly call on a participant.
  5. Private LCD Graph: Display a response graph on the Instructor Remote’s LCD.
  6. Public Screen Graph: Display the response graph for everyone to view.
  7. Re-pose Question: Re-pose the current question slide.
  8. Help Menu: Displays a list of participants who have requested help.
  9. New Q: Pose a spontaneous question.
  10. Space: Add a space when typing a question.
  11. Pick (Special): Select a participant at random from a specific group. Groups include answered correctly, not answered on, etc.
  12. Shift: Changes case options: ABC/ Abc/abc/123/Superscript/Subscript
  13. Symbols: Press to enter fraction, punctuation, etc.
  14. Delete: Press to delete the last character.

Please note: When using Q6 participant clickers, in order to send question text to Q6RF remotes click on the edit2 Advanced Options button and check Send Question Text to Remotes. See Creating Slides for details.


Q5RF Instructor Remote

q5 teacher rev

  1. Send send key – press to submit command.
  2. C [Clear] – press to clear names from the Help Request list.
  3. Thumb pad – press right/left to navigate between slide sets, up/down for menu options, and “on-the-fly” question choices. Press the circle key (in the middle) to select an option, play Microsoft PowerPoint® animations, advance slides, exit the presentation, and show/hide correct responses on the response graph.
  4. ? [Help List] – displays list of participants who requested help on the LCD screen.
  5. Menu – view menu options such as entering Session ID and search again for host.
  6. True/Right and False/Wrong – not applicable.
  7. New Q [-] – press to pose an “on-the-fly” question.
  8. Pick [.] – press to display/hide a random participant’s name on the computer screen.
  9. Private Graph graph 1 [0] – displays the results of participant responses as a graph on the LCD screen of the instructor’s remote.
  10. Public Graph graph 2[/] – displays the results of participant responses as a graph on the computer (projector, television screen, etc.) screen for everyone to view. Use the right/left controls on the thumb pad to scroll through the different graphs. Use the circle key (in middle of thumb pad) to show/hide correct responses.
  11. Show [7] – displays game animations.
  12. Play [8] – will plays videos in Connect only.
  13. Fn (Function) – allows you to re-pose a question if you go back during to a previous slide during presentation. Note: previous answers will be overwritten.
  14. Power switch – turns remote on/off.
  15.  Backlight – turns Backlight on/off. The “Enable Backlight” box in the Configuration Settings window needs to be checked to turn on the Backlight feature.

This device complies with part 15 of the FCC Rules. Operation is subject to the following two conditions: (1) This device may not cause harmful interference, and (2) this device must accept any interference received, including interference that may cause undesired operation.

0 people did not find this helpful

Back To Top

Q7RF Tablet

Tools Overview

TabletSM

Tablet Functions when presenting an activity using Qwizdom Mac Connect Software Suite. Q7 has limited annotation features when presenting Actionpoint activities. 


pick2_24 Pick – picks random participants

 Show Presentation – starts game animation

HelpNew24  Help Requests – privately displays list of participants who requested help

Question Type24 Insert Slide – makes a copy of the current slide and lets you pose a spontaneous question to participant remotes

NewStopwatch24 Timer – adds additional time to timer

StopQuestion24 Stop – stops the question being posed

PrivateResults24Private Graph – displays private graph of responses on tablet (See Response Graph for details.)

DisplayResults24 Public Graph – displays response graph to participants (see Response Graph for details)

Backlight24 LCD Backlight – turns backlight on or off

PenTool24 Pen – use to draw

 Highlighter – use to highlight

 Line – use to draw lines

Text – use to create text

  Insert Multimedia – inserts images, audio, and video files

 Window Shade – hides portion of displayed screen

Laser Pointer24Laser Pointer – displays laser dot when using the Pen

 Absolute Position Mouse – displays arrowhead when using the Pen and works as an absolute position mouse

 Keyboard – activates keyboard region

 New Slide – creates a blank slide

 Copy – copies selected object(s)

 Paste – pastes copied object(s)

  Undo – undo last action(s)

 Redo – redo previous action(s)

 Delete – deletes selected object(s)


 Volume Control


Quick Pose Controls:  Click an answer to spontaneously pose a numeric, multiple choice, yes/no, or rating scale question.

NumericT For Numeric question types

MultipleChoiceT For Multiple Choice question types

RateT For Rating question types

YesNoT For Yes/No or True/False question types

* Click Any to pose a survey question.

This device complies with part 15 of the FCC Rules. Operation is subject to the following two conditions: (1) This device may not cause harmful interference, and (2) this device must accept any interference received, including interference that may cause undesired operation.

Using the Pen

The Pen is used (with the Tablet) to write, draw, and control mouse movements.

T-PenRev

  • Pen Tip – same as a mouse cursor.
  • Left – click button-same as double-clicking with left button on the mouse.
  • Right – click button-same as the right-click button on the mouse.

Pen Actions

  • Press, Tap, Push Down with Pen Tip – activates Tablet icons, similar to left-clicking with mouse.
  • Double tap with Pen Tip – is similar to double-clicking with mouse.
  • Left-click – activates Tablet icons, similar to double-clicking with mouse.
  • Right-click – similar to right-clicking with the mouse.

Sleep Mode
The Pen goes into sleep mode after a minute of inactivity. Touching the pen to the Q7RF Tablet surface or pressing the Left/Right buttons on the pen will reactivate it.


0 people did not find this helpful

Back To Top

Organizing Content

Content Manager

Content Manager  is where all created and imported activities are stored. Double-click Content Manager found in the Finder/Applications window to launch Content Manager.

Overview

Content Manager menu – Check software version number and set state standards preferences.
File menu – import and export presentations and activities .
Qwizdom Online menu – login to Connect Online to access premade activities and the media library. See Online Registration for details.
Connect Apps menu – displays the 3 applications within the software suite.
Remotes menu – setup remote handling.
Help menu  – view user guide.


Create a New Folder
1. Click the  Add Folder button.
2. Enter a name for the folder and click Done.
3. The folder appears in the Content Tree on the left.


Create a New Folder
1. Click the Add Folder button.
2. Enter a name for the folder and click Done.
3. The folder appears in the Content Tree on the left.


Edit an Activity
1. Double-click on the Content Manager button.
2. Double-click the activity you wish to edit in the Content Tree on the left.
3. This will launch Live Editor. Edit your activity in Live Editor. See Creating Slides for more information.


Create a New Answer Key
1. Click the black arrow to the right of the Add File button.
2. Select Create and Add Answer Key file and enter a name.
3. Click Done and the answer key will appear in the Content Tree on the left.
4. Double-click the answer key file to launch the Answer Key window. See Answer Key for more information.


0 people did not find this helpful

Back To Top

Importing and Exporting

Importing Activities (.QAP and .QXA)

  1. Go to the File menu and select Import / Qwizdom Activity. The Open window appears.
  2. Select the Import / Qwizdom Activity you would like to import and click Open. The activity will import into the Content Tree.

Importing External Documents

  1.  Go to the File menu and select Import External Document. The Open window appears.
  2.  Select the file you would like to import and click Open. The external document will import into the Content Tree.

Exporting Activities

  1. Select the activity you want to export.
  2. Go to the File menu and select Export. The Export Activity window appears.
  3. Choose the location to which to export your file and click Save.

0 people did not find this helpful

Back To Top

Applying Standards

Installing Standards
Standards will auto-install during the first use. See Installing Standards for details.


Applying Standards

You can apply standards to a single slide or activity.

Apply standards to whole activity.

  1. Click on the Content tab.
  2. Select an activity in the Content Tree.
  3. Click the Standards button. The Standards window appears.
  4. Select the desired set of standards you wish to use, located in the lower left hand corner of the Standards window.
  5. Select the standard at the level you want to apply to the activity.
  6. Select Apply Standards to All Questions.
  7. Click Link and then Close. The standards will appear in the Standards tab at the bottom of the Content Manager window.

Apply standards to individual slide/s.

  1. Click on the Content tab.
  2. Select an activity in the Content Tree. Click on a slide/s in the Activity Preview window on the right. Use the Command key to select multiple slides, if desired.
  3.  Click the Standards button. The Standards window appears.
  4. Select the desired set of standards you wish to use. Located in the lower left hand corner of the window.
  5. Select the standard at the level you want to apply to the slide(s).
  6. Select Apply Standards to Selected Questions.
  7. Click Link and then Close. The standards will appear in the Standards tab at the bottom of the Content Manager window.

0 people did not find this helpful

Back To Top

Search & Download Content

  1. Go to the Qwizdom Online menu and select Login to Qwizdom Online. Enter your username and password.
  2. Next click on the Connect Online tab and select Browse, and then Collections.
  3. Use the drop down menus to select a Subject, Grade, and Package.
    ConnectOnline
    There are 2 types of content: Basic Content (labeled ‘Curriculum Packages’; available to anyone with a Connect license) and Premium Content (titled ‘ReadySet’ and/or has green flag icon; requires an annual subscription).
  4. The selected content package will appear on the left. Click on the [+] to open the nested folders and view the contents.
  5. To download the entire package, collapse the content tree, highlight the package title, and click Download on the right side of the screen.
  6. To download a specific lesson, highlight the lesson title in the content tree, go back to the right side of the screen and click Download.
  7. On the lower left of the screen, view the status bar for download completion.
  8. Click the Content tab. The package will appear in the Recently Added folder.

0 people did not find this helpful

Back To Top

Creating Content / Live Editor

Creating Content/ Overview of Live Editor

Create and present multimedia activities, lessons and tests in Live Editor. Use premade styles, tools and templates or create your own.

  1.  Click the Content tab.
  2.  Click New Activity and select Create and Add Live Editor File.
  3. Enter a name for your new activity and click Done.
  4. The new activity name will appear in the left column.
  5. Double-click the activity name to launch Live Editor and begin creating the slide set.

Editor Toolbar Overview

 Insert Question Slide – Creates new question slide
 Add Answer Slide – Adds new slide to current slide set
 Copy Slide – Copies selected slide
 Delete Slide – Deletes selected slide
 Start Presentation – Launches Presentation Setup window
Activity Properties – Select an item on a slide to view properties such as size, source,opacity, etc. 
 Change View – Change viewing mode (full screen, glass mode, integrated)
 Select – Selects objects on slide
 Text tool  Add text to a slide
 Pen Tool – Use for freehand drawing
 Line Tool – Draw straight lines, add arrows, etc
 Shape Tool – Draw and customize shapes
 MathML – Use to insert an equation
 Add Media – Insert photos and other multimedia objects
 Color – Select text, lines or shapes to change the color
 Delete – Deletes selected objects


Text Tool

  1. Click the Text tool drop-down arrow and choose a styled font.
  2. Click on the slide, to add a text box.
  3.  Double-click inside of the text box and add text.
  4. Highlight text and click Color to change the color of the text.
  5. Click off of the text box and use the handles to move and resize text box.


Pen Tool

  1. Click the Pen tool drop-down arrow and choose a pen style.
  2. (Optional) Select Customize . The Customize Pens window appears.
  3. Click Add. Scroll down and select the newly added pen style. Set thickness, color, and transparency.
  4. Click Delete to delete a pen style.
  5. Close window when finished.


Line Tool

  1. Click the Line tool drop-down arrow.
  2. (Optional) Select Customize. The Customize Line window appears.
  3. Click Add. Scroll down and select the newly added line style. Set thickness, color, and transparency.
  4. Click Delete to delete a line style.
  5. Click OK to save the line style(s).


Shapes Tool

  1. Click the Shapes tool drop-down arrow.
  2. (Optional) Select Customize. The Customize Shapes window appears.
  3. Click Add. Scroll down and select the newly added shape. Set thickness, color, and transparency.
  4. Click Delete to delete a shape.
  5. Close window when finished.


Font Toolbar
To view Font toolbar either click an active text box or the Text tool.


Answer Toolbar – see Creating Slides for details.


Question Types

  • None – non-question slide (non-remote)
  • Multiple Choice – multiple choice question slide (up to six choices).Use with Q2RF, Q4RF, Q5RF, Q6RF and QVR App.
  • Yes/No – yes/no question slide. Use with Q2RF, Q4RF, Q5RF, Q6RF and QVR App.
  • True/False – true/false question slide. Use with Q2RF, Q4RF, Q5RF, Q6RF and QVR App.
  • Numeric – numeric question slide. Single digit numeric answer allowed for Q2RF. Nine digit numeric answer allowed for Q4RF. Eight digit numeric answer allowed for Q5RF. Fourteen digit numeric answer allowed for Q6RF.
  • Sequence – place item choices in the specified order. Use with Q4RF, Q5RF, Q6RF and QVR App.
  • Multiple Mark – this question type enables two or more correct answers (up to six choices). Use with Q4RF, Q5RF, Q6RF and QVR App.
  • Rating Scale/Survey – rating/opinions/polling using scales from 1-5, 1-10, etc. Use with Q2RF(single digit), Q4RF, Q5RF, Q6RF and QVR App.
  • Short Text Response – (Q5RF & Q6RF remotes or QVR Response App) best used for single word responses were capitalization does not matter.
  • Text Response – (Q6RF remotes or QVR Response App). Best used for short phrase responses, feature allows for punctuation, spacing, and other advance grading options.
  • Text Edit – (Q6RF remotes or QVR Response App) participants are given a sentence, phrase, or item that they can correct on the Q6RF remote.
  • Equation – (Q6RF remotes or QVR Response App) create questions that allows participants to respond with numeric answers, including special characters.


Slides Tab
Displays thumbnails of all slides in the activity.

Media Tab
Allows you to search and use images in the Qwizdom database and/ or your computer.

Templates Tab
Displays slide templates.

Styles Tab
Displays slide styles.


0 people did not find this helpful

Back To Top

Creating Slides

Double-click the activity name to launch Live Editor and begin creating the slide sets.

Information Slide : Non-question slide (non-remote).

  1. Click the New Question button. A blank slide will appear on the right and a thumbnail preview of the slide will appear in the Slides tab on the left.
  2. Click the Question drop-down list and select None as the slide type.
  3. (Optional) Click on the Templates tab. Select a template; click and drag the template onto the slide. See Styles and Templates for more details.
  4. Enter text onto the slide.
  5. (Optional) Add multimedia such as images, movies, and sound. Click on the Media tab. Select the Search (Online) tab. Type in a keyword/s and click Search. Drag and drop multimedia items onto slide.
  6. (Optional) Add custom style to slide. Click the Styles tab, browse styles by category, and select a style. Drag and drop style onto slide. See Styles and Templates for more details.
  7. When the slide is complete, either go to the File menu, select Save, and close the window; or click the New Question button to create a new slide set.


Multiple Choice (All Remotes & QVR App)
Multiple choice question slide (up to six choices).

  1. Click the New Question button. A blank slide will appear on the right and a thumbnail preview of the slide will appear in the Slides tab on the left.
  2. Click the Question drop-down list and select Multiple Choice as the slide type.
  3. Select the correct answer in the Answer field.
  4. (Optional) Set the time limit.
  5. (Optional) Click on the Templates tab. Select a template; click and drag the template onto the slide. See Styles and Templates for more details.
  6. Enter text onto the slide.
  7. (Optional) Add multimedia such as images, movies, and sound. Click on the Media tab. Select the Search (Online) tab. Type in a keyword/s and click Search. Drag and drop multimedia items onto slide.
  8. (Optional) Add custom style to slide. Click the Styles tab, browse styles by category, and select a style. Drag and drop style onto slide. See Styles and Templates for more details.
  9. (Optional) Click the Advanced Options button. This will bring up the Answer Details window. Enter point value and send questions to Q6RF remotes. Click OK to save and close window.
  10. (Optional)Create an answer slide. Click the Add Answer Slide button. A new slide will appear within the slide set.
  11. When the slide/slide set is complete, either go to the File menu, select Save, and close the window; or click the New Question button to create a new slide set.


Yes/No & True/False Slides (All Remotes & QVR App)

  1. Click the New Question button. A blank slide will appear on the right and a thumbnail preview of the slide will appear in the Slides tab on the left.
  2. Select the type of slide you want to create.
  3. Select the correct answer in the Answer field.
  4. (Optional) Set the time limit.
  5. (Optional) Click on the Templates tab. Select a template; click and drag the template onto the slide. See Styles and Templates for more details.
  6. Enter text onto the slide.
  7. (Optional) Add multimedia such as images, movies, and sound. Click on the Media tab. Select the Search (Online) tab. Type in a keyword/s, and click Search. Drag and drop multimedia items onto slide.
  8. (Optional) Add custom style to slide. Click the Styles tab, browse styles by category, and select a style. Drag and drop style onto slide. See Styles and Templates for more details.
  9. Click the Advanced Options button to change point value and/or send question text to Q6 participant remotes.
  10. (Optional)Create an answer slide. Click the Add Answer Slide button. A new slide will appear within the slide set.
  11. When the slide/slide set is complete, either go to the File menu, select Save, and close the window; or click the New Question button to create a new slide set.


Numeric (All Remotes & QVR App)
Single digit numeric answer allowed for Q2RF; nine digit numeric answer allowed for Q4RF; eight digit numeric answer allowed for Q5RF; 14 digit numeric answer allowed for Q6RF. Over 14 digit numeric allowed for the QVR.

  • Click the New Question button. A blank slide will appear on the right and a thumbnail preview of the slide will appear in the Slides tab on the left.
  • Click the Question drop-down list and select Numeric as the slide type.
  • Enter the correct answer in the Answer field.
  • (Optional) Set partial grading options. Click theAdvance Options button. This brings up the Answer Details window. Enter the answer/s and point value/s. Click OK to save and close.

    Numeric – Select Numeric to add in standard numeric answer/s. (Optional) Enter in multiple answers and point values to give students partial credit. (Optional) Check the Convert fractions to numbers box to allow both fraction and decimal answers to be counted as correct. If this box is unchecked only the answer that is typed into the above field will be counted as correct.Numeric Range – Select Numeric Range to add an answer for rounding, number set, algebraic and other problems with a varying answer range. (Optional) Check the Require Precision to box and select a place value from the drop-down menu.5. (Optional) Set the time limit and/or points.
    6. (Optional) Click on the Templates tab. Select a template; click and drag the template onto the slide. See Styles and Templates for more details.
    7. Enter text onto the slide.
    8. (Optional) Add multimedia such as images, movies, and sound. Click on the Media tab. Select the Search (Online) tab. Type in a keyword/s, and click Search. Drag and drop multimedia items onto slide.
    9. (Optional) Add custom style to slide. Click the Styles tab, browse and select a style. Drag and drop style onto slide. See Styles and Templates for more details.
    10. (Optional)Create an answer slide. Click the Add Answer Slide button. A new slide will appear within the slide set.
    11. When the slide/slide set is complete, either go to the File menu, select Save, and close the window; or click the New Question button to create a new slide set.


Sequence (QVOTE, Q4RF, Q5RF, Q6RF & QVR App)
Place item choices in the specified order.

  1. Click the New Question button. A blank slide will appear on the right and a thumbnail preview of the slide will appear in the Slides tab on the left.
  2. Click the Question drop-down list and select Sequence as the slide type.
  3. Enter the correct answer in the Answer field.
  4. (Optional) Click on the Templates tab. Select a template; click and drag the template onto the slide. See Styles and Templates for more details.
  5. Enter text onto the slide.
  6. (Optional) Add multimedia such as images, movies, and sound. Click on the Media tab. Select the Search (Online) tab. Type in a keyword/s, and click Search. Drag and drop multimedia items onto slide.
  7. (Optional) Add custom style to slide. Click the Styles tab, browse and select a style. Drag and drop style onto slide. See Styles and Templates for more details.
  8. (Optional) Click the Advance Options button to set partial grading options and/or send text to Q6 participant remotes.
  9. (Optional) Create an answer slide. Click the Add Answer Slide button. A new slide will appear within the slide set.
  10. When the slide/slide set is complete, either go to the File menu, select Save, and close the window; or click the New Question button to create a new slide set.


Multiple Mark (QVOTE, Q4RF, Q5RF, Q6RF & QVR App)

This question type enables two or more correct answers (up to six choices).

  1. Click the New Question button. A blank slide will appear on the right and a thumbnail preview of the slide will appear in the Slides tab on the left.
  2. Click the Question drop-down list and select Multiple Mark as the slide type.
  3.  Enter the correct answer(s) in the Answer field.
  4. (Optional) Click on the Templates tab. Select a template; drag and drop the template onto the slide. See Styles and Templates for more details.
  5. Enter text onto the slide.
  6. (Optional) Add multimedia such as images, movies, and sound. Click on the Media tab, type in a keyword/s, and click Search. Drag and drop multimedia items onto slide.
  7. (Optional) Add custom style to slide. Click the Styles tab, browse and select a style. Drag and drop style onto slide. See Styles and Templates for more details.
  8. (Optional) Click the Advance Options button to set partial grading options and send text to Q6 participant remotes.
  9. (Optional) Create an answer slide. Click the Add Answer Slide button. A new slide will appear within the slide set.
  10. When the slide/slide set is complete, either go to the File menu, select Save, and close the window; or click the New Question button to create a new slide set.


Rating Scale / Survey (All Remotes & QVR App)
Rating scale question slide (i.e. rating/opinions/polling using scales from 1-5, 1-10, etc.). Q2RF remotes support (1-5 ) and (1-7). QVOTE, Q4RF, Q5RF, Q6RF & QVR App support all rating scale options.

  1. Click the New Question button. A blank slide will appear on the right and a thumbnail preview of the slide will appear in the Slides tab on the left.
  2. Click the Question drop-down list and select Rating Scale as the slide type.
  3. (Optional) Click on the Templates tab. Select a template; click and drag the template onto the slide. See Styles and Templates for more details.
  4. Enter text onto the slide.
  5. (Optional) Add multimedia such as images, movies, and sound. Click on the Media tab. Select the Search (Online) tab. Type in a keyword/s, and click Search. Drag and drop multimedia items onto slide.
  6. (Optional) Add custom style to slide. Click the Styles tab, browse and select a style. Drag and drop style onto slide. See Styles and Templates for more details.
  7. Click the  Advanced Options button to send text to Q6 participant remotes.
  8. (Optional) Create an answer slide. Click the Add Answer Slide button. A new slide will appear within the slide set.
  9. When the slide is complete, either go to the File menu, select Save, and close the window; or click the New Question button to create a new slide set.


Short Text Response (Q5RF, Q6RF & QVR App)
Answer can be up to 32 characters long on the Q5RF remote. Best used for single word responses were capitalization does not matter.

  1. Click the New Question button. A blank slide will appear on the right and a thumbnail preview of the slide will appear in the Slides tab on the left.
  2. Click the Question drop-down list and select Short Text Response as the slide type.
  3. Click the Answer field and type in answer.
  4. (Optional) Set time limit and number of points.
  5. (Optional) Click on the Templates tab. Select a template; click and drag the template onto the slide. See Styles and Templates for more details.
  6. Enter text onto the slide.
  7. (Optional) Add multimedia such as images, movies, and sound. Click on the Media tab. Select the Search (Online) tab. Type in a keyword/s, and click Search. Drag and drop multimedia items onto slide.
  8. (Optional) Add custom style to slide. Click the Styles tab, browse and select a style. Drag and drop style onto slide. See Styles and Templates for more details.
  9. Click the Advanced Options button to send text to Q6 participant remotes.
  10. (Optional)Create an answer slide. Click the Add Answer Slide button. A new slide will appear within the slide set.
  11. When the slide is complete, either go to the File menu, select Save, and close the window; or click the New Question button to create a new slide set.


Text Response (Q6RF & QVR App)
Answers can be approximately 144 characters , including punctuation and spacing.

  • Click the New Question button. A blank slide appears on the right and the thumbnail preview of the slide appears in the Slides tab on the left.
    2. Click the Type drop-down list and select Text Response as the slide type.
    3. (Optional) Click on the Templates tab. Select a template; click and drag the template onto the slide. See Styles and Templates for more details.
    5. Enter text onto the slide.
    6. (Optional) Add multimedia such as images, movies, and sound. Click on the Media tab. Select the Search (Online) tab. Type in a keyword/s, and click Search. Drag and drop multimedia items onto slide.
    7. (Optional) Add custom style to slide. Click the Styles tab, browse and select a style. Drag and drop style onto slide. See Styles and Templates for more details.
    8. (Optional) Set the time limit.
    9. Click the button. This brings up the Answer Details window.

    – (Optional) Send questions to Q6RF. Check the Send Question Text to Remotes box.
    – Fill in answer/s in the Answer field. Enter the number of points. Multiple answers and point values can be added for partial grading (whole numbers only).
    – (Optional) Set grading options. Participant’s answers will be marked right or wrong based on these options.
    – Click OK when finished.
    10. (Optional) Create an answer slide. Click the Add Answer Slide button. A new slide will appear within the slide set.
    11. When the slide is complete, either go to the File menu, select Save, and close the window; or click the New Question button to create a new slide set.


Text Edit (Q6RF & QVR App)

  1. Click the  New Question button. A blank slide appears on the right and the thumbnail preview of the slide appears in the Slides tab on the left.
  2. Click the Type drop-down list and select Text Edit as the slide type.
  3. (Optional) Click on the Templates tab. Select a template; click and drag the template onto the slide. See Styles and Templates for more details.
  4. Enter text onto the slide.
  5. (Optional) Add multimedia such as images, movies, and sound. Click on the Media tab. Select the Search (Online) tab. Type in a keyword/s, and click Search. Drag and drop multimedia items onto slide.
  6. (Optional) Add custom style to slide. Click the Styles tab, browse and select a style. Drag and drop style onto slide. See Styles and Templates for more details.
  7. (Optional) Set the time limit.
  8. Click the button. This brings up the Answer Details window.

    – (Optional) Send questions to Q6RF. Check the Send Question Text to Remotes box.
    – Enter the correct answer in the Correct Answer Text field.
    – Enter the text to be edited by participant in the Text Displayed on Device field.
    – Click OK when finished.
  9. (Optional) Create an answer slide. Click the Add Answer Slide button. A new slide will appear within the slide set.
  10. When the slide is complete, either go to the File menu, select Save, and close the window; or click the New Question button to create a new slide set.


Equation (Q6RF & QVR App)
Create questions that allow participants to respond with numeric answers, including special characters.

  1. Click the New Question button. A blank slide appears on the right and the thumbnail preview of the slide appears in the Slides tab on the left.
  2. Click the Type drop-down list and select Equation as the slide type.
  3. (Optional) Click on the Templates tab. Select a template; click and drag the template onto the slide. See Styles and Templates for more details.
  4. Enter text onto the slide.
  5. (Optional) Add multimedia such as images, movies, and sound. Click on the Media tab. Select the Search (Online) tab. Type in a keyword/s, and click Search. Drag and drop multimedia items onto slide.
  6. (Optional) Add custom style to slide. Click the Styles tab, browse and select a style. Drag and drop style onto slide. See Styles and Templates for more details.
  7. (Optional) Set the time limit.
  8. Click the button. This brings up the Answer Details window.

    – (Optional) Send questions to Q6RF. Check the Send Question Text to Remotes box.
    – (Optional) Fill in answer/s in the Answer field. Enter the number of points. Multiple answers and point values can be added for partial grading (whole numbers only).
    – (Optional) Add an equation to be edited by participant in the Text Display on Device field.
    – (Optional) Set grading options. Participant’s answers will be marked right or wrong based on these options.
    – Click OK when finished.
  9. (Optional) Create an answer slide. Click the Add Answer Slide button. A new slide will appear within the slide set.
  10.  When the slide is complete, either go to the File menu, select Save, and close the window; or click the New Question button to create a new slide set.

0 people did not find this helpful

Back To Top

Adding Equations

1. Click the  Equation button. The Equation from Live Editor window opens.
2. Create an equation in the window.
3. Close window when finished.
4. The equation will appear on the slide as an object.
5. You can resize the equation by stretching the handles (click and drag).

0 people did not find this helpful

Back To Top

Styles and Templates

Live Editor makes creating, editing and applying styles and templates easy.

Applying Styles

  1. Create a slide with or without text.
  2. Click the Styles tab. You can either select a style to use by browsing all the available styles or select a Category from the drop-down menu to select from a particular set of styles.
  3. Click and drag the style to the slide (on the right) to apply.
  4. You are able to change the font style, size, and color (if applicable) after applying the style.

Creating Styles

  1.  Click the Styles tab.
  2. Click the Edit Styles button.
  3. This will bring up the Styles window.
  4. Click New. An untitled style row will appear.
  5. Double-click on the untitled style to rename it and press the Return key to save it.
  6. Create a unique name for each style to make it easier and more accurate for importing, exporting, and applying styles.
  7. Click each tab to customize text, shapes & media, and backgrounds of your newly created style.
  8. Create as many styles as you like. Click Done when finished.
  9. To view the newly added style(s), select the All category. Styles appear in alphabetic order.

    Text tab:
    Select font type, color, accent color (highlight), and style (bold, italic, and/or underline)

    Shapes & Media tab:
    Line thickness – determines the size of stroke applied to drawn shapes. To select thickness, click Line Thickness and select the thickness of the line.
    Fill Color – applies selected color to all shapes drawn on an activity. To select color, check the Fill Color box (if Fill Color box is unselected, the default color will be applied to any drawn shapes), and double-click the Color box.
    Border Color – applies selected color to outline/stroke of any drawn shape. To select color, check the Border Color box (if fill Border Color box is unselected, the default color will be applied to any drawn shapes).

    Background tab:
    Background Image – Browse for the image. Click Open, and a preview will appear in the Sample window. Select the appropriate scaling option, stretch, tile or center.
    Background Color – click inside the Background Color box to change background color .
    Filter – applies a tint to your background image. Select the Content and Background Filter Opacity.
    Layout – changes the color behind your content. Select the layout and how it should be scaled on the slide.
    Please Note: The Content Filter Opacity will overwrite your Filter Color unless you scale the size of content (see below for Content Scaling).

Edit Styles

  1. Click the Styles tab.
  2. Click the Edit Styles button.
  3. The Styles window appears.
  4. Select the style you want to edit and edit the style settings.
  5. Click Done when finished editing.
  6. Reapply the style to view the updated style.

Delete Styles

  1. Click the Styles tab.
  2. Click the Edit Styles button.
  3. The Styles window appears.
  4. Select the style you want to delete.
  5. Click Delete. A prompt will appear asking if you want to delete.
  6. Click Yes.
  7. Click Done to exit the Styles Window.

Import Styles

  1. Click the Styles tab.
  2. Click Edit Styles. The Styles window appears.
  3. Click Import. The Import Styles window appears.
  4. Select the .QSP (styles) file you want to import.
  5. Click Open. The style will import into the Styles window. If there is a style of the same name that already exists in the Styles window, it will ask you to Overwrite or Ignore.

Export Styles
Exporting styles exports all styles as a .QSP file.

  1. Click the Styles tab.
  2. Click Edit Styles. The Styles window opens.
  3. Click Export. The Export All Styles window opens.
  4. Select the location where you want to save the styles.
  5. Enter the name with which you want the styles to be saved.
  6. Click Save. The styles are saved in the selected location.

Applying Templates

  1. Click the Templates tab.
  2. Click and drag the template onto the slide.
  3. Templates must be applied before adding text and multimedia to a slide.

Creating Templates

  1. Create a slide with text and/or images and multimedia.
  2. Click the Templates tab.
  3. Click Create Template.
  4. The template will be created and added to the Templates tab.
    Please Note: Check the Filter for selected question type box to sort and display the templates for a specified question type.
    By default, there are no predetermined template categories. You must create categories, see Creating Categories for Templates below for more information.

Creating Categories for Templates
Setting up categories allows you to filter your templates by question type, answer slides, or preferences.

  1. Click the Templates tab.
  2. Click the Browse button that is located next to the Category drop-down. The Categories Editor window appears.
  3. Click Add and it will add an untitled category.
  4. Double-click on the untitled category to enter a category name.
  5. Click Close to exit.
  6. Using the Category drop-down menu, select a category.
  7. Click on a template, this will bring up the Template Inspector window. Check all templates that apply to the category.
  8. Close window when finished.

0 people did not find this helpful

Back To Top

Adding Multimedia

Insert an Image

  1. Click the Add Media button in the toolbar. The Open window appears.
  2. Select the image and click Open.
  3. The image will appear on the slide.
  4. Grab and drag the handles of the image to resize to desired size.

Online Media Search

  1. Click the Media tab.
  2. Click Search (online).
  3. Enter the keyword(s) in the Keywords field to search for an image.
  4. Click Search.
  5. Images matching the keyword(s) you entered will appear in the Media tab.
  6.  Select an image by dragging and dropping it onto the slide (on the right).
  7. Grab and drag the handles of the image to resize to desired size.

Insert a Movie

  1. Click the Add Media button in the toolbar. The Open window appears.
  2. Select the movie and click Open.
  3. The movie will appear on the slide.
  4. Double-click the movie to play or stop it; or set the media properties.

Adding Sound

  1. Click the Add Media button in the toolbar. The Open window appears.
  2. Select the sound file and click Open.
  3. The sound file will appear on the slide.
  4. Double-click the sound file to play or stop it; or set the media properties.

Media Properties
Control-click on a video to bring up the Media Properties window.

Play Continuously – repeats movie or sound file continuously when the slide is displayed.
Play Automatically – plays the movie or sound file upon slide display.
Delay —- seconds before playing – enter number of seconds to pause before the movie or sound file plays.

Media Control (During Presentations)
Media Control is used for presentation when an Instructor Remote or Q7RF tablet will not be used.

  1. Go to the Tools menu and select Full Screen Settings / Movie Controls. The Movie Controls window appears.

    Play – black triangle
    Stop – silver square

0 people did not find this helpful

Back To Top

Creating Classes

Creating Classes

Creating a Participant List

  1. Click the Participants tab.
  2. Click the Participant Wizard button. The Participant wizard will appear.
  3.  Select Create a new participant list.
  4. Enter a name for the class and click Next.
  5. Select a Template and then click Next. Templates are commonly used fields that allow you to customize a participant list.
  6. Select the different fields you would like to use and click Next. If you do not see a field you would like in the participant list, you can create a customized field and add it to your template.
  7. Click Next. The participant list template will appear.
  8. Fill in the fields and click Finish. The participant list will save into the Participants tab.

Importing a .CSV (Comma Delimited) File
You can import .CSV class and convert it into Qwizdom participant lists (.QPL).
Please Notes: If you have a class list in Microsoft Excel® you would like to import, save it as a .CSV (comma delimited) file.

  1. Click the Participants tab.
  2. Click the Participant Wizard button. The Participant wizard will appear.
  3. Select Import CSV file.
  4. Click Next.
  5. Click Browse. The Open window will appear.
  6. Select the .CSV file and click Open.
  7. Match the fields on the left to the fields on the right.
  8. If the information on the left are headers, check the First Record is Header box, otherwise leave it unchecked.
  9. Click Next when all the fields have been matched. The participant list will appear.
  10. Click Finish. The participant list will save into the Participants tab.

Creating an Anonymous List
Before using an anonymous list, be sure you have the correct estimated number of remotes set within the Remote Preferences window. For example, if you create an anonymous list with a hundred participants but only have eighty as the estimated number of remotes, then not all remotes will register.

  1. Select an activity to present.
  2. Click the Present button. The Presentation Setup window will appear.
  3. Click the Participant List drop-down list and select Anonymous.
  4. Click OK to begin presentation.

Creating a Self-Forming List
This option lets participants add themselves to list during a live presentation. Participants are identified by an unique User ID number. We recommend using an assigned employee or student ID number for easier tracking.

  1. In the Content tab, select an activity.
  2. Click the Present button. The Presentation Setup window will appear.
  3. Click the Participant List drop-down list and select Self-Forming List.
  4. Select a location to save results and select desired presentation settings.
  5. Click OK to begin presentation.
  6. Users will be prompted to enter a User ID. Participants will be identified by their User ID numbers throughout the session.
  7. You can view students’ answers, post-session. Click on the Results tab, select the results file. The Overall Score Report will appear. Scores can be tracked by User/ Participant IDs.

Editing an Existing Participant List

  1. Click the Participants tab.
  2. Select a participant list.
  3. Click the Participant Wizard button. The participant wizard will appear.
  4. The Browse for and modify an existing list is selected by default. Click Next.
  5. You will be taken to Participant Field Selection. You may add new fields or remove existing fields.
  6.  Click Next. The participant list will appear.
  7. Make the necessary changes.
    Delete Students: Select a student and then select Remove from the drop-down menu.
    Renumber Remotes: Select Renumber Remote IDs from the drop-down menu.
  8. Click Finish when done. A prompt will appear asking if you want to overwrite or rename the participant list.
  9. Select Overwrite if you want to save the changes to the original participant list, or select Rename to create a new participant list.
  10. Once finished, the changes to the participant list will appear in the Participants tab.

0 people did not find this helpful

Back To Top

Creating Groups

Automatically organize students into groups based on Ability, Odd and Even Numbers, Activity Score, or Performance. Groups can be used when playing Quandary. See Games for details.

Creating Groups

  1. Click the Participants tab.
  2. Select the class for which you want to create groups.
  3. Click the Groups button. The Group Management window will open.
  4. Select the Grouping Action:
    Balance: Creates balanced ability groups from either the Predefined Ability Ratings (set in the participant list*) or scores from a selected activity.
    Group Similar: Groups students with similar Ability Ratings (set in the participant list*) or scores from a selected activity.
    Random: Groups students randomly, no ability rating settings are needed.
  5. Add the number of students per group.
  6. Click Generate to create the groups.
  7. (Optional) To manually alter groups, click a student and then drag and drop the selected student
    into the desired group
  8. Click OK when finished.

    * Create a custom field named ‘Ability’ in the participant list. See for Creating Classes details.

0 people did not find this helpful

Back To Top

Presenting

Presenting

Presenting an Activity (with Remotes)

  1. Click on the Content tab.
  2. Select an activity to present.
  3. Click the Present button. The Presentation Setup window appears. (See Presentation Setup for details.)
  4. Select a Participant List.
  5. Select how you would like to save the results. (Recommend) Save to Results Manager.
  6. Select the options you would like available during presentation.
  7. Click Present to begin the presentation.
  8. Have the participants turn on their remotes.
  9. Select the options you would like available during presentation.
  10. Here are a few things you can do during presentation:
    Show Results: Display the public response graph or private graph. (See Response Graph for details. )
    Pick: Randomly call upon a participant. (Click the  Pick button on the Q7RF Tablet, the (.) Pick button on the Q5RF Instructor remote or the (1) button on the Q6i.
  11. Go through the presentation until all the question slides are answered. See Using Remotes in Presentation for descriptions and troubleshooting of all the remote messages.
  12. When all the slides have been presented, a prompt will appear asking if you would like to finish the presentation or continue (review). Click Finish Presentation to exit the presentation.

0 people did not find this helpful

Back To Top

Presentation Setup

There are many options you can apply to your presentation. Not all options will be applicable.

Presentation Settings tab:

  1. Select a Participant List, see Creating Classes for details.
  2. Select where you would like to save results file.
    Manual Save: Name the results file and select a location to save the .qrx results file.
    Auto Save: The file name will contain the document title, participant list, date, and time. Select a location to save the results file.
    Auto Save to Results Manager: The results will save in the Results tab, in the class name folder, when the presentation is complete.
  3. Select how you would like to present the activity.
    Normal Presentation: Present activity with interactive questions
    Presentation on Autopilot: Automatically cycles through presentation, adding a 15-20 second timer to each slide.
    Self-Paced: Participants work through an Answer Key activity at their own pace. See Answer Key for details.

  4.  Set additional options.
    Allow participants to change their answer – checking this option allows participants to change their answer for the current question slide.
    Send right/wrong feedback to remotes after answering – remotes will receive a check mark if answer is correct and an X if answer is incorrect. Remotes will receive both a check mark and X to indicate that the response has been received if feedback is turned off.
    Override question point value with global point value of —- points – enter the new amount of points that will be temporarily applied to the slide for that presentation.
    Timer – you can select no timer, use the time set within the slides, or global timer by entering the number of seconds for all slides in the presentation.

Login tab:

  1. Use the default Host Session ID or type in a custom Session ID in the User Session field. Custom Session ID numbers are a quick fix if you receive a replacement host and don’t want to reprogram your participant remotes.
  2. Check the Require Login by ID box if you would like students to login using their Participant ID. Perfect for classrooms were students don’t have assigned remotes. See Remote Login for details.
  3. Check Show Login Screen to monitor participants logging in.
  4. Check the Add & Allow Unregistered participants box to allow participants that are not on selected participants list to join the session. This option must be checked when using an Anonymous list.
  5. The Deny Login After … feature restricts participants from logging in after a set amount of time.
  6. Advance Settings
    Turn off remotes on presentation end – automatically turns off the remotes when a presentation ends.
    Show score on remote in self-paced mode – enables final score to display on screen after completing an answer key.

Q-VR tab:


In order to present using the Qwizdom QVR, you are required to purchase a QVR license and register for a Qwizdom Online account.

  1. Click on Enable Web-Based Q-VR Support.
  2. You will be prompted to Login with your Qwizdom account credentials. (If you have not registered, click on the ‘New User’ link at the bottom of the window.)

0 people did not find this helpful

Back To Top

Presentation Features

Qwizdom Toolbar
There are many ways to customize your Qwizdom presentations. Click the Q menu and select Settings.

Response Indicator


The response indicator displays the number participants who have answered over the total number logged into the session.

Timer
Timer displays the remaining time in which participants can submit responses. Add additional time by clicking on the + Add icon.

To add a timer during presentation:

  1. Click the  Q menu and select Settings.
  2. Check the Show Timer box and select Use Timer From Slides. Time limit is set when creating slides.
  3. Timer will be applied to the following slide.
  4. Remotes will not be able to answer when time is up.

Answer Grid
The Answer Grid indicates participant response by corresponding remote ID numbers.

To Show/Hide the Answer Grid.

  1. Click the Q menu and select View/ Answer Grid.
  2. Right-click Answer Grid to change placement.

Qwizdom Tools
Use Re-Pose, Response Graph, Pick icons when presenting activities using a desktop or laptop.

Reposing a Question
Reposing is used to ask a question again and/or when you accidentally skip a slide that needs to be answered. Reposing the question overwrites the previous responses if any were recorded.

  1. Click the Repose button to pose the question slide again.
  2. Click the Repose button again to stop.

Response Graph
1. Click the Response Graph button.
2. The Response Graph appears.
3. Click the Response Graph again to remove the graph.

Picking Participants
1. Click the Pick button to randomly call upon a participant.
2. The participant’s name or participant ID appears on screen.
3. Click the Pick button again to remove the name.


Display Session ID During a Presentation

  1. Click the Q menu and select Settings.
  2. Click on the Login tab.

Right/Wrong Feedback
This feature allows participants to see if their response is right or wrong. Feedback appears on the LCD screen of the participant’s remote during presentation. A check mark will indicate a correct response, an X will indicate an incorrect response. If the feedback is disabled, a check mark and X appears on the LCD screen indicating that a response was received.

You can turn this feature on and off during a presentation by

  1. Click the Q menu and select Settings.
  2. Click on the General tab.
  3. Check the Send Right/Wrong Feedback box.


Presentation Toolbar

Use the presentation toolbar if you would like to annotate a live presentation using a desktop computer or Q7 Presenter Tablet.

This is the defaulted toolbar view during presentation:

Click to expand the toolbar to display annotation tools.


Toolbar Overview:

0 people did not find this helpful

Back To Top

Remote Login

Logging in with IDs allows participants to use any remote. The participant is identified by a unique ID number that is set in participant lists. (Go to Creating Classes for more information).

  • Participant IDs can only be numeric.
  • IDs cannot be used for more than one participant (IDs cannot be duplicated).
  • Maximum number of digits allowed for IDs is: · 8 for Q2RF remotes.
    – 9 for Q4RF remotes.
    – 8 for Q5RF remotes.
    – 14 for Q6RF remotes.
    – 15 for QVOTE remotes.
  1. Select an activity or create one to present.
  2. Click the Present button. The Presentation Setup window will appear.
  3. Select a participant list.
  4. Click the Login tab.
  5. Check the Require Login by ID option.
  6. Checking the Show Login Screen, if desired.
  7. Check the Add and Allow Unregistered Users to allow participants not on the list to join the session.
  8. Select all other preferred options and click OK to present. The presentation will begin.
  9. The Q2RF remotes will display –U. All others will prompt for UserID.
  10. Participants will enter their ID and press the Send key.
    Please note: If Add and Allow Unregistered Users is checked, participants not on the class list, may be prompted to enter their User ID twice to confirm.
  11. Once everyone has logged in, begin the presentation.
  12. You can start the presentation as participants log in. Participants who are late can log in later, if you have not set a timer to deny log in.

0 people did not find this helpful

Back To Top

Using Remotes in a Presentation

Q6i RF Instructor Remote Tips

  • The Q6iRF Instructor Remote will display a list of actions when ready.
  • Press the (3) key to display the public response graph. Press again to close.
  • Press the (2) key to display the graph on the instructor’s LCD. Press again to close.
  • Press the (1) key to randomly call upon a participant during presentation. Press again to close.
  • Press the (6) key to pose a spontaneous question. A list of question types will appear on the LCD. Use the up/down arrows to navigate through the question types. Press the  Select key to choose the question type. Enter the correct answer and press Send; if the answer is survey only, press the Send key without selecting an answer.
  • Press the (5) key to display the list of participants who have requested help. Press Back to exit.
  • Press the (8) key to Play or Pause videos.*
  • Press the  Select key to show Answer Slide during a presentation.*
  • Press the right arrow key to display game animations.*

* Features only work in Qwizdom Connect Software.


Q5RF Instructor Remote Tips

  • The Q5RF Instructor Remote will display Ready or Last Key.
  • Since the Q5RF Instructor Remote is not applicable during answer keys, the LCD screen will display Access Denied.
  • Press the / key on the Q5RF Instructor Remote to display the response graph.
  • Press the / key on the Q5RF Instructor Remote to close the response graph.
  • Press the 0 key on the Q5RF Instructor Remote to display the graph on the instructor’s LCD
  • Press the Pick (.) key on the Q5RF Instructor Remote to randomly call upon a participant during presentation.
  • Press the 1 (A) key on the Q5RF Instructor Remote to go to the next question in Fast Track/Mars Mission games.
  • Press the Show (7) key on the Q5RF Instructor Remote to show game animations. In Fast Track and Mission to Mars, press the (1) key to move to the next question and press the (3) key to display track.
  • Press the New Q (-) key to pose a spontaneous question. A list of question types appear on the LCD. Use the up/down arrows on the thumb pad to navigate through the question types. Press the Send key to select the question type. Select the correct answer and press Send; if the answer is survey only, press the Send key without selecting an answer.
  • Press the (?) key to display the list of participants who have requested help.
  • Press the circle key, in the thumb pad, to close out of the presentation (must be on last slide), play the PowerPoint® animation and schemes (if any were applied), move to the next slide, or display/hide the correct answer on response graph.


Q7 Presenter Tips

  • The Q7RF Presenter Tablet will display Ready when it has successfully connected to the host.
  • Press to display the public response graph. Press again to close.
  • Press to display the graph on the instructor’s LCD. Press again to close.
  • Press  to randomly call upon a participant during presentation. Press again to close.
  • Press to pose a spontaneous question. A list of question types will appear on the LCD. Use the toggle to navigate through the question types. Press the Send key to select the question type. Select the correct answer and press Send; if the answer is survey only, press the Send key without selecting an answer.
  • Press  to display the list of participants who have requested help.
  • Press  Show to display game animations.


Participant Remote Tips

  • Remote displays will vary when they are Ready to Start an activity/presentation.
    Qwizdom will be displayed on the Q4RF and Q5RF remotes when a lesson (nonquestion) slide is in view. Ready will be displayed on the QVOTE and Q6RF when remotes have found the host and are ready for a question slide.
  • Remote displays will vary during an activity/presentation.
    For Q2RF remotes, participants will see a blank screen with a battery icon. For QVOTE, Q4RF and Q5RF remotes, participants will either see answer choices or a blank screen (depending on question type) on their remote during a question slide. For Q6RF remotes, question text and/or answer choices will appear on the LCD screen (display varies depending on question type). See Creating Slides for information on setting up the different question types.
  • Request Help.
    For Q2RF remotes, press the Help (Hand) key. To request help on all other remotes, press the Menu key to select Help and press Send.
  • Change Session ID.
    To change the Session ID on the Q2RF remote, when the remote is on, wait for the remote to time out and turn off. When you turn it back on, press the Help key. When you see –S on the display, enter the Session ID and press the Send key to confirm.To change the Session ID on the Q4RF remote, press the Menu key and use the right arrow to scroll through the menu options. When you see Sess. ID, press the Send key to select it. An existing Session ID may appear and the remote will ask if you want to change it. Press T for yes and enter the new Session ID. Press the Send key to confirm.To change the Session ID on the Q5RF remote, press the Menu key when the remote displays No Host Found. Use the thumb pad to navigate through the menu options and press the Send key to select Enter Session ID.To change the Session ID on the QVOTE and Q6RF remote, press the Menu key, scroll to Enter Session ID, press the menu  select key, re-enter the Session ID, and press Join to submit.

Troubleshooting Tips

  • The Q4 LCD screen on the participant remotes may read Push Key, Inactive, Not Active, press the Send (double arrows) key to “wake up” the remote. If the remote still displays Not Active, re-enter the Session ID. Go to Changing Session IDs for more information.
  • If the Q4RF displays No Net, or the Q5RF remote displays Host not found, Session ID Not Found, or the Q2RF remote displays – – – and turns off, re-enter the Session ID. Go to Changing Session IDs for more information.
  • If the Q4RF remote displays Denied, or the Q5RF remote displays Access Denied, or the QVOTE or Q6RF displays Session ID Login Denied, or the Q2RF remote displays –U, the Participant ID is incorrect, or the Remote ID attempting to participate isn’t in the participant list that was loaded. re-enter the Participant ID, and check to make sure that Remote ID is in the participant list.
  • The QVOTE and Q6 LCD screen on the participant remotes may display Power Save Mode. This indicates that the remote is idle. Click RESUME, to reactivate.


Below are the procedures on how to respond for each question type during presentation for Q2RF remotes:

  • True/False – press T or F key.
  • Yes/No – press Yes or No key.
  • Multiple Choice – press A, B, C, D, E, or F key.
  • Single Digit Numeric – enter a single number key.
  • Rating Scale (1-5) or (1-7) – enter a single number.

Below are the procedures on how to respond for each question type during presentation for Q4RF and Q5RF remotes:

  • True/False – press T or F key and then press the Send key.
  • Yes/No – press Y or N key and than press the Send key.
  • Multiple Choice – press A, B, C, D, E, or F and then press the Send key.
  • Multiple Mark – select multiple letter choices and than press the Send key.
  • Numeric – enter the numbers and than press the Send key. · Sequence-enter the numbers in the correct order and press the Send key.
  • Short Text Response – for Q5 remotes only. The alphabet menu will automatically appear when this question type is displayed. Use the arrows on the thumb pad to navigate through the letters, using the Circle key to select the letter(s). Press the Send key to confirm your answer.

Below are the procedures on how to respond for each question type during presentation for QVOTE and Q6RF remotes:

  • True/False – use down arrow to scroll to T or F and then press the Send key.
  • Yes/No – use down arrow to scroll to Y or N and then press the Send key.
  • Multiple Choice – use down arrow to scroll to A, B, C, D, E, or F and then press the Send key.
  • Multiple Mark – use down arrow to scroll to answer choice, click the Menu Select key to select multiple answer choices, and then press the Send key.
  • Numeric – enter the numeric answer and then press the Send key.
  • Sequence – enter the numbers in the correct order and then press the Send key.

Q6RF Only:

  • Short Text Response – enter in the appropriate answer and then press the Send key
  • Text Response – enter in the sentence/s answer and then press the Send key.
  • Text Edit – use directional arrows to scroll to the text that needs editing, press Delete to remove incorrect character/s, enter correction, and press the Send key when finished.
  • Equation – enter the numeric answer (add special characters by pressing the Sym button) and then press the Send key.

0 people did not find this helpful

Back To Top

Presenting with the QVR

You will need to purchase a QVR Presenter license to use this feature. Email info@qwizdom.com for pricing details.

To begin a QVR presentation follow the steps below:

  1. Select an activity, then click Present to begin setting up a presentation.
  2. In the Presentation Setup window, select the presentation options (i.e. Participant List, Save Results and Present As). See Presentation Setup for details.
  3. Click on Q-VR tab. Check Enable Web-Based Q-VR Support. Click Present to begin.
  4. Login with your credentials. (If you have not registered, click on the ‘New User’ button at the bottom of the window.)
  5. The Session ID will appear on the Qwizdom Toolbar. Click on the link to make the QVR Session ID number large. It’s helpful to create an instructional slide to help users login in.
  6. Instruct participants to login to the QVR session at qvr.qwizdom.com using a browser of their choice. Additionally, participants can download an app from the Google Play or Apple App store.
  7. In the QVR window, instruct participants to login with the 6 digit QVR Session ID number and then press Launch.
  8. Participants maybe asked to enter a User ID, if you selected a class list in the Presentation Setup window.
  9. Participants will see the presentation via their personal web-enabled device. If the show right/wrong feedback feature is turned on in the Presentation Settings window a green check mark will appear if the participant answered correctly. If an answer is incorrect, a red X will appear.
  10. The instructor can display a chart showing the results of all other users currently in the presentation.
  11. At the end of the presentation, this window will appear:

0 people did not find this helpful

Back To Top

Response Graph

Response Graph During presentation, you can display a response graph to see the results of the question. There are two response graphs you can display: the public response graph and the private graph.

Public Response Graph using the Q6iRF

  1. Press the (3) key on the Q6iRF instructor remote.
  2. The response graph will appear on the computer screen.
  3. Press again to close the response graph.


Private Response Graph using the Q6iRF

  1. Press the (2) key on the Q6iRF instructor remote.
  2. The response graph will appear on the computer screen.
  3. Click Details to view Response Times and participant that have not responded.
  4. Press again to close the response graph.


Public Response Graph using the Q7RF Tablet

  1. Press the Public Graph icon on the Q7RF tablet.
  2. The response graph will appear on the computer screen.
  3. Toogle through menu options to view response times and a list of participants that have not responded.
  4. Press the Public Graph icon on the Q7RF tablet again to close the response graph.

Please Note: The public and/or private graph must be closed (follow step 3 above) before moving to the next slide.

Private Response Graph using the Q7RF Tablet

  1.  Press the Private Graph icon on the Q7RF tablet.
    2. The response graph will display on the Q7RF tablet’s LCD.
    3. Press the Private Graph icon on the Q7RF tablet again to close the response graph.


Public Response Graph using the Q5RF Instructor Remote

  1. Press the (/) key on the Q5RF Instructor Remote.
  2. The response graph will appear on screen for the participants to view.
  3. Press the (/) key again to remove the response graph.

Please Note: The public and/or private graph must be closed (follow step 3 above) before moving to the next slide.


Private Response Graph using the Q5RF Instructor Remote

  1. Press the (0) key on the Q5RF Instructor Remote.
  2. A bar chart showing the number of responses will display on the Q5RF Instructor Remote’s LCD screen.
  3. Press the (0) key again to remove the graph.

0 people did not find this helpful

Back To Top

Games

January 2021:

Our legacy Presentation Games (Fast Track, Mission to Mars, etc) are no longer supported due to Adobe discontinuing Flash Player. New games are under development and we hope to release them this coming summer. Meanwhile, presentation game options have been removed in current software versions. (Older versions still show those options but will not work.)

0 people did not find this helpful

Back To Top

Reports

Reports

Generate Reports

You can generate reports using existing saved results.

  1. Click the Results/Reports tab.
  2. Click on an Activity. The Overall Score Report will be displayed.
  3. Click the  Report Wizard to view additional reports. View data in the Overview, Participants, Questions and Reports tabs.
  4. In the reports tab, click the Choose Report to Run drop-down and select the type of report you want to generate.

    · Attendance Report – displays participants’ names, IDs and login times.
    · Participant Group List Report – displays participant group information .
    · Participant List Report – displays general participant list information.
    · Overall Score Report – displays participant information with various point totals and scores.
    · Overall Answer Report – displays a class average bar chart, participant responses, correct answers and scores.
    · Summary Report – displays class percentages scoring at different grade categories, plus overall class statistics.
    · Question Detail Report  lists question type of each slide in the activity.
    · Question Summary Report – displays a thumbnail preview of each question in an activity, with a bar chart indicating correct answer and percentage of class responses for each answer choice.
    · Standards Mastery Report – displays standards linked to specific questions, the class percentage correct and level of mastery.
    · Participant Comparison Report – displays a comparison between an individual’s responses and the correct answers, plus response time and overall score/grade.
    · Participant Standards Report – displays an individual’s performance on each standard linked in the activity.
  5. Any report can be exported to a .pdf or .csv file or printed.


Saving a Report as PDF

  1. Click the Print button in the Reporting Wizard after the selected report type is displayed. The Print window appears.
  2. Click the PDF drop-down and select Save as PDF. The Save window appears.
  3. Enter the name with which you want the results to be saved.
  4. Click Save. The report is saved as a .PDF.


Printing a Report

  1. Click the Print button in the Reporting Wizard after the selected report type is displayed. The Print window appears.
  2. Click the Printer drop-down and select the printer to use.
  3. Click Print. The report will print to the printer you selected.

0 people did not find this helpful

Back To Top

Question Toolbar

Question Toolbar

Question Toolbar allows you to turn any activity into an interactive presentation. This floating toolbar appears over any application (including web pages, written documents, lessons, slide shows, etc.) allowing you to ask verbal questions or create content on-the-fly, while students respond in using student remotes. You may choose to save results to assess student understanding or simply save your presentations.

Tools Overview

  1. Exits the presentation
  2. Slide navigator
  3. Create new question
  4. Indicates  information, question or  answer slide
  5. Add an answer slide or slide to a slide set.
  6. Copies current slide into slide set
  7. Pose Questions
  8. Undo/redo
  9. Selects objects on slide
  10. Add pen annotations
  11. Draw lines
  12. Add shapes
  13. Add Text
  14. Add equation
  15. Insert an image
  16. Deletes a selected object
  17. Switch to Full Screen or Integrated view
  18. Expands/contracts toolbar

Starting a Presentation

  1. Open up any computer program, application, graphic, etc you wish to use in your presentation.
  2. Open Content Manager, go to the Connect Apps menu and select Question Toolbar.
  3. Name the activity and click Done. The activity will appear in the Content Tree and the Presentation Setup window will appear.
  4. Select a participant list.
  5. Select how you would like to save the results. (Recommend) Save to Results Manager.
  6. Select the options you would like available during presentation. (See Presentation Setup for details.)
  7. Click Begin to start the presentation.
    Sample
  8. Have the participants turn on their remotes.
  9. Select a question type from the Question menu (Multiple Choice, True/False, Yes/No, etc) and make desired annotations.
  10. Ask verbal questions and pose questions to student remotes by clicking the Pose button. A screen capture of your desktop will be made into a slide.
  11. Once all participants have answered click the Stop Pose button.
  12. (Optional) Click the public graph button on the Qwizdom Toolbar, Q6iRF, Q5RF or Q7RF Presenter Tablet to view results graph. See Response Graph for more information.
  13. Click the right-arrow to create and pose another question.
  14. When you are finished presenting, click the Content  Utilities button and select Quit.
  15. The activity will be saved in the Content tab.

0 people did not find this helpful

Back To Top

Qwizdom Tools

Qwizdom Tools

Qwizdom Tools are located in the upper right-hand corner of the computer screen (next to the clock). Qwizdom Tools is a tray application, set to launch automatically on system startup. Qwizdom tools can be used to launch Qwizdom programs, check for updates or set features on the Tablet.


Creating Application Shortcuts
1. Click Qwizdom Tools. The Tools menu appears.

  1. Select Preferences. The Preferences window appears.
  2. Select shortcuts you want displayed in the list.
  3. Close window and the changes will take affect.
  4. Click on an application to begin.


Check for Updates

  1. Close all Qwizdom software applications.
  2. Click Qwizdom Tools.
  3. Select Check For Updates.
  4. If there are any updates available, the Software Update window will appear and list the release version, date, and the list of fixes.
  5. Click Install Update. The update will download.
  6. Once the update is done downloading, it is ready to be installed.
  7. Click Install and Relaunch. The Install Qwizdom Connect window appears.
  8. Click Continue in the Introduction.
  9. Read the information in the Read Me section and click Continue.
  10. Read the Licensing Agreement in the License section and click Continue.
  11. Click Agree when the “To continue installing the software, you must agree to the terms of the software license agreement” prompt appears.
  12. Select a destination to install Qwizdom Mac Connect in the Destination Select section. Click Continue.
  13. Click Install in the Installation Type section.
  14. Your computer may or may not prompt you for a password (depending on permission levels). Enter a password (if applicable) and click OK; or just click OK if no password is required.
  15. The update will begin to install.
  16. Follow the wizard as it guides you to apply the update.

0 people did not find this helpful

Back To Top

Hot Key Editor

Hot-Key Editor allows you to program actions for a specific software application. The Hot-Key Editor controls the default commands for the soft-keys on the Tablet, allowing users to customize some of the default commands and set up alternate commands.

  1. Click Qwizdom Tools.
  2. Select Utilities.
  3. Select Hot-Key Editor. Hot-Key Manager opens.


List of Actions
These are the actions that can be set for the Hot Key Editor.

  • None
  • Open Application
  • Open File
  • Open Website
  • Keystroke
  • Keystroke: CMD +
  • Keystroke: ALT+
  • Keystroke: CMD+ ALT+
  • Keystroke: CMD+ SHIFT+
  • Keystroke: ALT+ SHIFT+
  • Keystroke: CMD+ ALT+ SHIFT

Editing a Key
Soft-keys can be customized to perform specific commands.

  1. Modify the Default keys 1, 9-18, 20-30
  2. Select a key number.
  3. Click the Edit button. The Hot-Key Editor opens.
  4. Click the Action Type drop-down list and select the keystroke you want to associate the Action Name (key) with.
  5. Then, enter in the character in the field below.
  6. Click OK to confirm the key assignment.

Exporting (Saving) a Hot-Key Configuration File
You can transfer the Hot-Key configuration file to another computer to save time from reconfiguring the open soft-keys on the Tablet.

  1. Click the Save As button. The Save As window appears.
  2. Select the save location of the file.
  3. Enter the name of the file.
  4. Click Save. The Hot-Key configuration file is saved as .QMP.

Importing a Hot-Key Configuration File

  1. Click the Import button. The Open window appears.
  2. Select the Hot-Key configuration file you want to import.
  3. Click Open.
  4. The configuration file appears, replacing the currently displayed configuration file in the Hot-Key Manager window.

0 people did not find this helpful

Back To Top