Presentation Setup

There are many options you can apply to your presentation. Not all options will be applicable.

Presentation Settings tab:

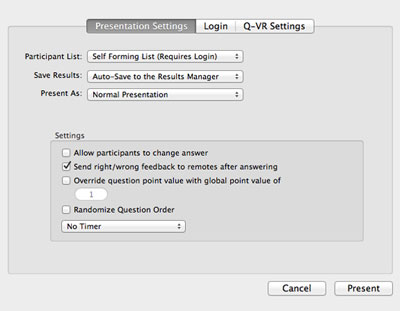
  1. Select a Participant List, see Creating Classes for details.
  2. Select where you would like to save results file.
    Manual Save: Name the results file and select a location to save the .qrx results file.
    Auto Save: The file name will contain the document title, participant list, date, and time. Select a location to save the results file.
    Auto Save to Results Manager: The results will save in the Results tab, in the class name folder, when the presentation is complete.
  3. Select how you would like to present the activity.
    Normal Presentation: Present activity with interactive questions
    Presentation on Autopilot: Automatically cycles through presentation, adding a 15-20 second timer to each slide.
    Self-Paced: Participants work through an Answer Key activity at their own pace. See Answer Key for details.

  4.  Set additional options.
    Allow participants to change their answer – checking this option allows participants to change their answer for the current question slide.
    Send right/wrong feedback to remotes after answering – remotes will receive a check mark if answer is correct and an X if answer is incorrect. Remotes will receive both a check mark and X to indicate that the response has been received if feedback is turned off.
    Override question point value with global point value of —- points – enter the new amount of points that will be temporarily applied to the slide for that presentation.
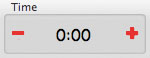
    Timer – you can select no timer, use the time set within the slides, or global timer by entering the number of seconds for all slides in the presentation.
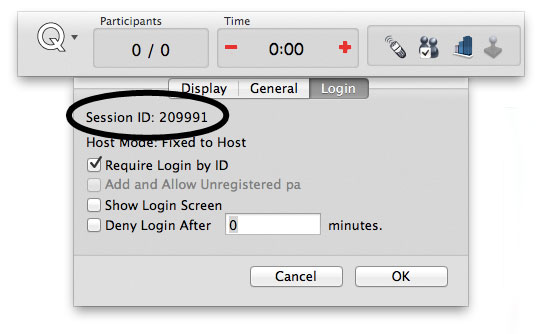
Login tab:

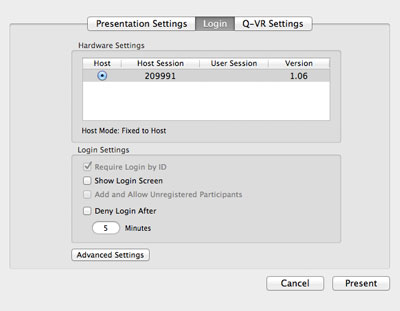
  1. Use the default Host Session ID or type in a custom Session ID in the User Session field. Custom Session ID numbers are a quick fix if you receive a replacement host and don’t want to reprogram your participant remotes.
  2. Check the Require Login by ID box if you would like students to login using their Participant ID. Perfect for classrooms were students don’t have assigned remotes. See Remote Login for details.
  3. Check Show Login Screen to monitor participants logging in.
  4. Check the Add & Allow Unregistered participants box to allow participants that are not on selected participants list to join the session. This option must be checked when using an Anonymous list.
  5. The Deny Login After … feature restricts participants from logging in after a set amount of time.
  6. Advance Settings
    Turn off remotes on presentation end – automatically turns off the remotes when a presentation ends.
    Show score on remote in self-paced mode – enables final score to display on screen after completing an answer key.
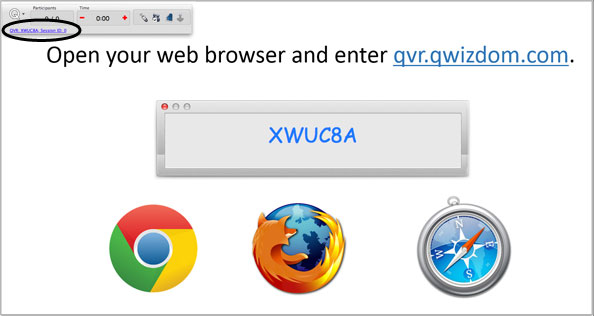
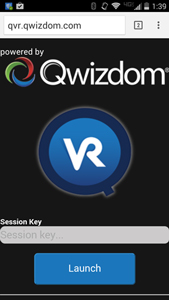
Q-VR tab:


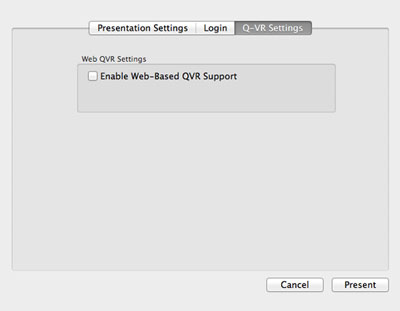
In order to present using the Qwizdom QVR, you are required to purchase a QVR license and register for a Qwizdom Online account.

  1. Click on Enable Web-Based Q-VR Support.
  2. You will be prompted to Login with your Qwizdom account credentials. (If you have not registered, click on the ‘New User’ link at the bottom of the window.)

0 people did not find this helpful

Back To Top

Starting a Presentation

Presenting an Activity (with Remotes)

  1. Open PowerPoint/Actionpoint presentation.
  2. Click the  Present button. The Presentation Setup window appears. (See Presentation Setup for details.)
  3. Select a Participant List.
  4. Select how you would like to save the results.
  5. Select the options you would like available during presentation.
  6. Click Present to begin the presentation.
  7. Have the participants turn on their remotes.
  8. Select the options you would like available during presentation.
  9. Here are a few things you can do during presentation:
    Show Results: Display the public response graph or private graph. (See Response Graph for details. )
    Pick: Randomly call upon a participant. (Click the  Pick button on the Q7RF Tablet, the (.) Pick button on the Q5RF Instructor remote or the (1) button on the Q6i.
  10. Go through the presentation until all the question slides are answered. See Using Remotes in Presentation for descriptions and troubleshooting of all the remote messages.
  11. When all the slides have been presented, a prompt will appear asking if you would like to finish the presentation or continue (review). Click Finish Presentation to exit the presentation.

0 people did not find this helpful

Back To Top

Presentation Features

Qwizdom Toolbar
There are many ways to customize your Qwizdom presentations. Click the Q menu and select Settings.

Response Indicator


The response indicator displays the number participants who have answered over the total number logged into the session.

Timer
Timer displays the remaining time in which participants can submit responses. Add additional time by clicking on the + Add icon.

To add a timer during presentation:

  1. Click the  Q menu and select Settings.
  2. Check the Show Timer box and select Use Timer From Slides. Time limit is set when creating slides.
  3. Timer will be applied to the following slide.
  4. Remotes will not be able to answer when time is up.

Answer Grid
The Answer Grid indicates participant response by corresponding remote ID numbers.

To Show/Hide the Answer Grid.

  1. Click the Q menu and select View/ Answer Grid.
  2. Right-click Answer Grid to change placement.

Qwizdom Tools
Use Re-Pose, Response Graph, Pick icons when presenting activities using a desktop or laptop.

Reposing a Question
Reposing is used to ask a question again and/or when you accidentally skip a slide that needs to be answered. Reposing the question overwrites the previous responses if any were recorded.

  1. Click the Repose button to pose the question slide again.
  2. Click the Repose button again to stop.

Response Graph
1. Click the Response Graph button.
2. The Response Graph appears.
3. Click the Response Graph again to remove the graph.

Picking Participants
1. Click the Pick button to randomly call upon a participant.
2. The participant’s name or participant ID appears on screen.
3. Click the Pick button again to remove the name.


Display Session ID During a Presentation

  1. Click the Q menu and select Settings.
  2. Click on the Login tab.

Right/Wrong Feedback
This feature allows participants to see if their response is right or wrong. Feedback appears on the LCD screen of the participant’s remote during presentation. A check mark will indicate a correct response, an X will indicate an incorrect response. If the feedback is disabled, a check mark and X appears on the LCD screen indicating that a response was received.

You can turn this feature on and off during a presentation by

  1. Click the Q menu and select Settings.
  2. Click on the General tab.
  3. Check the Send Right/Wrong Feedback box.


Presentation Toolbar

Use the presentation toolbar if you would like to annotate a live presentation using a desktop computer or Q7 Presenter Tablet.

This is the defaulted toolbar view during presentation:

Click to expand the toolbar to display annotation tools.


Toolbar Overview:

0 people did not find this helpful

Back To Top

Remote Login

Logging in with IDs allows participants to use any remote. The participant is identified by a unique ID number that is set in participant lists. (Go to Creating Classes for more information).

  • Participant IDs can only be numeric.
  • IDs cannot be used for more than one participant (IDs cannot be duplicated).
  • Maximum number of digits allowed for IDs is: · 8 for Q2RF remotes.
    – 9 for Q4RF remotes.
    – 8 for Q5RF remotes.
    – 14 for Q6RF remotes.
    – 15 for QVOTE remotes.
  1. Select an activity or create one to present.
  2. Click the Present button. The Presentation Setup window will appear.
  3. Select a participant list.
  4. Click the Login tab.
  5. Check the Require Login by ID option.
  6. Checking the Show Login Screen, if desired.
  7. Check the Add and Allow Unregistered Users to allow participants not on the list to join the session.
  8. Select all other preferred options and click OK to present. The presentation will begin.
  9. The Q2RF remotes will display –U. All others will prompt for UserID.
  10. Participants will enter their ID and press the Send key.
    Please note: If Add and Allow Unregistered Users is checked, participants not on the class list, may be prompted to enter their User ID twice to confirm.
  11. Once everyone has logged in, begin the presentation.
  12. You can start the presentation as participants log in. Participants who are late can log in later, if you have not set a timer to deny log in.

0 people did not find this helpful

Back To Top

Using Remotes in a Presentation

Q6i RF Instructor Remote Tips

  • The Q6iRF Instructor Remote will display a list of actions when ready.
  • Press the (3) key to display the public response graph. Press again to close.
  • Press the (2) key to display the graph on the instructor’s LCD. Press again to close.
  • Press the (1) key to randomly call upon a participant during presentation. Press again to close.
  • Press the (6) key to pose a spontaneous question. A list of question types will appear on the LCD. Use the up/down arrows to navigate through the question types. Press the  Select key to choose the question type. Enter the correct answer and press Send; if the answer is survey only, press the Send key without selecting an answer.
  • Press the (5) key to display the list of participants who have requested help. Press Back to exit.
  • Press the (8) key to Play or Pause videos.*
  • Press the  Select key to show Answer Slide during a presentation.*
  • Press the right arrow key to display game animations.*

* Features only work in Qwizdom Connect Software.


Q5RF Instructor Remote Tips

  • The Q5RF Instructor Remote will display Ready or Last Key.
  • Since the Q5RF Instructor Remote is not applicable during answer keys, the LCD screen will display Access Denied.
  • Press the / key on the Q5RF Instructor Remote to display the response graph.
  • Press the / key on the Q5RF Instructor Remote to close the response graph.
  • Press the 0 key on the Q5RF Instructor Remote to display the graph on the instructor’s LCD
  • Press the Pick (.) key on the Q5RF Instructor Remote to randomly call upon a participant during presentation.
  • Press the 1 (A) key on the Q5RF Instructor Remote to go to the next question in Fast Track/Mars Mission games.
  • Press the Show (7) key on the Q5RF Instructor Remote to show game animations. In Fast Track and Mission to Mars, press the (1) key to move to the next question and press the (3) key to display track.
  • Press the New Q (-) key to pose a spontaneous question. A list of question types appear on the LCD. Use the up/down arrows on the thumb pad to navigate through the question types. Press the Send key to select the question type. Select the correct answer and press Send; if the answer is survey only, press the Send key without selecting an answer.
  • Press the (?) key to display the list of participants who have requested help.
  • Press the circle key, in the thumb pad, to close out of the presentation (must be on last slide), play the PowerPoint® animation and schemes (if any were applied), move to the next slide, or display/hide the correct answer on response graph.


Q7 Presenter Tips

  • The Q7RF Presenter Tablet will display Ready when it has successfully connected to the host.
  • Press to display the public response graph. Press again to close.
  • Press to display the graph on the instructor’s LCD. Press again to close.
  • Press  to randomly call upon a participant during presentation. Press again to close.
  • Press to pose a spontaneous question. A list of question types will appear on the LCD. Use the toggle to navigate through the question types. Press the Send key to select the question type. Select the correct answer and press Send; if the answer is survey only, press the Send key without selecting an answer.
  • Press  to display the list of participants who have requested help.
  • Press  Show to display game animations.


Participant Remote Tips

  • Remote displays will vary when they are Ready to Start an activity/presentation.
    Qwizdom will be displayed on the Q4RF and Q5RF remotes when a lesson (nonquestion) slide is in view. Ready will be displayed on the QVOTE and Q6RF when remotes have found the host and are ready for a question slide.
  • Remote displays will vary during an activity/presentation.
    For Q2RF remotes, participants will see a blank screen with a battery icon. For QVOTE, Q4RF and Q5RF remotes, participants will either see answer choices or a blank screen (depending on question type) on their remote during a question slide. For Q6RF remotes, question text and/or answer choices will appear on the LCD screen (display varies depending on question type). See Creating Slides for information on setting up the different question types.
  • Request Help.
    For Q2RF remotes, press the Help (Hand) key. To request help on all other remotes, press the Menu key to select Help and press Send.
  • Change Session ID.
    To change the Session ID on the Q2RF remote, when the remote is on, wait for the remote to time out and turn off. When you turn it back on, press the Help key. When you see –S on the display, enter the Session ID and press the Send key to confirm.To change the Session ID on the Q4RF remote, press the Menu key and use the right arrow to scroll through the menu options. When you see Sess. ID, press the Send key to select it. An existing Session ID may appear and the remote will ask if you want to change it. Press T for yes and enter the new Session ID. Press the Send key to confirm.To change the Session ID on the Q5RF remote, press the Menu key when the remote displays No Host Found. Use the thumb pad to navigate through the menu options and press the Send key to select Enter Session ID.To change the Session ID on the QVOTE and Q6RF remote, press the Menu key, scroll to Enter Session ID, press the menu  select key, re-enter the Session ID, and press Join to submit.

Troubleshooting Tips

  • The Q4 LCD screen on the participant remotes may read Push Key, Inactive, Not Active, press the Send (double arrows) key to “wake up” the remote. If the remote still displays Not Active, re-enter the Session ID. Go to Changing Session IDs for more information.
  • If the Q4RF displays No Net, or the Q5RF remote displays Host not found, Session ID Not Found, or the Q2RF remote displays – – – and turns off, re-enter the Session ID. Go to Changing Session IDs for more information.
  • If the Q4RF remote displays Denied, or the Q5RF remote displays Access Denied, or the QVOTE or Q6RF displays Session ID Login Denied, or the Q2RF remote displays –U, the Participant ID is incorrect, or the Remote ID attempting to participate isn’t in the participant list that was loaded. re-enter the Participant ID, and check to make sure that Remote ID is in the participant list.
  • The QVOTE and Q6 LCD screen on the participant remotes may display Power Save Mode. This indicates that the remote is idle. Click RESUME, to reactivate.


Below are the procedures on how to respond for each question type during presentation for Q2RF remotes:

  • True/False – press T or F key.
  • Yes/No – press Yes or No key.
  • Multiple Choice – press A, B, C, D, E, or F key.
  • Single Digit Numeric – enter a single number key.
  • Rating Scale (1-5) or (1-7) – enter a single number.

Below are the procedures on how to respond for each question type during presentation for Q4RF and Q5RF remotes:

  • True/False – press T or F key and then press the Send key.
  • Yes/No – press Y or N key and than press the Send key.
  • Multiple Choice – press A, B, C, D, E, or F and then press the Send key.
  • Multiple Mark – select multiple letter choices and than press the Send key.
  • Numeric – enter the numbers and than press the Send key. · Sequence-enter the numbers in the correct order and press the Send key.
  • Short Text Response – for Q5 remotes only. The alphabet menu will automatically appear when this question type is displayed. Use the arrows on the thumb pad to navigate through the letters, using the Circle key to select the letter(s). Press the Send key to confirm your answer.

Below are the procedures on how to respond for each question type during presentation for QVOTE and Q6RF remotes:

  • True/False – use down arrow to scroll to T or F and then press the Send key.
  • Yes/No – use down arrow to scroll to Y or N and then press the Send key.
  • Multiple Choice – use down arrow to scroll to A, B, C, D, E, or F and then press the Send key.
  • Multiple Mark – use down arrow to scroll to answer choice, click the Menu Select key to select multiple answer choices, and then press the Send key.
  • Numeric – enter the numeric answer and then press the Send key.
  • Sequence – enter the numbers in the correct order and then press the Send key.

Q6RF Only:

  • Short Text Response – enter in the appropriate answer and then press the Send key
  • Text Response – enter in the sentence/s answer and then press the Send key.
  • Text Edit – use directional arrows to scroll to the text that needs editing, press Delete to remove incorrect character/s, enter correction, and press the Send key when finished.
  • Equation – enter the numeric answer (add special characters by pressing the Sym button) and then press the Send key.

0 people did not find this helpful

Back To Top

Presenting with the QVR

You will need to purchase a QVR Presenter license to use this feature. Email info@qwizdom.com for pricing details.

To begin a QVR presentation follow the steps below:

  1. Select an activity, then click Present to begin setting up a presentation.
  2. In the Presentation Setup window, select the presentation options (i.e. Participant List, Save Results and Present As). See Presentation Setup for details.
  3. Click on Q-VR tab. Check Enable Web-Based Q-VR Support. Click Present to begin.
  4. Login with your credentials. (If you have not registered, click on the ‘New User’ button at the bottom of the window.)
  5. The Session ID will appear on the Qwizdom Toolbar. Click on the link to make the QVR Session ID number large. It’s helpful to create an instructional slide to help users login in.
  6. Instruct participants to login to the QVR session at qvr.qwizdom.com using a browser of their choice. Additionally, participants can download an app from the Google Play or Apple App store.
  7. In the QVR window, instruct participants to login with the 6 digit QVR Session ID number and then press Launch.
  8. Participants maybe asked to enter a User ID, if you selected a class list in the Presentation Setup window.
  9. Participants will see the presentation via their personal web-enabled device. If the show right/wrong feedback feature is turned on in the Presentation Settings window a green check mark will appear if the participant answered correctly. If an answer is incorrect, a red X will appear.
  10. The instructor can display a chart showing the results of all other users currently in the presentation.
  11. At the end of the presentation, this window will appear:

0 people did not find this helpful

Back To Top

Response Graph

Response Graph During presentation, you can display a response graph to see the results of the question. There are two response graphs you can display: the public response graph and the private graph.

Public Response Graph using the Q6iRF

  1. Press the (3) key on the Q6iRF instructor remote.
  2. The response graph will appear on the computer screen.
  3. Press again to close the response graph.


Private Response Graph using the Q6iRF

  1. Press the (2) key on the Q6iRF instructor remote.
  2. The response graph will appear on the computer screen.
  3. Click Details to view Response Times and participant that have not responded.
  4. Press again to close the response graph.


Public Response Graph using the Q7RF Tablet

  1. Press the Public Graph icon on the Q7RF tablet.
  2. The response graph will appear on the computer screen.
  3. Toogle through menu options to view response times and a list of participants that have not responded.
  4. Press the Public Graph icon on the Q7RF tablet again to close the response graph.

Please Note: The public and/or private graph must be closed (follow step 3 above) before moving to the next slide.

Private Response Graph using the Q7RF Tablet

  1.  Press the Private Graph icon on the Q7RF tablet.
    2. The response graph will display on the Q7RF tablet’s LCD.
    3. Press the Private Graph icon on the Q7RF tablet again to close the response graph.


Public Response Graph using the Q5RF Instructor Remote

  1. Press the (/) key on the Q5RF Instructor Remote.
  2. The response graph will appear on screen for the participants to view.
  3. Press the (/) key again to remove the response graph.

Please Note: The public and/or private graph must be closed (follow step 3 above) before moving to the next slide.


Private Response Graph using the Q5RF Instructor Remote

  1. Press the (0) key on the Q5RF Instructor Remote.
  2. A bar chart showing the number of responses will display on the Q5RF Instructor Remote’s LCD screen.
  3. Press the (0) key again to remove the graph.

0 people did not find this helpful

Back To Top

Games

January 2021:

Our legacy Presentation Games (Fast Track, Mission to Mars, etc) are no longer supported due to Adobe discontinuing Flash Player. New games are under development and we hope to release them this coming summer. Meanwhile, presentation game options have been removed in current software versions. (Older versions still show those options but will not work.)

0 people did not find this helpful

Back To Top

Reports

Generate Reports

To view saved response data from a presentation, click  Results on the Mac Actionpoint toolbar.

  1. Click Browse to locate the Qwizdom (.qrx) results file.
  2. In the reports tab, click the Choose Report to Run drop-down and select the type of report you want to generate.

    · Attendance Report – displays participants’ names, IDs and login times.
    · Participant Group List Report – displays participant group information .
    · Participant List Report – displays general participant list information.
    · Overall Score Report – displays participant information with various point totals and scores.
    · Overall Answer Report – displays a class average bar chart, participant responses, correct answers and scores.
    · Summary Report – displays class percentages scoring at different grade categories, plus overall class statistics.
    · Question Detail Report  lists question type of each slide in the activity.
    · Question Summary Report – displays a thumbnail preview of each question in an activity, with a bar chart indicating correct answer and percentage of class responses for each answer choice.
    · Standards Mastery Report – displays standards linked to specific questions, the class percentage correct and level of mastery.
    · Participant Comparison Report – displays a comparison between an individual’s responses and the correct answers, plus response time and overall score/grade.
    · Participant Standards Report – displays an individual’s performance on each standard linked in the activity.
  3. Any report can be exported to a .pdf or .csv file or printed.


Saving a Report as PDF

  1. Click the Print button in the Reporting Wizard after the selected report type is displayed. The Print window appears.
  2. Click the PDF drop-down and select Save as PDF. The Save window appears.
  3. Enter the name with which you want the results to be saved.
  4. Click Save. The report is saved as a .PDF.


Printing a Report

  1. Click the Print button in the Reporting Wizard after the selected report type is displayed. The Print window appears.
  2. Click the Printer drop-down and select the printer to use.
  3. Click Print. The report will print to the printer you selected.

0 people did not find this helpful

Back To Top

Reports

Generate Reports

You can generate reports using existing saved results.

  1. Click the Results/Reports tab.
  2. Click on an Activity. The Overall Score Report will be displayed.
  3. Click the  Report Wizard to view additional reports. View data in the Overview, Participants, Questions and Reports tabs.
  4. In the reports tab, click the Choose Report to Run drop-down and select the type of report you want to generate.

    · Attendance Report – displays participants’ names, IDs and login times.
    · Participant Group List Report – displays participant group information .
    · Participant List Report – displays general participant list information.
    · Overall Score Report – displays participant information with various point totals and scores.
    · Overall Answer Report – displays a class average bar chart, participant responses, correct answers and scores.
    · Summary Report – displays class percentages scoring at different grade categories, plus overall class statistics.
    · Question Detail Report  lists question type of each slide in the activity.
    · Question Summary Report – displays a thumbnail preview of each question in an activity, with a bar chart indicating correct answer and percentage of class responses for each answer choice.
    · Standards Mastery Report – displays standards linked to specific questions, the class percentage correct and level of mastery.
    · Participant Comparison Report – displays a comparison between an individual’s responses and the correct answers, plus response time and overall score/grade.
    · Participant Standards Report – displays an individual’s performance on each standard linked in the activity.
  5. Any report can be exported to a .pdf or .csv file or printed.


Saving a Report as PDF

  1. Click the Print button in the Reporting Wizard after the selected report type is displayed. The Print window appears.
  2. Click the PDF drop-down and select Save as PDF. The Save window appears.
  3. Enter the name with which you want the results to be saved.
  4. Click Save. The report is saved as a .PDF.


Printing a Report

  1. Click the Print button in the Reporting Wizard after the selected report type is displayed. The Print window appears.
  2. Click the Printer drop-down and select the printer to use.
  3. Click Print. The report will print to the printer you selected.

0 people did not find this helpful

Back To Top