Connecting using a web browser

  1. Open a web browser
  2. Enter the IP address supplied by the presenter, followed by port 8080.
    For example, if the presenter’s IP address was 192.168.1.10, in the URL bar, you would type http://192.168.1.10:8080
  3. Press the return/enter key or click the “Go” button beside the URL bar.

Note: The browser version does not contain the same feature set as the app, such as saving and adding notes.

The app or browser will now attempt to connect to the presenter’s live session. If the presentation was live before the app connects and the presenter has already annotated or navigated through slides, all previous actions are sent to the app to ensure that the participant receives the entire presentation thus far.

0 people did not find this helpful

Back To Top

Collaborating

When Notes+ is connected to an active collaboration session (from Qwizdom Connect, Qwizdom Actionpoint, or Qwizdom OKTOPUS), you will receive screenshot updates from the presenter’s computer.

You will be able to make your own notes by using the annotation tools or by typing text notes. When the presenter moves forward a slide, you will be able to add new annotations and new notes for that slide.

These annotations and text notes will be saved when you save your session, and can be loaded at a later date for review or revision purposes.


If the presenter chooses, they can enable collaboration for your device. When this happens, you will see a “share” icon appear.

share-icon


When you tap this icon, all annotations you have created will be sent to the presenter device, and then shared out to all other connected devices as part of a new screenshot.

Note that when this happens, you will no longer be able to edit your annotations as they have become part of the presentation.


0 people did not find this helpful

Back To Top

Polling

When Notes+ is connected to an active collaboration session (from Qwizdom Connect, Qwizdom Actionpoint, or Qwizdom OKTOPUS), the presenter can pose questions to your device.

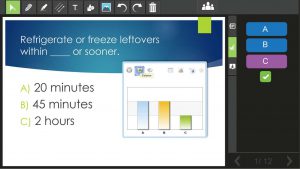
When this happens, you will see question options appear on the right hand side of the screen. The question and answer choices should also appear on the main window.


polling


Tap the answer you wish to send. In some cases you will be required to press the “submit” button, eg for numeric, text, or questions where there may be more than one answer.

Depending on settings chosen by the presenter, you may receive feedback as to whether your answer was correct or incorrect. If there is no correct answer set or if feedback is not enabled, you will see a tick and an X appear together to show that you have answered.


0 people did not find this helpful

Back To Top

Introduction

This is a user guide for Qwizdom Connect.

This guide provides information and tips on using Qwizdom Connect.

If you need assistance, please contact Technical Support

0 people did not find this helpful

Back To Top

Installing Qwizdom Actionpoint

System Requirements

  • Windows 7, Windows 8, or Windows 10
  • MS Office 365 (2013, 2016, or 2019)
  • Available USB Port
  • Qwizdom Host / Receiver : version .938 or higher


Installing Qwizdom Actionpoint
Microsoft PowerPoint 2013 or later must be installed before installing Qwizdom Actionpoint. Before installing the software on a PC, make sure that all available Microsoft Windows and Office updates have been installed on your computer. If you have an older version of Qwizdom Actionpoint on your computer, uninstall the program through the computer’s Control Panel. (If you have an older Red RF Host, be sure to plug it into the USB port before installing Actionpoint. See Hardware Setup for details.)

  1. Download the latest version of Actionpoint at qwizdom.com/us/support/downloads
  2. Open and run the downloaded ActionpointSetup.exe file, then follow the prompts of the Install Wizard.
  3. Click Next. The Select Installation Folder section appears.
  4. You have the option to select the location of where you would like Qwizdom Actionpoint, or use the default location.
  5. Click Next to begin the installation. This will take a few moments.
  6. Three icons will appear on your desktop, once installation is complete.
  • Actionpoint: create interactive PowerPoint presentations.
  • Survey Bar: survey your audience using an application of your choice.
  • Answer Key: present and grade paper tests and activities.

0 people did not find this helpful

Back To Top

Introduction

This is a user guide for Qwizdom Actionpoint.

This guide provides information and tips on using Qwizdom Actionpoint.

If you need assistance, please create a support ticket at qwizdom.com/supportcenter

0 people did not find this helpful

Back To Top

Contents of Remote Set

  • Q2RF, QVOTE, or Q6RF Remotes*
  • 1 HID (Black) Host/Receiver
  • 1 Q6iRF Instructor Remote or 1 Q7RF Instructor Tablet*
  • 1 Charger (Q7RF Instructor Tablet)*
  • 1 Screwdriver AA Batteries (Q4RF & Q6RF) or AAA Batteries (Q2RF)*
  • 1 Carrying Case

*Remote types and accessories based on actual order. This device complies with part 15 of the FCC Rules. Operation is subject to the following two conditions: (1) This device may not cause harmful interference, and (2) this device must accept any interference received, including interference that may cause undesired operation.

0 people did not find this helpful

Back To Top

Notice

Notices of Compliance for Qwizdom’s RF Response Devices

Note: This equipment has been tested and found to comply with the limits for a Class B digital device, pursuant to part 15 of the FCC Rules. These limits are designed to provide reasonable protection against harmful interference in a residential installation. This equipment generates, uses, and can radiate radio frequency energy and, if not installed and used in accordance with the instructions, may cause harmful interference to radio communications. However, there is no guarantee that interference will not occur in a particular installation. If this equipment does cause harmful interference to radio or television reception, which can be determined by turning the equipment off and on, the user is encouraged to try to correct the interference by one or more of the following measures:


  • Reorient or relocate the receiving antenna.
  • Increase the separation between the equipment and receiver.
  • Connect the equipment into an outlet on a circuit different from that to which the receiver is connected.
  • Consult the dealer or an experienced radio/TV technician for help.


Caution: Changes or modifications to Qwizdom’s RF hardware that are not expressly approved by Qwizdom could void the user’s authority to operate the equipment.

CE Mark

This product is designed for the 2.4 Ghz WLAN network throughout the EC region and Switzerland with restrictions in France.


FCC 15.19:

(3) All other devices shall bear the following statement in a conspicuous location on the device.

This device complies with Part 15 of the FCC Rules. Operation is subject to the following two conditions: (1) this device may not cause harmful interference, and (2) this device must accept any interference received, including interference that may cause undesired operation.

FCC 15.21:

The user’s manual or instruction manual for an intentional or unintentional radiator shall caution the user that changes or modifications not expressly approved by the party responsible for compliance could void the user’s authority to operate the equipment. In cases where the manual is provided only in a form other than paper, such as on a computer disk or over the Internet, the information required by this section may be included in the manual in that alternative form, provided the user can reasonably be expected to have the capability to access information in that form.

FCC 15.105:

(b) For a Class B digital device or peripheral, the instructions furnished the user shall include the following or similar statement, placed in a prominent location in the text of the manual:

NOTE: This equipment has been tested and found to comply with the limits for a Class B digital device, pursuant to Part 15 of the FCC Rules. These limits are designed to provide reasonable protection against harmful interference in a residential installation. This equipment generates, uses and can radiate radio frequency energy and, if not installed and used in accordance with the instructions, may cause harmful interference to radio communications. However, there is not guarantee that interference will not occur in a particular installation. If this equipment does cause harmful interference to radio or television reception, which can be determined by turning the equipment off and on, the user is encouraged to try to correct the interference by one or more of the following measures:

 

0 people did not find this helpful

Back To Top

Installing Qwizdom Connect

System Requirements

  • Windows 7, Windows 8 or Windows 10
  • MS Office 2013 or 2016
  • Available USB Port

Installing Qwizdom Connect
Before installing the software on a PC, make sure that all available Microsoft Windows and Office updates have been installed on your computer. If you have an older version of Qwizdom Connect on your computer, uninstall the program through the computer’s Control Panel. (If you have an older Red RF host, be sure to plug it into the USB port before installing Qwizdom Connect. See Hardware Setup for details.)

  1. Download the latest version of Qwizdom Connect Software at qwizdom.com/support/downloads
  2. Open and run the downloaded ConnectSetup.exe file, then follow the prompts of the Install Wizard.
  3. Click Next. The Select Installation Folder section appears.
  4. You have the option to select the location of where you would like Qwizdom Connect, or use the default location.
  5. Click Next to begin the installation. This will take a few moments. Four icons will appear on your desktop, once installation is complete.
  • Connect: present pre-made Qwizdom activities.
  • Actionpoint: create interactive PowerPoint presentations.
  • Survey Bar: survey your audience using an application of your choice.
  • Answer Key: present and grade paper tests and activities.

0 people did not find this helpful

Back To Top

Installing Standards

QConnectIconTo open Qwizdom Connect, double-click the shortcut icon on your desktop.

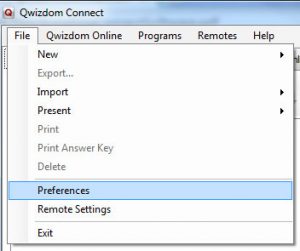
  1. From the Connect toolbar, click File, then Preferences.
    Preferences1
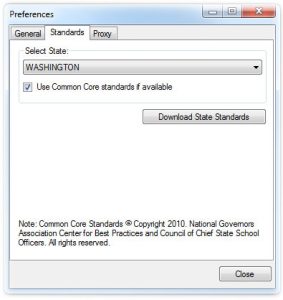
  2. Click the Standards tab.
    Preferences2
  3. From the Select State drop-down menu, highlight your state.
  4. If desired, check Use Common Core standards if available.
  5. Click Download State Standards.
  6. Click Close when download is complete.
  7. From the File drop-down menu, click Exit. It is recommended that you close and reopen Qwizdom Connect after installing state standards.

0 people did not find this helpful

Back To Top