This is a user guide for Qwizdom Actionpoint.
This guide provides information and tips on using Qwizdom Actionpoint.
If you need assistance, please create a support ticket at qwizdom.com/supportcenter
This is a user guide for Qwizdom Actionpoint.
This guide provides information and tips on using Qwizdom Actionpoint.
If you need assistance, please create a support ticket at qwizdom.com/supportcenter
0 people found this helpful
0 people did not find this helpful
System Requirements
Installing Qwizdom Actionpoint
Microsoft PowerPoint 2013 or later must be installed before installing Qwizdom Actionpoint. Before installing the software on a PC, make sure that all available Microsoft Windows and Office updates have been installed on your computer. If you have an older version of Qwizdom Actionpoint on your computer, uninstall the program through the computer’s Control Panel. (If you have an older Red RF Host, be sure to plug it into the USB port before installing Actionpoint. See Hardware Setup for details.)
0 people found this helpful
0 people did not find this helpful
*Remote types and accessories based on actual order. This device complies with part 15 of the FCC Rules. Operation is subject to the following two conditions: (1) This device may not cause harmful interference, and (2) this device must accept any interference received, including interference that may cause undesired operation.
0 people found this helpful
0 people did not find this helpful
Notices of Compliance for Qwizdom’s RF Response Devices
Note: This equipment has been tested and found to comply with the limits for a Class B digital device, pursuant to part 15 of the FCC Rules. These limits are designed to provide reasonable protection against harmful interference in a residential installation. This equipment generates, uses, and can radiate radio frequency energy and, if not installed and used in accordance with the instructions, may cause harmful interference to radio communications. However, there is no guarantee that interference will not occur in a particular installation. If this equipment does cause harmful interference to radio or television reception, which can be determined by turning the equipment off and on, the user is encouraged to try to correct the interference by one or more of the following measures:
Caution: Changes or modifications to Qwizdom’s RF hardware that are not expressly approved by Qwizdom could void the user’s authority to operate the equipment.
![]()
This product is designed for the 2.4 Ghz WLAN network throughout the EC region and Switzerland with restrictions in France.
FCC 15.19:
(3) All other devices shall bear the following statement in a conspicuous location on the device.
This device complies with Part 15 of the FCC Rules. Operation is subject to the following two conditions: (1) this device may not cause harmful interference, and (2) this device must accept any interference received, including interference that may cause undesired operation.
FCC 15.21:
The user’s manual or instruction manual for an intentional or unintentional radiator shall caution the user that changes or modifications not expressly approved by the party responsible for compliance could void the user’s authority to operate the equipment. In cases where the manual is provided only in a form other than paper, such as on a computer disk or over the Internet, the information required by this section may be included in the manual in that alternative form, provided the user can reasonably be expected to have the capability to access information in that form.
FCC 15.105:
(b) For a Class B digital device or peripheral, the instructions furnished the user shall include the following or similar statement, placed in a prominent location in the text of the manual:
NOTE: This equipment has been tested and found to comply with the limits for a Class B digital device, pursuant to Part 15 of the FCC Rules. These limits are designed to provide reasonable protection against harmful interference in a residential installation. This equipment generates, uses and can radiate radio frequency energy and, if not installed and used in accordance with the instructions, may cause harmful interference to radio communications. However, there is not guarantee that interference will not occur in a particular installation. If this equipment does cause harmful interference to radio or television reception, which can be determined by turning the equipment off and on, the user is encouraged to try to correct the interference by one or more of the following measures:
0 people found this helpful
0 people did not find this helpful
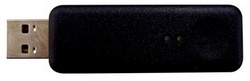
Installing the HID (Black) Host/Receiver
*This device complies with part 15 of the FCC Rules. Operation is subject to the following two conditions:
(1) This device may not cause harmful interference, and (2) this device must accept any interference received, including interference that may cause undesired operation.
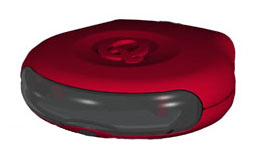
Installing the RF (Red) Host/Receiver
0 people found this helpful
0 people did not find this helpful

To open Actionpoint, double-click the shortcut icon on your desktop.
Microsoft PowerPoint® will open displaying the Qwizdom Actionpoint toolbar.

0 people found this helpful
0 people did not find this helpful
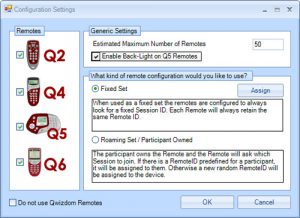
Please Note: Available Question Slide options are based on type of Remotes selected in the Configuration Settings window.

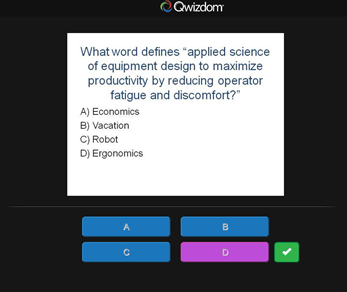
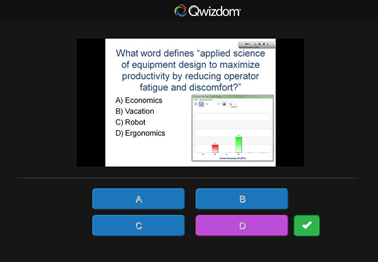
Multiple Choice Slides
Yes/No & True/False Slides
Numeric Slides
Sequence Slides
Multiple Mark Slides
Please Note: Use the Multiple Mark option to tally results by exact answer. For instance the results graph will show all participants who answered AB, BC, etc. Use the Vote Multiple Mark to tally results by total votes cast for each option. For instance, the results graph will show that 200 participants voted for A, 100 for B, etc.
Rating Scale Slides
Text Input (For Q5RF & Q6RF remotes and QVR App )
Please Note: Best used for single word responses where capitalization does not matter.
Text Response, Text Edit, and Equation (For Q6RF remotes and QVR App)
Please Note: Best used for short phrase responses, feature allows for punctuation, spacing, and other advance grading options.
Demographic Slides
These slides allow you to categorize results based on location, ethnicity, gender and more.

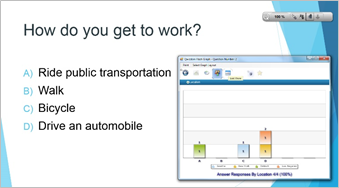
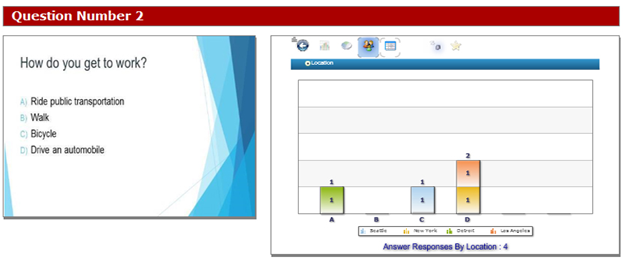
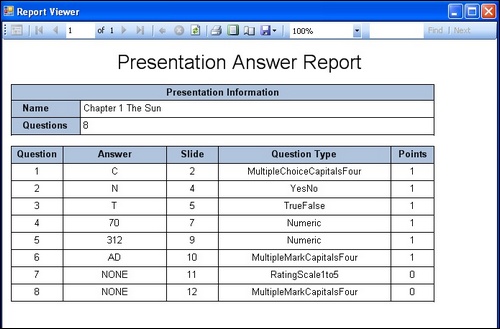
Report Sample
0 people found this helpful
0 people did not find this helpful
The Print Presentation feature allows you to view a question summary report of an Actionpoint presentation.
0 people found this helpful
0 people did not find this helpful
Creating a Participant List
Importing a .CSV (Comma Delimited) File
You can import a .CSV (comma delimited) file and convert it into a Qwizdom participant list (.QPL).
Please Note: If you have a class list in Microsoft Excel® you would like to import, save them as .CSV(comma delimited) file.
Creating an Anonymous List
Before using an anonymous list, be sure you have the correct estimated number of remotes set within the Configuration Settings window. For example, if you create an anonymous list with a hundred participants but only have eighty as the estimated number of remotes, then not all remotes will register.
Creating a Self-Forming List
This option lets participants add themselves to list during a live presentation. Participants are identified by an unique User ID number. We recommend using an assigned employee or student ID number for easier tracking.

Editing an Existing Participant List
0 people found this helpful
0 people did not find this helpful
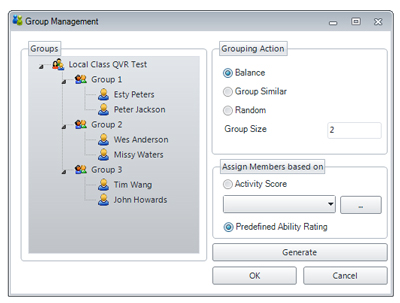
Automatically create groups.
0 people found this helpful
0 people did not find this helpful
If setting up remotes for the first time we recommend the following steps. Note: You will only have to do this once. Be sure the HID (black) host, or RF (red) host is properly installed and plugged in before proceeding see Hardware Setup for details.
Other Settings & Explanations:
Assign Remote IDs
Remotes received in 2011 or earlier need to be set up once, prior to use, with computer-assigned ID numbers. Newer remotes, received in 2012 or later, already come with pre-assigned numbers, matching their affixed stickers, so no additional setup is required.
Assign Remote IDs – Q4 Remotes with Firmware Older than Version 1.34
The following directions only apply for customers on a PC, using Q4 remotes older than version 1.34. (The Q4 firmware number is displayed on the remote’s screen when the remote is first turned on.)
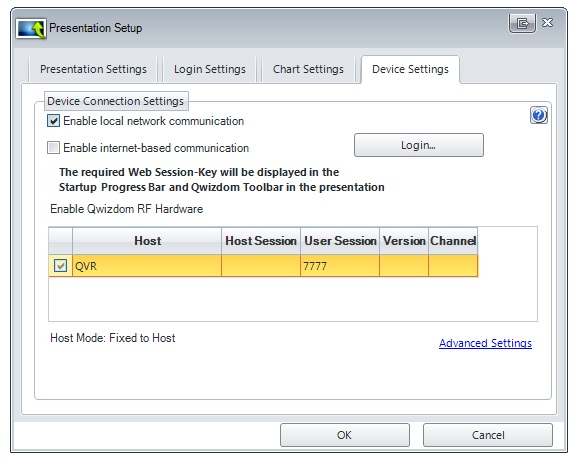
Changing Session IDs
If the RF remote displays No Net, Not Found, Not Active, or Inactive, it could be that the Session ID is not correct.
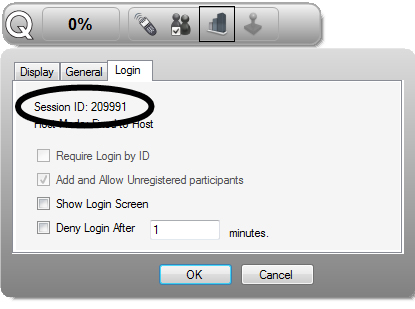
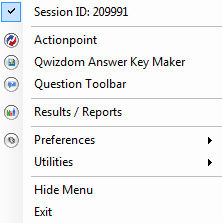
What is a Session ID?
Each host/receiver has a unique six-digit called a Session ID number. Session IDs “assign” the remote to the host, allowing the remote to only communicate with that specific host.
The Session IDs can be found:
For both HID and RF Host, the Session ID can be found in the Remote Assignments window, the Device Settings tab in the Presentation Setup window, and the Login tab of the Qwizdom Toolbar during a presentation. Session ID is also displayed at the top of the Qwizdom Tools menu: click Qwizdom Tools, found in the lower right-hand corner of the Windows Taskbar (next to the clock).
For the RF (Red) Host, the Session ID is printed on a white sticker affixed to the bottom of the device.
You can also create your own Session ID in the Presentation Setup window. Creating your own Session ID does not change the host’s default Session ID. See Presentation Setup for details. The Session ID must be unique because if there are other hosts in the same building, the remotes will become confused about the host with which they are to communicate.
0 people found this helpful
0 people did not find this helpful
Q2 Common Screen Displays
_ _ S : Enter Session ID. See Remote Setup for details.
_ _U : The remote is asking for a Participant ID. See Remote Login for details.
_ _ A : Displays when the remote is requesting an Answer Key activity number. Prompt only appears when Multiple Answer Keys are being presented. See Answer Key for details.
– – – : Remote cannot find host and will power down.
– – : Remote is searching for the host.
![]() : Battery icon indicates battery charge when remote is on.
: Battery icon indicates battery charge when remote is on.
Supports the Following Question Types:
Multiple Choice
True/False
Yes/No
Single Digit Numeric
Rating Scale (1-5 ) and (1-7)
This device complies with part 15 of the FCC Rules. Operation is subject to the following two conditions: (1) This device may not cause harmful interference, and (2) this device must accept any interference received, including interference that may cause undesired operation.
0 people found this helpful
0 people did not find this helpful
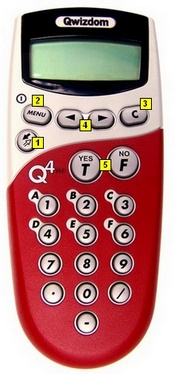
Q4 Common Screen Displays
Supports the Following Question Types:
Multiple Choice
True/False
Yes/No
Single and Multi-Digit Numeric
Rating Scale
Negative Number
Fractions
Decimal
Multiple Mark
Vote Multiple Mark
Sequence
Demographic
This device complies with part 15 of the FCC Rules. Operation is subject to the following two conditions: (1) This device may not cause harmful interference, and (2) this device must accept any interference received, including interference that may cause undesired operation.
0 people found this helpful
0 people did not find this helpful
Q5RF Common Screen Displays
Supports the Following Question Types:
Multiple Choice
Yes/No
True/False
Numeric
Sequence
Multiple Mark
Vote Multiple Mark
Rating Scale
Text Input
This device complies with part 15 of the FCC Rules. Operation is subject to the following two conditions: (1) This device may not cause harmful interference, and (2) this device must accept any interference received, including interference that may cause undesired operation.
0 people found this helpful
0 people did not find this helpful
QVOTE Common Screen Displays
Supports the Following Question Types:
Multiple Choice
Yes/No
True/False
Numeric
Fractions
Decimals
Negative
Sequence
Multiple Mark
Vote Multiple Mark
Rating Scale
This device complies with part 15 of the FCC Rules. Operation is subject to the following two conditions: (1) This device may not cause harmful interference, and (2) this device must accept any interference received, including interference that may cause undesired operation.
0 people found this helpful
0 people did not find this helpful
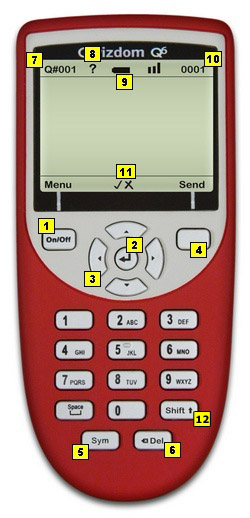
Q6 Common Screen Displays
Please Note: To send question text to Q6RF remotes click on the ![]() Advanced Options button and check Send Question Text to Remotes. See Creating Slides for details.
Advanced Options button and check Send Question Text to Remotes. See Creating Slides for details.
Supports the Following Question Types:
Multiple Choice
Yes/No
True/False
Numeric
Sequence
Multiple Mark
Vote Multiple Mark
Rating Scale
Text Input
Text Response
Text Edit
Equation
This device complies with part 15 of the FCC Rules. Operation is subject to the following two conditions: (1) This device may not cause harmful interference, and (2) this device must accept any interference received, including interference that may cause undesired operation.
0 people found this helpful
0 people did not find this helpful
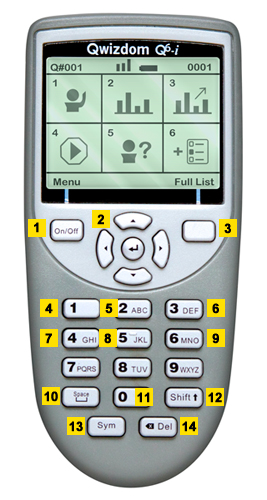
Q6iRF Instructor Remote
Please note: When using Q6 participant clickers, in order to send question text to Q6RF remotes click on the ![]() Advanced Options button and check Send Question Text to Remotes. See Creating Slides for details.
Advanced Options button and check Send Question Text to Remotes. See Creating Slides for details.
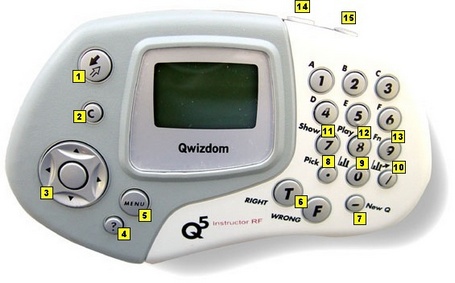
Q5RF Instructor Remote
This device complies with part 15 of the FCC Rules. Operation is subject to the following two conditions: (1) This device may not cause harmful interference, and (2) this device must accept any interference received, including interference that may cause undesired operation.
0 people found this helpful
0 people did not find this helpful
![]() Pick – picks random participants
Pick – picks random participants
![]() Help Requests – privately displays list of participants who requested help
Help Requests – privately displays list of participants who requested help
![]() Insert Slide – makes a copy of the current slide and lets you pose a spontaneous question to participant remotes
Insert Slide – makes a copy of the current slide and lets you pose a spontaneous question to participant remotes
![]() Pose – re-poses current question slide
Pose – re-poses current question slide
![]() Timer – adds additional time to timer
Timer – adds additional time to timer
![]() Stop – stops the question being posed
Stop – stops the question being posed
![]() Private Graph – displays private graph of responses on tablet (See Response Graph for details.)
Private Graph – displays private graph of responses on tablet (See Response Graph for details.)
![]() Public Graph – displays response graph to participants (see Response Graph for details)
Public Graph – displays response graph to participants (see Response Graph for details)
![]() LCD Backlight – turns backlight on or off
LCD Backlight – turns backlight on or off
![]() Pen &
Pen &![]() Laser Pointer – can be used for annotation
Laser Pointer – can be used for annotation
Quick Pose Controls: Click an answer to spontaneously pose a numeric, multiple choice, yes/no, or rating scale question.
![]() For Numeric question types
For Numeric question types
![]() For Multiple Choice question types
For Multiple Choice question types
![]() For Rating question types
For Rating question types
![]() For Yes/No or True/False question types
For Yes/No or True/False question types
* Click Any to pose a survey question.
This device complies with part 15 of the FCC Rules. Operation is subject to the following two conditions: (1) This device may not cause harmful interference, and (2) this device must accept any interference received, including interference that may cause undesired operation.
The Pen is used (with the Tablet) to write, draw, and control mouse movements.
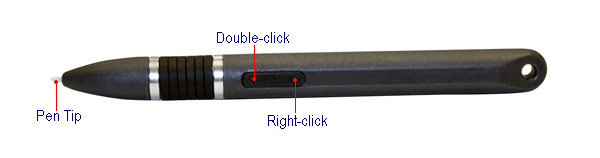
Pen Actions
Sleep Mode
The Pen goes into sleep mode after a minute of inactivity. Touching the pen to the Q7RF Tablet surface or pressing the Left/Right buttons on the pen will reactivate it.
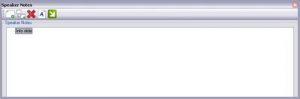
Speaker notes allow you to view notes on the Q7 Tablet while in presentation mode.
1. In Live Editor, select a slide.
2. Go to the View menu and select Speaker Notes.
3. The Speaker Notes window appears.
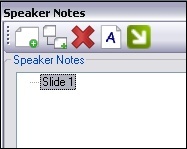
4. Click Insert at Root ![]() . Root appears for you to enter text.
. Root appears for you to enter text.
5. Enter text.
6. Click Insert ![]() to insert a subroot.
to insert a subroot.
7. Enter text.
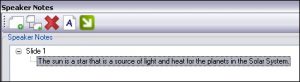
8. When finished, close the window to save the information.
0 people found this helpful
0 people did not find this helpful
Using Multiple Hosts
Up to 3 hosts (with 999 remotes on each) can be used for presentation to remotes. If you have selected to use fixed set, be sure you have assigned fixed numbers for the
remotes using all hosts.
0 people found this helpful
0 people did not find this helpful
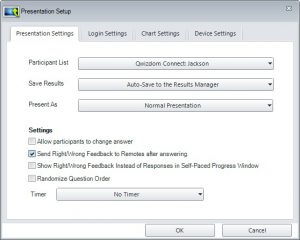
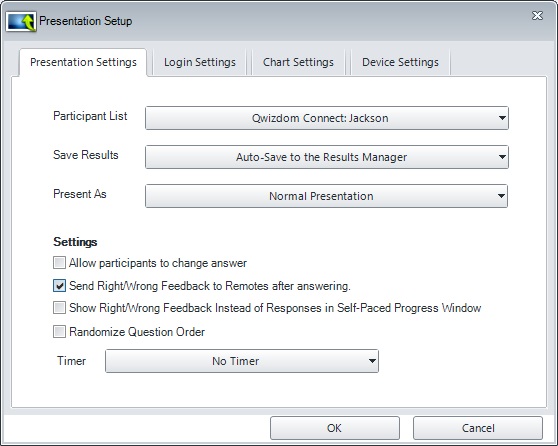
There are many options you can apply to your presentation. Not all options will be applicable.
Presentation Settings tab:
Login tab:
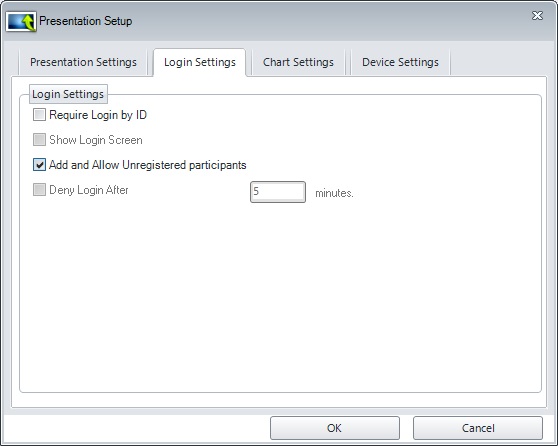
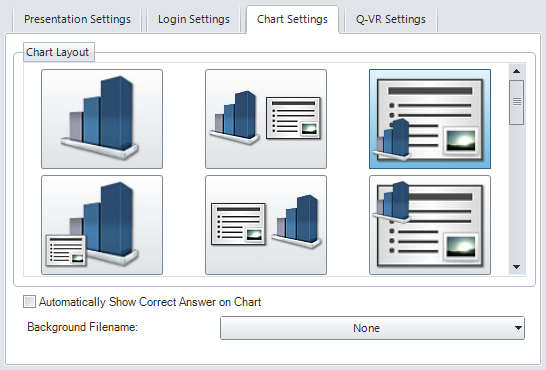
Chart tab:
Device Settings tab:
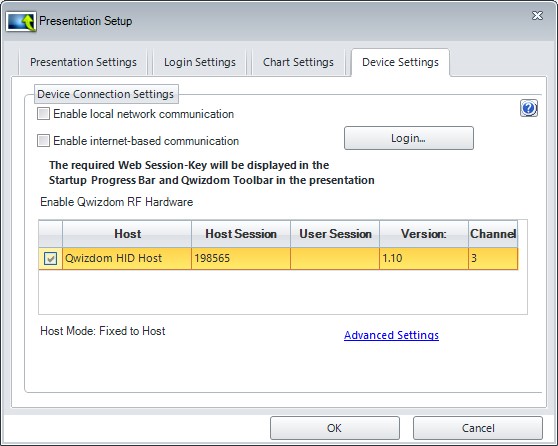
These settings determine how participants may join and interact during a session using a personal device. Participants may collaborate, annotate, take notes, answer questions, request help, and more, depending on the device, application, and license.
Consumer Devices refers to any Wi-Fi enabled device that participants may use to join a session, including laptop, tablet, computer, or smart-phone. An additional license (by presenter or participant) may be required in order to join a session.
Qwizdom Hardware refers to dedicated RF handsets manufactured by Qwizdom. These devices are simple, low cost, and reliable and may be used for polling, instant assessment, and basic interaction by participants.
Advance Settings Link:
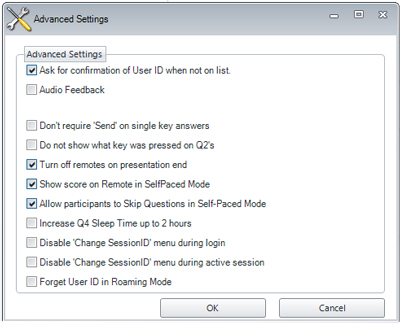
0 people found this helpful
0 people did not find this helpful
Qwizdom Toolbar
There are many ways to customize your Qwizdom presentations. Right-click on the Qwizdom Toolbar to view options menu.


Presentation Tools
Use ![]() Re-Pose,
Re-Pose, ![]() Response Graph,
Response Graph,![]() Pick, and
Pick, and ![]() Game icons when presenting activities using a desktop or laptop.
Game icons when presenting activities using a desktop or laptop.
Display Session ID During a Presentation
1. Right-click the Qwizdom Toolbar and select the Login tab. The Session ID will appear at the top of the window.
Automatically Show Correct Answer on Response Chart
Displays a fraction and percentage of correct answers. For example: Correct Answer(s)10/12 83%. To activate this feature during a session, right-click the Qwizdom Toolbar and select Settings. Under the Display tab, select Automatically Show Correct Answer on Chart and then click OK.
Right/Wrong Feedback
This feature allows participants to see if their response is right or wrong. Feedback appears on the LCD screen of the participant’s remote during presentation. A check mark will indicate a correct response, an X will indicate an incorrect response. If the feedback is disabled, a check mark and X appears on the LCD screen indicating that a response was received.
You can turn this feature on and off during a presentation by
0 people found this helpful
0 people did not find this helpful
Logging in with IDs allows participants to use any remote. The participant is identified by a unique ID number that is set in participant lists.
Login Timer
You can deny login after a certain amount of time by setting the time under the Login tab.
Troubleshooting
If the Q4RF remote displays Denied, or the Q5RF remote displays Access Denied, or the QVOTE or Q6RF displays Session ID Login Denied, or the Q2RF remote displays –U, then the Participant ID may have been entered incorrectly.
0 people found this helpful
0 people did not find this helpful
Q6iRF Instructor Remote Tips
Q5RF Instructor Remote Tips
* Features only work in Actionpoint Software.
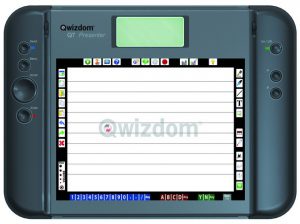
Q7 Presenter Tips
Participant Remote Tips
Change Session ID
Troubleshooting Tips
The Q4 LCD screen on the participant remotes may read Push Key, Inactive, Not Active, press the Send (double arrows) key to “wake up” the remote. If the remote still displays Not Active, re-enter the Session ID. Go to Changing Session IDs for more information.
The QVOTE and Q6 LCD screen on the participant remotes may display Power Save Mode. This indicates that the remote is idle. Click RESUME, to reactivate.
If the Q4RF displays No Net, or the Q5RF remote displays Host not found, or the QVOTE or Q6RF displays Session ID Not Found, or the Q2RF remote displays – – – and turns off, re-enter the Session ID. Go to Changing Session IDs for more information.
If the Q4RF remote displays Denied, or the Q5RF remote displays Access Denied, or the QVOTE or Q6RF displays Session ID Login Denied, or the Q2RF remote displays –U, the Participant ID is incorrect, or the Remote ID attempting to participate isn’t in the participant list that was loaded. Re-enter the Participant ID, and check to make sure that Remote ID is in the participant list.
How to respond for each question type during a presentation using Q2RF participant remotes:
How to respond for each question type during a presentation using Q4RF and Q5RF participant remotes:
How to respond for each question type during a presentation using QVOTE and Q6RF participant remotes:
Q6RF Only:
0 people found this helpful
0 people did not find this helpful
You will need to purchase a QVR Presenter license to use this feature. Email info@qwizdom.com for pricing details.
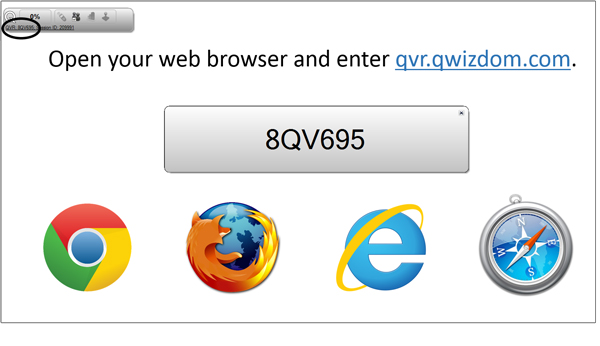
To begin a QVR presentation follow the steps below:


0 people found this helpful
0 people did not find this helpful
Qwizdom software includes 5 Qwizdom Notes+ licenses that allow for classroom collaboration. (Additional licenses are available for a fee–email info@qwidom.com for pricing.)
Participants can view live lessons, respond, share annotations, take notes, and save presentations for review, using any tablet or laptop on the same local network as the presenter.
Start Presentation
Participants Join Presentation

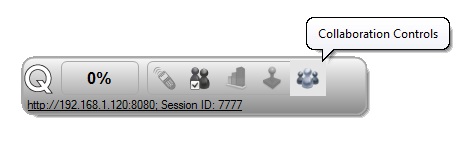
Alternatively, if participants do not have the Qwizdom Notes+ App, but have internet-enabled computers, they can type the local IP address of the presenter’s computer into a web browser, on port 8080. For example 192.168.1.120:8080. (In this case, the port number ‘8080’ is needed in order to join the session.)
(Note: browser version does not contain the same feature set as the app, such as saving and adding notes.)
Enable Collaboration

Participants Save Presentation
Once the presenter has stopped the presentation, the slides will appear on the right-hand side of the participant’s screen. At this point, the presentation–including all annotations and added objects–can be saved on the participant’s device for future review.
Please note: this feature is only available with the Qwizdom Notes+ App. It is not an option if connected to the session via web browser.
0 people found this helpful
0 people did not find this helpful
During presentation, you can display a response graph to see the results of the question. There are two response graphs you can display: the public response graph and the private graph.
Private Response Graph using the Q6iRF Instructor Remote
Public Response Graph using the Q6iRF Instructor Remote
Public Response Graph using the Q7RF Tablet
Private Response Graph using the Q7RF Tablet
Public Response Graph using the Q5RF Instructor Remote
Private Response Graph using the Q5RF Instructor Remote
0 people found this helpful
0 people did not find this helpful
* Features only work in Qwizdom Connect Software.
Monster Truck Race
Monster Truck is a race car game in which points are rewarded based on the response time of each remote.
Space Voyager
Space Voyager is a space ship game in which points are rewarded based on the response time of each remote.
0 people found this helpful
0 people did not find this helpful
All results are saved as a .QRX file but can be converted into a .CSV file.
Manual Save
Auto-save
Auto-Save to Results Manager
The results will save in the Results tab when the presentation is complete.
Save Results as a PDF or CSV.
You can save most reports out as a pdf or csv file.
0 people found this helpful
0 people did not find this helpful
You can generate reports* using existing saved results.
*Registered version of Microsoft Excel® is required to generate reports.
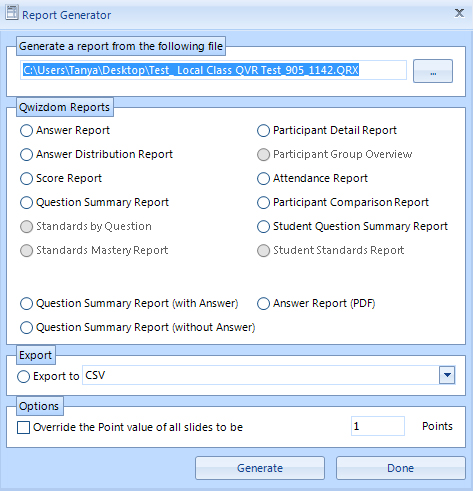
Report Features
Export:
Options:
0 people found this helpful
0 people did not find this helpful
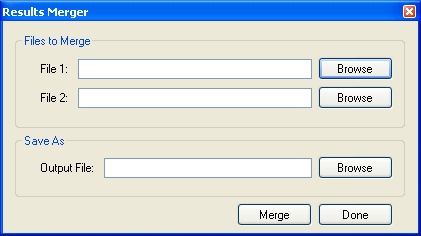
Two separate result files generated from the same activity and participant list can be merged to create one results file.
0 people found this helpful
0 people did not find this helpful
Qwizdom Tools are located in the lower right-hand corner of the Windows Taskbar (next to the clock). Qwizdom Tools is a tray application, set to launch automatically on system startup. Qwizdom tools can be used to launch Qwizdom programs or set features on the Tablet.
Customizing the Qwizdom Tools
1. Click ![]() Qwizdom Tools.
Qwizdom Tools.
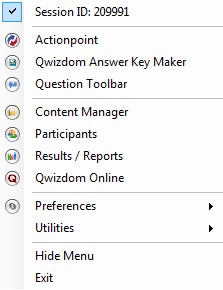
2. Select Preferences.
![]()
3. The Preferences window appears.
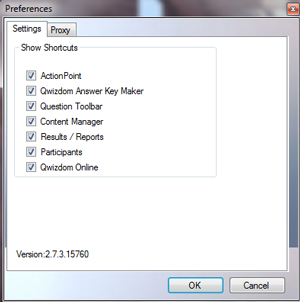
4. Select shortcuts you want displayed in the list and deselect shortcuts that you want to remove from the list.
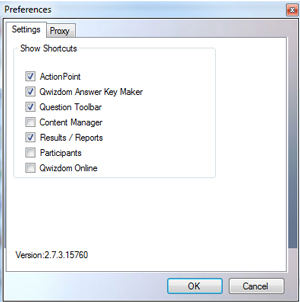
5. Click OK when finished.
6. Changes take effect immediately.
0 people found this helpful
0 people did not find this helpful
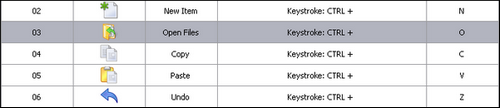
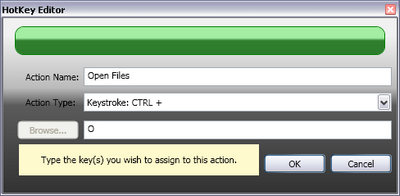
Hot-Key Editor allows you to program actions for a specific software application. The Hot-Key Editor controls the default commands for the soft-keys on the Tablet, allowing users to customize some of the default commands and set up alternate commands.
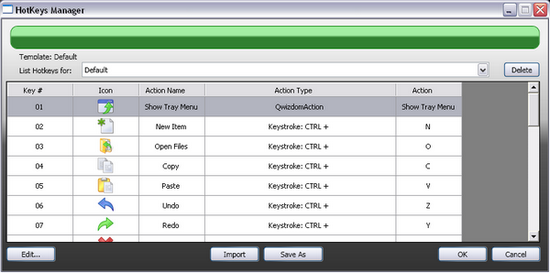

List of Actions
These are the actions that can be set for the Hot Key Editor.
Editing a Key
Soft-keys can be customized to perform specific commands.
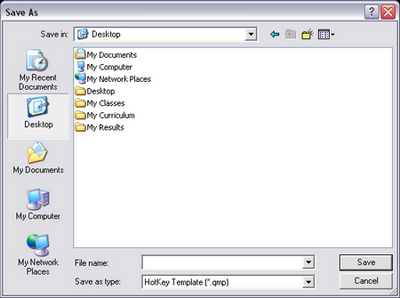
Exporting (Saving) a Hot-Key Configuration File
You can transfer the Hot-Key configuration file to another computer to save time from reconfiguring the open soft-keys on the Tablet.
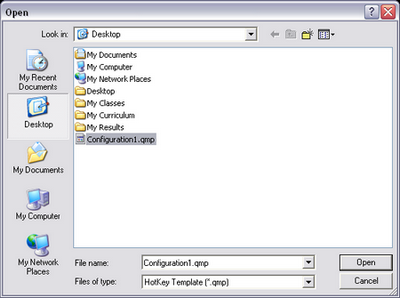
Importing a Hot-Key Configuration File
0 people found this helpful
0 people did not find this helpful
Installing the USB Drivers on Windows 7 for the RF Red Host
You will need to do this procedure twice (because there are two drivers).
Installing the USB Drivers on Vista for the RF Red Host
You will need to do this procedure twice (because there are two drivers). You can download the drivers here. Be sure to extract the files before proceeding.
Installing the USB Drivers on Windows XP for the RF Red Host
You will need to do this procedure twice (because there are two drivers). You can download the drivers here. Be sure to extract the files before proceeding.
0 people found this helpful
0 people did not find this helpful
I just installed Actionpoint but the toolbar is not appearing.
In the Windows version of Actionpoint, opening the program should cause PowerPoint® to open, with an Actionpoint tab added into the PowerPoint® toolbar. If your PowerPoint toolbar does not appear when opening Actionpoint, check to make sure that all Windows and Office updates have been installed on your computer. Install all available Microsoft updates, restart the computer if required then reopen Actionpoint. The toolbar should appear. If you still encounter problems, please email us at support@qwizdom.com.
The toolbar was present, but now disappeared. How do I get it back?
Actionpoint may have closed due to an error and disabled 3rd party add-ins.
Office 2003:
Please contact support@qwizdom.com for help with this version of Office.
Office 2007:
Office 2010 and Office 2013
0 people found this helpful
0 people did not find this helpful
0 people found this helpful
0 people did not find this helpful
Uninstalling Qwizdom Actionpoint
Uninstalling USB Drivers (RF Host)
If the host is still not initializing after following the steps above, then the hardware needs to be completely removed and reinstalled. Follow the steps below.
0 people found this helpful
0 people did not find this helpful