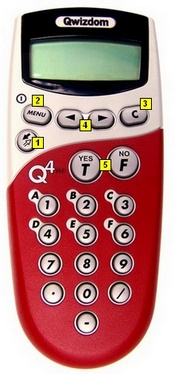
Q4RF Participant Clicker

new Q4 remote

  1. Send send key – press to submit answer or select menu options.
  2. Menu [power] – hold the Menu key for two seconds to turn the remote on or off. Turn off remotes if they are not in use. Remotes automatically turn off at the end of a presentation. Press the Menu key and use the scroll keys to view options. Press Send to select an option such as Search, Sess. ID, User ID, and Exit. When presenting, the menu items are Help, Login, User Id, and Exit. To request help during presentation, press the Menu key, scroll to select Help, and press the Send key to select it.
  3. Scroll scroll keys– scroll through menu options, answer choices, or questions.
  4. Clear [C] – press to delete response or change answers if instructor has enabled the feature.
  5. True/Yes and False/No – use to answer True/False and Yes/No questions


Q4 Common Screen Displays

  • Qwizdom: Remote has found the host and is ready for a question slide.
  • Activity ID: Displays when the remote is requesting an Answer Key activity number. Prompt only appears when Multiple Answer Keys are being presented. See Answer Key for details.
  • Sess. ID: Your remote may ask you to enter the Session ID. See Remote Setup for details.
  • User ID: The remote is asking for a Participant ID. See Remote Login for details.
  • Loading: An Answer Key is loading; may take a few moments.
  • Push Key: Remote is idle. Press any key, (except MENU) to reactivate.
  • Inactive: Remote senses the host is not in use or does not recognize the session. If remote remains inactive after starting a presentation, re-enter Session ID by pressing MENU, scrolling right to “Sess.ID,” and pressing SEND. When prompted, re-enter the Session ID and press SEND.
  • No Net: Remote cannot find the host. Re-enter the Session ID.
  • Denied: User denied due to incorrect User ID or a duplicate User ID. Re-enter User ID. Press MENU, scroll to “User ID,” press SEND, enter the User ID, and press SEND again.


Supports the Following Question Types:
Multiple Choice
True/False
Yes/No
Single and Multi-Digit Numeric
Rating Scale
Negative Number
Fractions
Decimal
Multiple Mark
Vote Multiple Mark
Sequence
Demographic

This device complies with part 15 of the FCC Rules. Operation is subject to the following two conditions: (1) This device may not cause harmful interference, and (2) this device must accept any interference received, including interference that may cause undesired operation.

0 people did not find this helpful

Back To Top

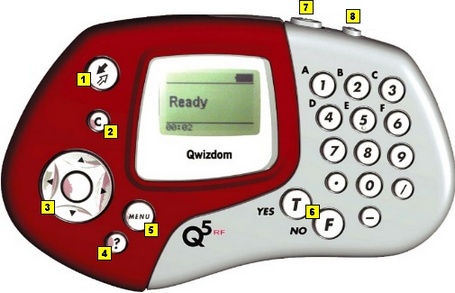
Q5RF Participant Clicker

q5 front rev 2

  1. Send send key – press to submit answer.
  2. Clear [C] – press to delete response or change an answer in a presentation (if option to change responses is allowed).
  3. Thumb pad – press to navigate between letters when keying in answer, press the circle key in the middle to select a letter or to select menu options or to scroll through question numbers during answer keys (paper-based tests).
  4. Question [?] – signals help to instructor during presentation.
  5. Menu – displays menu options Search Again, Enter Session ID, and Exit. Use the thumb pad to scroll through the menu options and the Send key or circle key to select an option.
  6. True/Yes and False/No – use to answer True/False and Yes/No questions.
  7. Power switch – turns remote on/off. The remotes do not automatically turn off. Turn off remotes if they are not in use.
  8. Backlight switch – turns Backlight on/off.

Q5RF Common Screen Displays

  • Qwizdom: Displays when slides are non-question types, such as lessons or information.
  • Activity ID: Displays when the remote is requesting an Answer Key activity number. Prompt only appears when multiple test versions are being presented. Activity numbers should be noted on the test sheets before presenting; numbers cannot be viewed while in presentation mode.
  • Loading: An answer key is loading; may take a few moments.
  • Push Key: Remote is idle. Press any key, (except MENU) to reactivate.
  • Inactive: Remote senses the host is not in use or does not recognize the session. If remote remains inactive after starting a presentation, re-enter Session ID by pressing MENU, scrolling right to “Sess.ID,” re-entering Session ID, and pressing SEND.
  • No Net: Remote cannot find the host. re-enter the Session ID. If “No Net” continues, enter User ID and Session ID.
  • Denied: User denied due to incorrect Session ID, User ID, or a duplicate User ID.
  • Ready: Displays on the instructor remote is ready to use.
  • Last Key: Will appear on the instructor’s remote showing the last key that was pressed.

Supports the Following Question Types:
Multiple Choice
Yes/No
True/False
Numeric
Sequence
Multiple Mark
Vote Multiple Mark
Rating Scale
Text Input

This device complies with part 15 of the FCC Rules. Operation is subject to the following two conditions: (1) This device may not cause harmful interference, and (2) this device must accept any interference received, including interference that may cause undesired operation.
0 people did not find this helpful

Back To Top

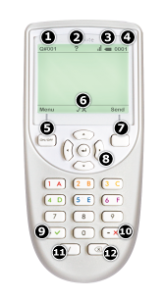
QVOTE Participant Clicker

  1. Q# – displays the current question number.
  2. Help Request  -indicates your requested help.
  3. Battery Power – displays battery charge.
  4. ID# – displays the remote ID number.
  5. Menu/Power – press and hold on to power remote on/off. Press to view menu options: Help, Search, Sess. ID, User ID, Adjust Contrast, and Exit.
  6. Right/Wrong Feedback – displays check mark for correct answer, X for incorrect answer, and both check mark/X for response received.
  7. Send / Change / Join – press to send or change an answer. Also press to join or search for a session.
  8. Directional Arrows and Select – press to navigate between menu options, answer choices, and questions. Press the MenuSelectKey to make a selection.
  9. True / Yes / Decimal – press to select True, Yes, or enter a decimal depending on question.
  10. False/No/Negative – press to select False, No, or enter a negative number depending on question.
  11. Fraction – use to enter a fraction answer.
  12. Delete – press to delete the last character.


QVOTE Common Screen Displays

  • Searching for Session ID: Remote is searching for the host.
  • Ready: Remote has found the host and is ready for a question slide.
  • Power Save Mode: Remote is idle. Click RESUME, to reactivate.
  • Help: First available Menu option. With Help selected, press the menu select key MenuSelectKey to privately ask for help or scroll to “EXIT” and press MenuSelectKey.
  • Session ID Not Found: Remote cannot find the host. Re-enter the “Session ID.” Press MENU, scroll to “Enter Session ID,” click MenuSelectKey, enter the Session ID, and press SEARCH AGAIN.
  • Session ID Login Denied: User denied due to incorrect User ID, or a duplicate ID. Re-enter User ID. Press MENU, scroll to “Enter User ID,” click MenuSelectKey, re-enter the User ID, and press JOIN.
  • Enter User ID: The remote is asking for a Participant ID. See Remote Login for details.
  • Loading: Loading an Answer Key; may take a few moments.
  • Enter Activity ID: Requesting an Answer Key activity number. Prompt only appears when Multiple Answer Keys are being presented. See Answer Key for details.


Supports the Following Question Types:
Multiple Choice
Yes/No
True/False
Numeric
Fractions
Decimals
Negative
Sequence
Multiple Mark
Vote Multiple Mark
Rating Scale

This device complies with part 15 of the FCC Rules. Operation is subject to the following two conditions: (1) This device may not cause harmful interference, and (2) this device must accept any interference received, including interference that may cause undesired operation.
0 people did not find this helpful

Back To Top

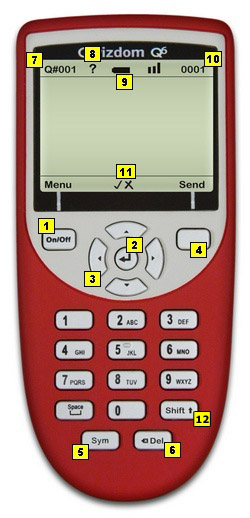
Q6RF Participant Clicker

Q6-Complete4weba

  1. Menu/Power – press and hold on to power remote on/off. Press to view menu options: Help, Search, Sess. ID, User ID, Adjust Contrast, and Exit.
  2. Enter – press to submit commands from LCD menu choices.
  3. Directional Arrows – press to navigate between menu options, answer choices, and questions.
  4. Multi-function – serves as multi-function for Send/Change.
  5. Symbols – select to enter fraction, punctuation, etc.
  6. Delete – press to delete the last character.
  7. Q# – displays the current question number.
  8. Help Request  -indicates your requested help.
  9. Battery Power – displays battery charge.
  10. ID# – displays the remote ID number.
  11. Right/Wrong Feedback – displays check mark for correct answer, X for incorrect answer, and both check mark/X for response received.
  12. Shift – changes case options: ABC/Abc/abc/123/Superscript/Subscript.


Q6 Common Screen Displays

  • Searching for Session ID: Remote is searching for the host.
  • Ready: Remote has found the host and is ready for a question slide.
  • Power Save Mode: Remote is idle. Click RESUME, to reactivate.
  • Help: First available Menu option. With Help selected, press the menu select key MenuSelectKey to privately ask for help or scroll to “EXIT” and press MenuSelectKey.
  • Session ID Not Found: Remote cannot find the host. Re-enter the “Session ID.” Press MENU, scroll to “Enter Session ID,” click MenuSelectKey, enter the Session ID, and press SEARCH AGAIN.
  • Session ID Login Denied: User denied due to incorrect User ID, or a duplicate ID. Re-enter User ID. Press MENU, scroll to “Enter User ID,” click MenuSelectKey, re-enter the User ID, and press JOIN.
  • Enter User ID: The remote is asking for a Participant ID. See Remote Login for details.
  • Loading: Loading an Answer Key; may take a few moments.
  • Enter Activity ID: Requesting an Answer Key activity number. Prompt only appears when Multiple Answer Keys are being presented. See Answer Key for details.

Please Note: To send question text to Q6RF remotes click on the edit2Advanced Options button and check Send Question Text to Remotes. See Creating Slides for details.


Supports the Following Question Types:
Multiple Choice
Yes/No
True/False
Numeric
Sequence
Multiple Mark
Vote Multiple Mark
Rating Scale
Text Input
Text Response
Text Edit
Equation

This device complies with part 15 of the FCC Rules. Operation is subject to the following two conditions: (1) This device may not cause harmful interference, and (2) this device must accept any interference received, including interference that may cause undesired operation.
0 people did not find this helpful

Back To Top

Instructor Remotes

Q6iRF Instructor Remote

Q6i01-sm-UserGuide

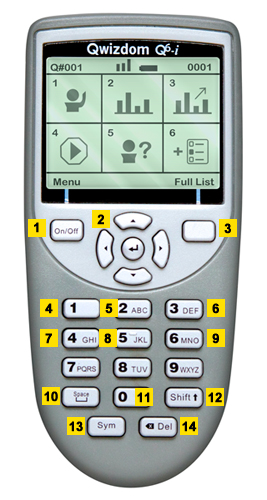
  1. On/Off: Press and hold to turn remote on/off. Press to view men options: Enter Sess. ID, Enter User ID, and Backlight.
  2. Directional Arrows: Press to navigate between slides and press to select LCD menu choices.
  3. Full List: View all available actions.
  4. Pick: Randomly call on a participant.
  5.  Private LCD Graph: Display a response graph on the Instructor Remote’s LCD.
  6. Public Screen Graph: Display the response graph for everyone to view.
  7.  Re-pose Question: Re-pose the current question slide.
  8. Help Menu: Displays a list of participants who have requested help.
  9. New Q: Pose a spontaneous question.
  10. Space: Add a space when typing a question.
  11. Pick (Special): Select a participant at random from a specific group. Groups include answered correctly, not answered on, etc.
  12. Shift: Changes case options: ABC/ Abc/abc/123/Superscript/Subscript
  13. Symbols: Press to enter fraction, punctuation, etc.
  14. Delete: Press to delete the last character.


Please note: When using Q6 participant clickers, in order to send question text to Q6RF remotes click on the edit2 Advanced Options button and check Send Question Text to Remotes. See Creating Slides for details.


Q5RF Instructor Remote

q5 teacher rev

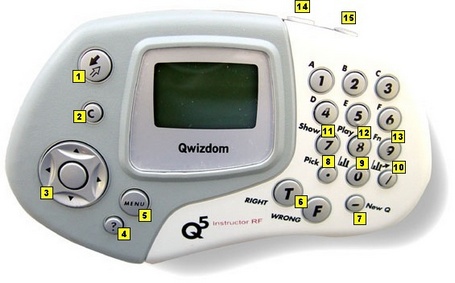
  1. Send send key – press to submit command.
  2. C [Clear] – press to clear names from the Help Request list.
  3. 3. Thumb pad – press right/left to navigate between slide sets, up/down for menu options, and “on-the-fly” question choices. Press the circle key (in the middle) to select an option, play Microsoft PowerPoint® animations, advance slides, exit the presentation, and show/hide correct responses on the response graph.
  4. ? [Help List] – displays list of participants who requested help on the LCD screen.
  5. Menu – view menu options such as entering Session ID and search again for host.
  6. True/Right and False/Wrong keys – not applicable using Qwizdom Actionpoint.
  7. New Q [-] – press to pose an “on-the-fly” question.
  8. Pick [.] – press to display/hide a random participant’s name on the computer screen.
  9. Private Graph graph 1 [0] – displays the results of participant responses as a graph on the LCD screen of the instructor’s remote.
  10. Public Graph graph 2[/] – displays the results of participant responses as a graph on the computer (projector, television screen, etc.) screen for everyone to view. Use the right/left controls on the thumb pad to scroll through the different graphs. Use the circle key (in middle of thumb pad) to show/hide correct responses.
  11. Show [7] – to show current scores and start game animations during game mode.
  12. Play [8] – not applicable.
  13. Fn (Function) – allows you to re-pose a question if you go back during to a previous slide during presentation. Note: previous answers will be overwritten.
  14. Power switch – turns remote on/off.
  15. Backlight – turns Backlight on/off. The “Enable Backlight” box in the Configuration Settings window needs to be checked to turn on the Backlight feature.

This device complies with part 15 of the FCC Rules. Operation is subject to the following two conditions: (1) This device may not cause harmful interference, and (2) this device must accept any interference received, including interference that may cause undesired operation.
0 people did not find this helpful

Back To Top

Q7RF Tablet

Tools Overview

TabletSM

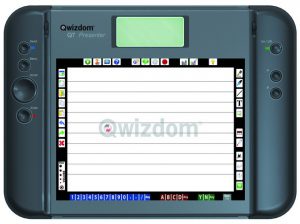
pick2_24 Pick – picks random participants

HelpNew24  Help Requests – privately displays list of participants who requested help

Question Type24 Insert Slide – makes a copy of the current slide and lets you pose a spontaneous question to participant remotes

NewPoseQuestion24 Pose – re-poses current question slide

NewStopwatch24 Timer – adds additional time to timer

StopQuestion24 Stop – stops the question being posed

PrivateResults24Private Graph – displays private graph of responses on tablet (See Response Graph for details.)

DisplayResults24 Public Graph – displays response graph to participants (see Response Graph for details)

Backlight24 LCD Backlight – turns backlight on or off

PenTool24 Pen &Laser Pointer24Laser Pointer – can be used for annotation


Quick Pose Controls:  Click an answer to spontaneously pose a numeric, multiple choice, yes/no, or rating scale question.

NumericT For Numeric question types

MultipleChoiceT For Multiple Choice question types

RateT For Rating question types

YesNoT For Yes/No or True/False question types

* Click Any to pose a survey question.

This device complies with part 15 of the FCC Rules. Operation is subject to the following two conditions: (1) This device may not cause harmful interference, and (2) this device must accept any interference received, including interference that may cause undesired operation.
 Using the Pen

The Pen is used (with the Tablet) to write, draw, and control mouse movements.

T-PenRev

  • Pen Tip – same as a mouse cursor.
  • Left – click button-same as double-clicking with left button on the mouse.
  • Right – click button-same as the right-click button on the mouse.

Pen Actions

  • Press, Tap, Push Down with Pen Tip – activates Tablet icons, similar to left-clicking with mouse.
  • Double tap with Pen Tip – is similar to double-clicking with mouse.
  • Left-click – activates Tablet icons, similar to double-clicking with mouse.
  • Right-click – similar to right-clicking with the mouse.

Sleep Mode
The Pen goes into sleep mode after a minute of inactivity. Touching the pen to the Q7RF Tablet surface or pressing the Left/Right buttons on the pen will reactivate it.


Speaker Notes

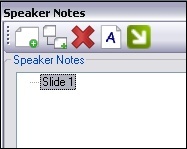
Speaker notes allow you to view notes on the Q7 Tablet while in presentation mode.

1. In Live Editor, select a slide.
2. Go to the View menu and select Speaker Notes.
3. The Speaker Notes window appears.
SpeakerNotes-Crop
4. Click Insert at Root CInsertRootB. Root appears for you to enter text.
5. Enter text.
CInsertRootText
6. Click Insert CRoot to insert a subroot.
7. Enter text.
CRootText
8. When finished, close the window to save the information.

0 people did not find this helpful

Back To Top

Creating Participant Lists

Creating a Participant List

  1. ClickGroups Participants Management and choose Participant Wizard.
  2. Select Create New Participant List.
  3. Enter a name for the class and click Next.
  4. In the Template Selection, select the template you would like to use (optional) and then click Next. Templates are commonly used fields to allow you to customize a participant list. Select the different fields you would like to use and click Next. If you do not see a field you would like in the participant list, you can create a customized field and add it to your template.
  5. Fill in the fields and click on Finish.
    Pick Chance: Adjust the number to increase a student’s chance of being called on when using the Pick participant feature. See Presentation Features for details.
    Ability Rating: Allows you to group students based on ability in the Group Management section. See Groups for details.
  6. The Save As window will open. Click Save and the participant list will save as a .QPL file.

Importing a .CSV (Comma Delimited) File
You can import a .CSV (comma delimited) file and convert it into a Qwizdom participant list (.QPL).
Please Note: If you have a class list in Microsoft Excel® you would like to import, save them as .CSV(comma delimited) file.

  1. Click Groups Participants Management and choose Participant Wizard.
  2. Select Import from a .CSV file.
  3. Click CBrowseEditCategories Browse, select the appropriate .CSV file and then click Next.
  4. Match the fields to the appropriate item by clicking in the Maps to: column and selecting the desired item from the drop-down list.
    – Click Add Field to create a custom item to the list.
    – Click First record is header, if your CSV file has column headers.
    – Click OK to complete.
  5. Click Finish and the Save As window will appear.
  6. Type in the class name and click on Save. The .CSV class will save as a .QPL file (Qwizdom Participant List).

Creating an Anonymous List
Before using an anonymous list, be sure you have the correct estimated number of remotes set within the Configuration Settings window. For example, if you create an anonymous list with a hundred participants but only have eighty as the estimated number of remotes, then not all remotes will register.

  1. Open a PowerPoint® presentation that has been properly formatted with the Qwizdom Actionpoint toolbar.
  2. Click the CPresent Start Presentation button. The Presentation Setup window will appear.
  3. Click the Participant List drop-down list and select Anonymous.
  4. Click OK to begin presentation.

Creating a Self-Forming List
This option lets participants add themselves to list during a live presentation. Participants are identified by an unique User ID number. We recommend using an assigned employee or student ID number for easier tracking.

  1. Open a PowerPoint® presentation that has been properly formatted with the Qwizdom Actionpoint toolbar.
  2. Click theCPresent Start Presentation button. The Presentation Setup window will appear.
  3. Click the Participant List drop-down list and select Self-Forming List.
  4. Select a location to save results and select desired presentation settings.
  5. Click OK to begin presentation.
  6. Users will be prompted to enter a User ID. They may be asked to enter it twice to confirm. Participants will be identified by their User ID numbers throughout the session.
  7. You can view students’ answers, post-session, by clicking on the Reports2014.jpgReport Generator icon on the toolbar, browsing to the results file, and selecting Answer Report.

Self-forming

Editing an Existing Participant List

  1. Click Groups Participants Management and choose Participant Wizard.
  2. Select Browse and Modify Existing List.
  3. Click CBrowseEditCategories Browse, select the appropriate participant list and then select Open.
  4. Add new fields or remove existing fields. If you do not want to change anything, skip to the next step.
  5. Make the necessary changes.
    Delete Students: Select the row by clicking in the cell to the far left, then go to Options and select Delete.
    Renumber Remotes: Use the Options menu and select Autonumber Remotes.
  6. Click Finish when done. The Save As window will appear.
  7.  Enter the name of the class and click Save.

0 people did not find this helpful

Back To Top

Groups

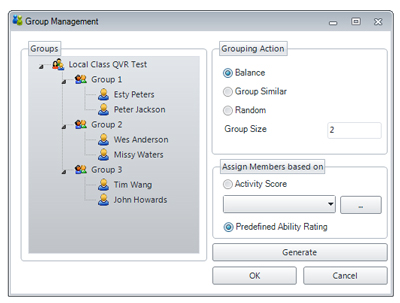
Automatically create groups.

  1. Click on Participant Management and select Group Management.
    GroupManagement
  2. Select the Grouping Action:
    Balance: Creates balanced ability groups from either the Predefined Ability Ratings (set in the participant list) or scores from a selected activity.
    Group Similar: Groups students with similar Ability Ratings (set in the participant list) or scores from a selected activity.
    Random: Groups students randomly, no ability rating settings are needed.
  3.  Set the size of group and click Generate.
  4. Review and modify as desired, by dragging students into different groups.
  5. Click OK when finish.

0 people did not find this helpful

Back To Top

Presentations


  1. Click the CPresent Present button. The Presentation Setup window appears. (See Presentation Setup for details.)
  2. Select a Participant List.
  3. Select how you would like to save the results.
  4. Select the options you would like available during presentation.
  5. Click OK to begin the presentation.
  6. Have the participants turn on their remotes.
  7. Participants enter their response.
  8. Here are a few things you can do during presentation:
    – Display the response chart
    – Display the private graph on instructor device
    – Randomly call upon a participant by pressing the Pick feature
  9. Go through the presentation until all the question slides are answered.
    See Using Remotes in Presentation for description and troubleshooting of all the remote LCD screen messages
  10. When you are unable to advance to the next slide, this means the presentation is
    done. Right-click the Q on the Presentation Toolbar and select End Session to end
    the presentation.

Using Multiple Hosts 

Up to 3 hosts (with 999 remotes on each) can be used for presentation to remotes. If you have selected to use fixed set, be sure you have assigned fixed numbers for the
remotes using all hosts.

  1. Click the CPresent Start Present button. The Presentation Setup window will appear.
  2. Click the Device Settings tab.
  3. Select the hosts you will be using by placing a check mark in each one of the
    boxes.
  4. You can create your own Session ID in the User Session column or use the default
    Session ID. Please Note: If you use the default Session ID in the Host Session column, the User
    Session column must be blank.
  5. Click OK to begin the presentation.
  6. When the presentation appears, turn on the remotes.
  7. If you assigned fixed numbers, the remotes will automatically log into the correct
    host, using the Session IDs used at that time.
  8. Either the answer choices or a blank screen will appear on the remote, depending
    on the question type. (See Using Remotes in Presentation for description and troubleshooting of
    all the remote LCD screen messages.)

0 people did not find this helpful

Back To Top

Presentation Setup

There are many options you can apply to your presentation. Not all options will be applicable.

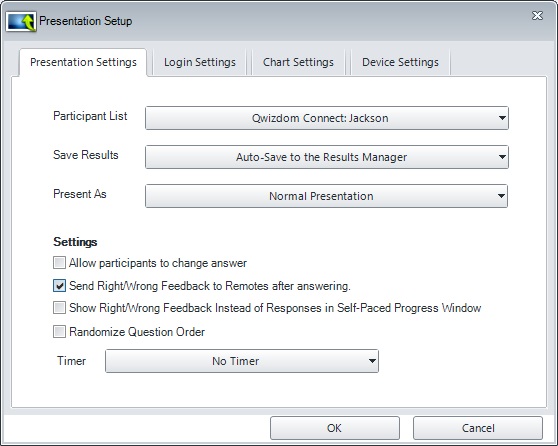
Presentation Settings tab:

PresSetup

  1. Select the desired participant list.
    Browse to Participant List (.QPL file): Identifies students by name as defined in Qwizdom class list (.qpl).
    Anonymous: Identifies users by a randomly assigned Participant ID number, allowing responses to be anonymous.
    Self Forming (Requires User ID Login): Identifies user by an assigned Participant ID number, for instance an employee or student number. Participant remotes will prompt users to enter a User ID, often twice to confirm. Reports will tally results based on the Participant ID numbers.
    Qwizdom Connect: All classes listed in the Participant tab will be found in the Qwizdom Connect menu.
    Blackboard Participant List: See Quick Start Guide for details.
  2. Select where you would like to save your results file.
  3. Select how you wish to present the activity.
    Normal Presentation: Present activity with interactive questions.
    Self-Paced: Participants work through an Answer Key activity at their own pace. See Answer Key for details.
    Autopilot: Automatically cycles through presentation, adding a 15 second timer to each slide.
  4. Select Send Right/Wrong Feedback to Remotes after answering to notify participants if they answered correctly (indicated by a check mark) or incorrectly (indicated by an X). Remotes will receive both a check mark and X if feedback is turned off, to indicate that the response has been received.
  5. Select Allow participants to change answer if you would like participants to change their answer during a presentation.
  6. Select no timer, use the time set within the slides, or global timer by entering the number of seconds for all slides in the presentation.

Login tab:

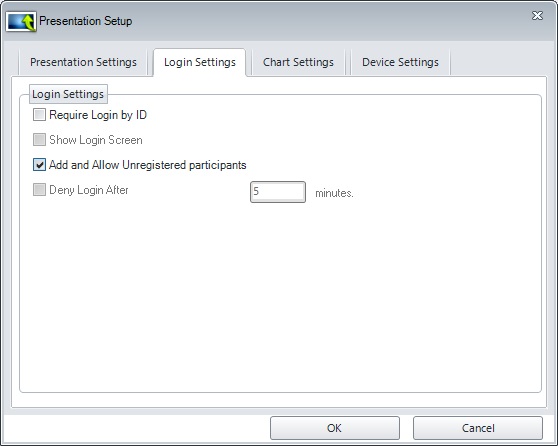
LoginSettings

  1. Check the Require Login by ID box if you would like students to login using their Participant ID. Perfect for classrooms were students don’t have assigned remotes.
  2. Check Show Login Screen to monitor participants logging in. Tip: When using QVR, be sure to write down QVR Session number on the board, as it is not displayed in the login screen.
  3. Check the Add & Allow Unregistered participants box to allow participants that are not on selected participants list to join the session. This option must be checked when using an Anonymous list.
  4. The Deny Login After … feature restricts participants from logging in after a set amount of time.

Chart tab:

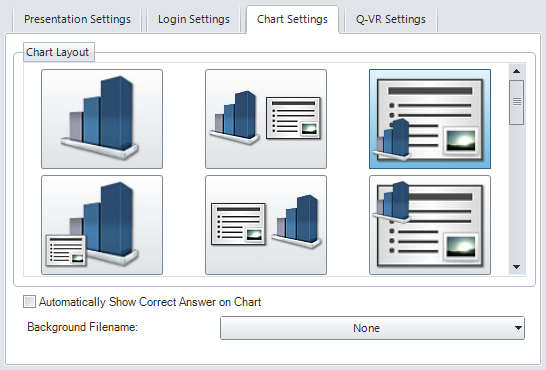
Presentation-Setup3

  1. Select the desired Results Graph layout that will be displayed during a presentation.
  2. Check the Automatically Show Correct Answer on Chart option to display the percentage and number of correct answers. Click correct-answers-icon Correct Answers icon to toggle feature on and off during a presentation.

Device Settings tab:

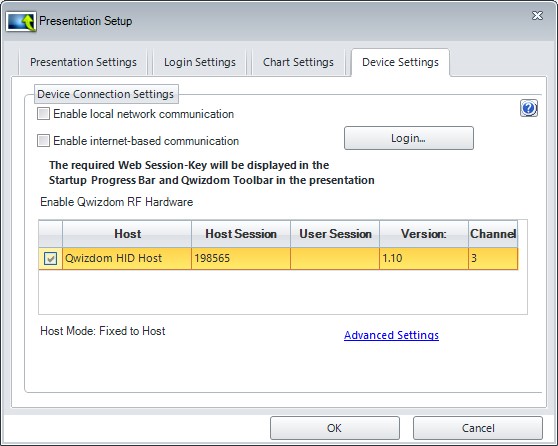
DeviceSettings

These settings determine how participants may join and interact during a session using a personal device. Participants may collaborate, annotate, take notes, answer questions, request help, and more, depending on the device, application, and license.

Consumer Devices refers to any Wi-Fi enabled device that participants may use to join a session, including laptop, tablet, computer, or smart-phone. An additional license (by presenter or participant) may be required in order to join a session.

  • Local Communication: allows users to connect to the session by IP address. All users must be on the same network as the presenter, but no internet access is required. (See Presenting with Collaboration)
  • Web-based Communication: allows users to connect to the session by a session key. Users can join from anywhere in the world, but internet access is required for the presenter and all participants. (See Presenting with QVR)

Qwizdom Hardware refers to dedicated RF handsets manufactured by Qwizdom. These devices are simple, low cost, and reliable and may be used for polling, instant assessment, and basic interaction by participants.

  • Host Session: use the default Host Session ID, or type in a custom Session ID in the User Session field.
    (Custom Session ID numbers are a quick fix if you receive a replacement host and haven’t had time to reprogram your participant remotes.

Advance Settings Link:

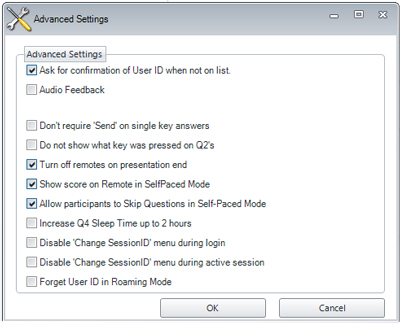
AdvancedPresentationSettings

  • Ask for confirmation of User ID when not on list – the remote will prompt the participant for the user ID again, if the participant is not in the participant list that was loaded.
  • Audio Feedback – notifies users with a tonal indicator that a tool is active when using the Q7 Tablet during a presentation.
  • Don’t require “Send” on single key answers – the remote will automatically send the answer once it has been entered.
  • Do not show what key was pressed on Q2’s – does not show on the display which key was pressed.
  • Turn off remotes on presentation end – automatically turns off the remotes when a presentation ends.
  • Show score on Remote in Self-Paced Mode – enables final score to display on screen after completing an answer key.
  • Increase Q4 Sleep Time to up to 2 hours – prevents the Q4s going to power saving mode for up to 2 hours.
  • Disable “Change Session ID” menu during login – hides the Session ID option from the menu.
  • Disable “Change Session ID” menu during active Session – hides the Session ID option from the menu during presentation.
  • Forget User ID in Roaming Mode – requires participants to login by Session ID and User ID each time a new session is started when remotes are set to Roaming. See Remote Setup for details.

0 people did not find this helpful

Back To Top