Question options are made available, based on the Remote Type selected in the Remote Configuration window. See Remote Setup for details.
Information – Non-question slide
- Click the
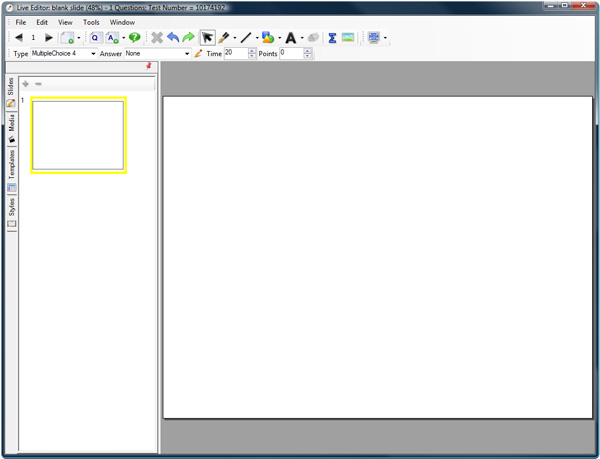
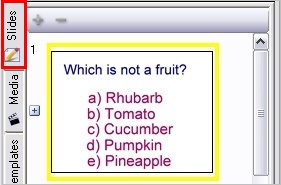
 New Question button. A blank slide appears on the right and the thumbnail preview of the slide appears in the Slides tab on the left.
- Click the Type drop-down list and select None.
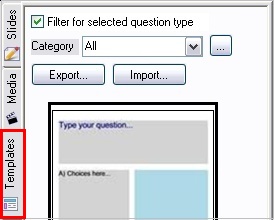
- (Optional) Click on the Templates tab. Select a template; drag and drop the template onto the slide. See Styles and Templates for more details.
- Enter text onto the slide.
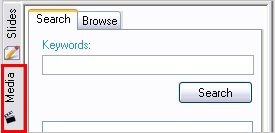
- (Optional) Add multimedia such as images, movies, and sound. Click on the Media tab, type in a keyword/s, and click Search. Drag and drop multimedia items onto slide.
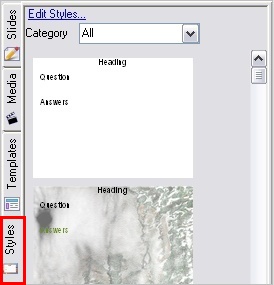
- (Optional) Add custom style to slide. Click the Styles tab, browse styles by category, and select a style. Drag and drop style onto slide. See Styles and Templates for more details.
- When the slide is complete, either go to File menu and select Exit to save and close activity; or click the New Question button to create a new slide set.
Multiple Choice (All Remotes & QVR App) – up to six choices.
- Click the New Question button. A blank slide appears on the right and the thumbnail preview of the slide appears in the Slides tab on the left.
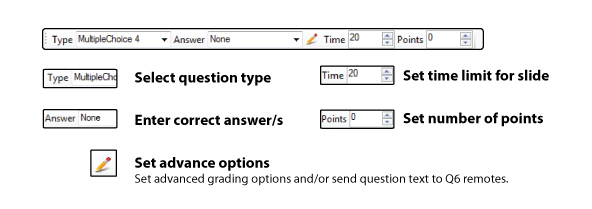
- Click the Type drop-down list and select Multiple Choice.
- Select the correct answer in the Answer field.
- (Optional) Set the time limit and number of points.
- (Optional) Click on the Templates tab. Select a template; drag and drop the template onto the slide. See Styles and Templates for more details.
- Enter text onto the slide.
- (Optional) Add multimedia such as images, movies, and sound. Click on the Media tab, type in a keyword/s, and click Search. Drag and drop multimedia items onto slide.
- (Optional) Add custom style to slide. Click the Styles tab, browse styles by category, and select a style. Drag and drop style onto slide. See Styles and Templates for more details.
- (Optional) Click the
 Advanced Options button to view advanced grading options and/or to send question text to Q6RF remotes.
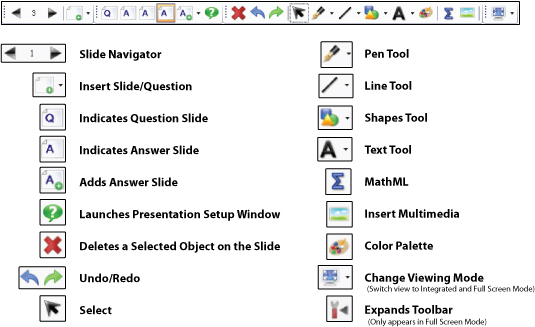
- (Optional) Create an answer slide. Click the Slides tab, press the black arrow on the
 Add Slide button and select Copy Current Slide. If you wish to create a blank answer slide, click on the
  Add Slide button.
- When the slide is complete, either go to File menu and select Exit to save and close activity; or click the New Question button to create a new slide set.
Yes/No & True/False Slides (All Remotes & QVR App)
- Click the New Question button. A blank slide appears on the right and the thumbnail preview of the slide appears in the Slides tab on the left.
- Select the type of slide you want to create.
- Select the correct answer in the Answer field.
- (Optional) Set the time limit and number of points.
- (Optional) Click on the Templates tab. Select a template; drag and drop the template onto the slide. See Styles and Templates for more details.
- Enter text onto the slide.
- (Optional) Add multimedia such as images, movies, and sound. Click on the Media tab, type in a keyword/s, and click search. Drag and drop multimedia items onto slide.
- (Optional) Add custom style to slide. Click the Styles tab, browse styles by category, and select a style. Drag and drop style onto slide. See Styles and Templates for more details.
- Click the Advanced Options button to send question text to Q6 participant remotes.
- (Optional) Create an answer slide. Click the Slides tab, press the black arrow on the Add Slide button and select Copy Current Slide. If you wish to create a blank answer slide, click on the Add Slide button.
- When the slide is complete, either go to File menu and select Exit to save and close activity; or click the New Question button to create a new slide set.
Numeric (All Remotes & QVR App) – Numeric question slide. Single digit numeric answer allowed for Q2RF; eight digit numeric answer allowed for Q4RF; ten digit numeric answer allowed for Q5RF; 14 digit numeric answer allowed for Q6RF.
- Click the New Question button. A blank slide appears on the right and the thumbnail preview of the slide appears in the Slides tab on the left.
- Click the Type drop-down list and select Numeric.
- Type numeric answer in Answer field.
- (Optional) Set the time limit.
- (Optional) Click on the Templates tab. Select a template; drag and drop the template onto the slide. See Styles and Templates for more details.
- Enter text onto the slide.
- (Optional) Add multimedia such as images, movies, and sound. Click on the Media tab, type in a keyword/s, and click Search. Drag and drop multimedia items onto slide.
- (Optional) Add custom style to slide. Click the Styles tab, browse and select a style. Drag and drop style onto slide. See Styles and Templates for more details.
- (Optional) Set partial grading options.If you do not want to use this option, skip to step 14. Click the Advance Options button. This brings up the Question Properties window.
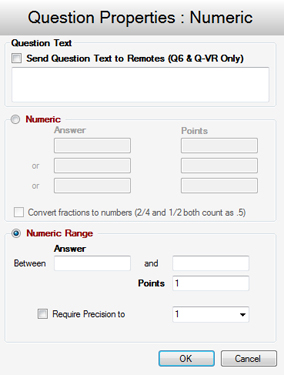
- Check Send Question Text to Remotes to send text to Q6RF remotes.
- Select Numeric to add in standard numeric answer/s. (Optional) Enter in multiple answers and point values to give students partial credit. (Optional)
Check the Convert fractions to numbers box to allow both fraction and decimal answers to be counted as correct. If this box is unchecked only the answer that is typed into the above field will be counted as correct.
- Select Numeric Range to add an answer for rounding, number set, algebraic and other problems with a varying answer range. (Optional) Check the – Require Precision to box and select a place value from the drop-down menu. Then set a place value to which answer/s need to be rounded.
- Click OK to save and close.
- (Optional) Create an answer slide. Click the Slides tab, press the black arrow on the Add Slide button and select Copy Current Slide. If you wish to create a blank answer slide, click on the Add Slide button.
- When the slide is complete, either go to File menu and select Exit to save and close activity; or click the New Question button to create a new slide set.
Sequence (QVOTE, Q4RF, Q5RF, Q6RF & QVR App) – Place item choices in the specified order.
- Click the New Question button. A blank slide appears on the right and the thumbnail preview of the slide appears in the Slides tab on the left.
- Click the Type drop-down list; select Sequence and number of items.
- Type numeric answer in Answer field and press the Enter key on the keyboard to save it.
- (Optional) Set the time limit.
- (Optional) Click on the Templates tab. Select a template; drag and drop the template onto the slide. See Styles and Templates for more details.
- Enter text onto the slide.
- (Optional) Add multimedia such as images, movies, and sound. Click on the Media tab, type in a keyword/s, and click Search. Drag and drop multimedia items onto slide.
- (Optional) Add custom style to slide. Click the Styles tab, browse and select a style. Drag and drop style onto slide. See Styles and Templates for more details.
- (Optional) Click the eAdvance Options button to set partial grading options and/or send text to Q6 participant remotes.
- (Optional) Create an answer slide. Click the Slides tab, press the black arrow on the Add Slide button and select Copy Current Slide. If you wish to create a blank answer slide, click on the Add Slide button.
- When the slide is complete, either go to File menu and select Exit to save and close activity; or click the New Question button to create a new slide set.
Multiple Mark (QVOTE, Q4RF, Q5RF, Q6RF & QVR App)- This question type enables two or more correct answers (up to six choices).
- Click the New Question button. A blank slide appears on the right and the thumbnail preview of the slide appears in the Slides tab on the left.
- Click the Type drop-down list and select Multiple Mark.
- Enter the correct answers in the Answer field and press the Enter key on the keyboard to save it.
- (Optional) Set the time limit.
- (Optional) Click on the Templates tab. Select a template; drag and drop the template onto the slide. See Styles and Templates for more details.
- Enter text onto the slide.
- (Optional) Add multimedia such as images, movies, and sound. Click on the Media tab, type in a keyword/s, and click Search. Drag and drop multimedia items onto slide.
- (Optional) Add custom style to slide. Click the Styles tab, browse and select a style. Drag and drop style onto slide. See Styles and Templates for more details.
- (Optional) Click the Advance Options button to set partial grading options and send text to Q6 participant remotes.
- (Optional) Create an answer slide. Click the Slides tab, press the black arrow on the Add Slide button and select Copy Current Slide. If you wish to create a blank answer slide, click on the Add Slide button.
- When the slide is complete, either go to File menu and select Exit to save and close activity; or click the New Question button to create a new slide set.
Rating Scale / Survey (All Remotes & QVR App)- Rating scale question slide (i.e. rating/opinions/polling using scales from 1-5, 1-10, etc.).
- Click the New Question button. A blank slide appears on the right and the thumbnail preview of the slide appears in the Slides tab on the left.
- Click the Type drop-down list and select Rating Scale.
- (Optional) Type in answer in the Answer field.
- (Optional) Set the time limit and number of points.
- (Optional) Click on the Templates tab. Select a template; drag and drop the template onto the slide. See Styles and Templates for more details.
- Enter text onto the slide.
- (Optional) Add multimedia such as images, movies, and sound. Click on the Media tab, type in a keyword/s, and click Search. Drag and drop multimedia items onto slide.
- (Optional) Add custom style to slide. Click the Styles tab, browse and select a style. Drag and drop style onto slide. See Styles and Templates for more details.
- Click the Advanced Options button to send text to Q6 participant remotes.
- (Optional) Create an answer slide. Click the Slides tab, press the black arrow on the Add Slide button and select Copy Current Slide. If you wish to create a blank answer slide click on the Add Slide button.
- When the slide is complete, either go to File menu and select Exit to save and close activity; or click the New Question button to create a new slide set.
Short Text Response (Q5RF, Q6RF & QVR App) – Answer can be up to 32 characters long on the Q5RF remote. Best used for single word responses were capitalization does not matter.
- Click the New Question button. A blank slide appears on the right and the thumbnail preview of the slide appears in the Slides tab on the left.
- Click the Type drop-down list and select Short Text Response.
- Click the Answer field, type in answer, and press enter when finished.
- (Optional) Set time limit and number of points.
- (Optional) Click on the Templates tab. Select a template; drag and drop the template onto the slide. See Styles and Templates for more details.
- Enter text onto the slide.
- (Optional) Add multimedia such as images, movies, and sound. Click on the Media tab, type in a keyword/s, and click Search. Drag and drop multimedia items onto slide.
- (Optional) Add custom style to slide. Click the Styles tab, browse and select a style. Drag and drop style onto slide. See Styles and Templates for more details.
- Click the e Advanced Options button to send text to Q6 participant remotes.
- (Optional) Create an answer slide. Click the Slides tab, press the black arrow on the Add Slide button and select Copy Current Slide. If you wish to create a blank answer slide, click on the Add Slide button.
- When the slide is complete, either go to File menu and select Exit to save and close activity; or click the New Question button to create a new slide set.
Text Response (Q6RF & QVR App) – Answers can be approximately 144 characters, including punctuation and spacing.
- Click the New Question button. A blank slide appears on the right and the thumbnail preview of the slide appears in the Slides tab on the left.
- Click the Type drop-down list and select Text Response.
- (Optional) Click on the Templates tab. Select a template; drag and drop the template onto the slide. See Styles and Templates for more details.
- Enter text onto the slide.
- (Optional) Add multimedia such as images, movies, and sound. Click on the Media tab, type in a keyword/s, and click Search. Drag and drop multimedia items onto slide.
- (Optional) Add custom style to slide. Click the Styles tab, browse and select a style. Drag and drop style onto slide. See Styles and Templates for more details.
- (Optional) Set the time limit.
- Click the Advanced Options button. This brings up the Question Properties window.
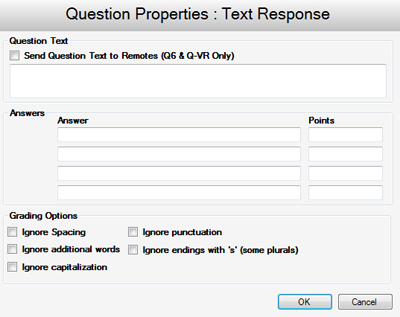
- Check the Send Question Text to Remotes box to send text to Q6 participant remotes.
- Fill in answer/s in the Answer field. Enter the number of points. Multiple answers and point values can be added for partial grading (whole numbers only).
- Set grading options. Participant’s answers will be marked right or wrong based on these options.
- Click OK when finished.
- (Optional) Create an answer slide. Click the Slides tab, press the black arrow on the Add Slide button and select Copy Current Slide. If you wish to create a blank answer slide, click on the Add Slide button.
- When the slide is complete, either go to File menu and select Exit to save and close activity; or click the New Question button to create a new slide set.
Text Edit (Q6RF & QVR App)
- Click the New Question button. A blank slide appears on the right and the thumbnail preview of the slide appears in the Slides tab on the left.
- Click the Type drop-down list and select Text Edit.
- (Optional) Click on the Templates tab. Select a template; drag and drop the template onto the slide. See Styles and Templates for more details.
- Enter text onto the slide.
- (Optional) Add multimedia such as images, movies, and sound. Click on the Media tab, type in a keyword/s, and click search. Drag and drop multimedia items onto slide.
- (Optional) Add custom style to slide. Click the Styles tab, browse and select a style. Drag and drop style onto slide. See Styles and Templates for more details.
- Click the button. This brings up the Question Properties window.
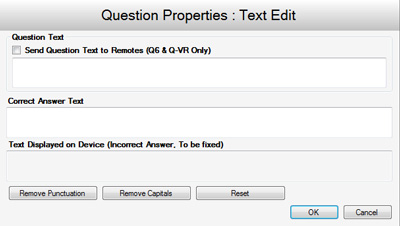
- Check the Send Question Text to Remotes box to send text to Q6 participant remotes .
- Enter the correct answer in the Correct Answer Text field.
- Enter the text to be edited by participant in the Text Displayed on Device field.
- Click OK when finished.
- (Optional) Create an answer slide. Click the Slides tab, press the black arrow on the Add Slide button and select Copy Current Slide. If you wish to create a blank answer slide, click on the Add Slide button.
- When the slide is complete, either go to File menu and select Exit to save and close activity; or click the New Question button to create a new slide set.
Equation (Q6RF & QVR App) – Create questions that allow participants to respond with numeric answers, including special characters.
- Click the New Question button. A blank slide appears on the right and the thumbnail preview of the slide appears in the Slides tab on the left.
- Click the Type drop-down list and select Equation.
- (Optional) Click on the Templates tab. Select a template; drag and drop the template onto the slide. See Styles and Templates for more details.
- Enter text onto the slide.
- (Optional) Add multimedia such as images, movies, and sound. Click on the Media tab, type in a keyword/s, and click search. Drag and drop multimedia items onto slide.
- (Optional) Add custom style to slide. Click the Styles tab, browse and select a style. Drag and drop style onto slide. See Styles and Templates for more details.
- (Optional) Set the time limit.
- Click the button. This brings up the Question Properties window.
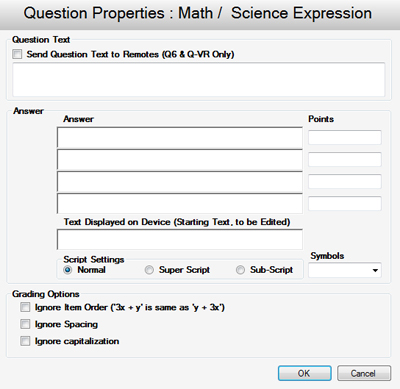
- Check the Send Question Text to Remotes box to send text to Q6 participant remotes.
- Fill in answer/s in the Answer field. Enter the number of points. Multiple answers and point values can be added for partial grading (whole numbers only).
- Add an equation to be edited by participant in the Text Display on Device field.
- Set grading options. Participant’s answers will be marked right or wrong based on these options.
- Click OK when finished.
- (Optional) Create an answer slide. Click the Slides tab, press the black arrow on the Add Slide button and select Copy Current Slide. If you wish to create a blank answer slide, click on the Add Slide button.
- When the slide is complete, either go to File menu and select Exit to save and close activity; or click the New Question button to create a new slide set.

