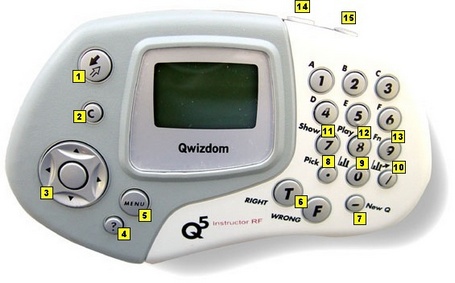
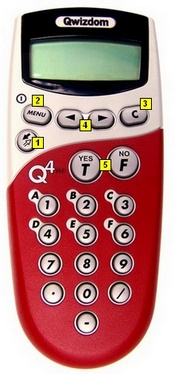
Q4RF Participant Clicker

new Q4 remote

  1. Send send key 
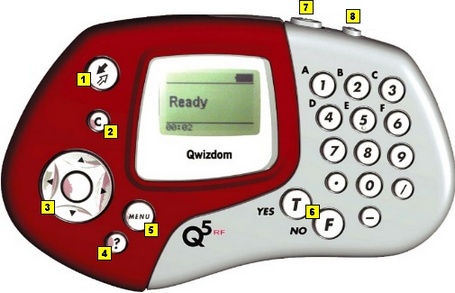
– press to submit answer or select menu options.
  2. Menu [power] – hold the Menu key for two seconds to turn the remote on or off. Turn off remotes if they are not in use. Remotes automatically turn off at the end of a presentation. Press the Menu key and use the scroll keys to view options. Press Send to select an option such as Search, Sess. ID, User ID, and Exit. When presenting, the menu items are Help, Login, User Id, and Exit. To request help during presentation, press the Menu key, scroll to select Help, and press the Send key to select it.
  3. Scroll scroll keys– scroll through menu options, answer choices, or questions.
  4. Clear [C] – press to delete response or change answers if instructor has enabled the feature.
  5. True/Yes and False/No – use to answer True/False and Yes/No questions


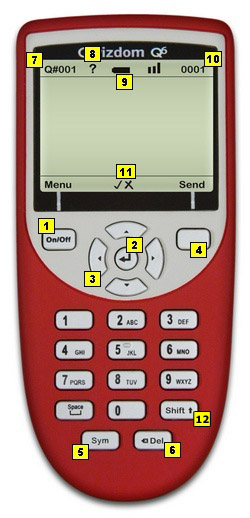
Q4 Common Screen Displays

  • Qwizdom: Remote has found the host and is ready for a question slide.
  • Activity ID: Displays when the remote is requesting an Answer Key activity number. Prompt only appears when Multiple Answer Keys are being presented. See Answer Key for details.
  • Sess. ID: Your remote may ask you to enter the Session ID. See Remote Setup for details.
  • User ID: The remote is asking for a Participant ID. See Remote Login for details.
  • Loading: An Answer Key is loading; may take a few moments.
  • Push Key: Remote is idle. Press any key, (except MENU) to reactivate.
  • Inactive: Remote senses the host is not in use or does not recognize the session. If remote remains inactive after starting a presentation, re-enter Session ID by pressing MENU, scrolling right to “Sess.ID,” and pressing SEND. When prompted, re-enter the Session ID and press SEND.
  • No Net: Remote cannot find the host. Re-enter the Session ID.
  • Denied: User denied due to incorrect User ID or a duplicate User ID. Re-enter User ID. Press MENU, scroll to “User ID,” press SEND, enter the User ID, and press SEND again.


Supports the Following Question Types:
Multiple Choice
True/False
Yes/No
Single and Multi-Digit Numeric
Rating Scale
Negative Number
Fractions
Decimal
Multiple Mark
Vote Multiple Mark
Sequence

This device complies with part 15 of the FCC Rules. Operation is subject to the following two conditions: (1) This device may not cause harmful interference, and (2) this device must accept any interference received, including interference that may cause undesired operation.

0 people did not find this helpful

Back To Top

Q5RF Participant Clicker

q5 front rev 2

  1. Send send key – press to submit answer.
  2. Clear [C] – press to delete response or change an answer in a presentation (if option to change responses is allowed).
  3. Thumb pad – press to navigate between letters when keying in answer, press the circle key in the middle to select a letter or to select menu options or to scroll through question numbers during answer keys (paper-based tests).
  4. Question [?] – signals help to instructor during presentation.
  5. Menu – displays menu options Search Again, Enter Session ID, and Exit. Use the thumb pad to scroll through the menu options and the Send key or circle key to select an option.
  6. True/Yes and False/No – use to answer True/False and Yes/No questions.
  7. Power switch – turns remote on/off. The remotes do not automatically turn off. Turn off remotes if they are not in use.
  8. Backlight switch – turns Backlight on/off.

Q5RF Common Screen Displays

  • Qwizdom: Displays when slides are non-question types, such as lessons or information.
  • Activity ID: Displays when the remote is requesting an Answer Key activity number. Prompt only appears when multiple test versions are being presented. Activity numbers should be noted on the test sheets before presenting; numbers cannot be viewed while in presentation mode.
  • Loading: An answer key is loading; may take a few moments.
  • Push Key: Remote is idle. Press any key, (except MENU) to reactivate.
  • Inactive: Remote senses the host is not in use or does not recognize the session. If remote remains inactive after starting a presentation, re-enter Session ID by pressing MENU, scrolling right to “Sess.ID,” re-entering Session ID, and pressing SEND.
  • No Net: Remote cannot find the host. re-enter the Session ID. If “No Net” continues, enter User ID and Session ID.
  • Denied: User denied due to incorrect Session ID, User ID, or a duplicate User ID.
  • Ready: Displays on the instructor remote is ready to use.
  • Last Key: Will appear on the instructor’s remote showing the last key that was pressed.

Supports the Following Question Types:
Multiple Choice
Yes/No
True/False
Numeric
Sequence
Multiple Mark
Vote Multiple Mark
Rating Scale
Text Input

This device complies with part 15 of the FCC Rules. Operation is subject to the following two conditions: (1) This device may not cause harmful interference, and (2) this device must accept any interference received, including interference that may cause undesired operation.

0 people did not find this helpful

Back To Top

QVOTE Participant Clicker

  1. Q# – displays the current question number.
  2. Help Request  -indicates your requested help.
  3. Battery Power – displays battery charge.
  4. ID# – displays the remote ID number.
  5. Menu/Power – press and hold on to power remote on/off. Press to view menu options: Help, Search, Sess. ID, User ID, Adjust Contrast, and Exit.
  6. Right/Wrong Feedback – displays check mark for correct answer, X for incorrect answer, and both check mark/X for response received.
  7. Send / Change / Join – press to send or change an answer. Also press to join or search for a session.
  8. Directional Arrows and Select – press to navigate between menu options, answer choices, and questions. Press the MenuSelectKey to make a selection.
  9. True / Yes / Decimal – press to select True, Yes, or enter a decimal depending on question.
  10. False/No/Negative – press to select False, No, or enter a negative number depending on question.
  11. Fraction – use to enter a fraction answer.
  12. Delete – press to delete the last character.


QVOTE Common Screen Displays

  • Searching for Session ID: Remote is searching for the host.
  • Ready: Remote has found the host and is ready for a question slide.
  • Power Save Mode: Remote is idle. Click RESUME, to reactivate.
  • Help: First available Menu option. With Help selected, press the menu select key MenuSelectKey to privately ask for help or scroll to “EXIT” and press MenuSelectKey.
  • Session ID Not Found: Remote cannot find the host. Re-enter the “Session ID.” Press MENU, scroll to “Enter Session ID,” click MenuSelectKey, enter the Session ID, and press SEARCH AGAIN.
  • Session ID Login Denied: User denied due to incorrect User ID, or a duplicate ID. Re-enter User ID. Press MENU, scroll to “Enter User ID,” click MenuSelectKey, re-enter the User ID, and press JOIN.
  • Enter User ID: The remote is asking for a Participant ID. See Remote Login for details.
  • Loading: Loading an Answer Key; may take a few moments.
  • Enter Activity ID: Requesting an Answer Key activity number. Prompt only appears when Multiple Answer Keys are being presented. See Answer Key for details.


Supports the Following Question Types:
Multiple Choice
Yes/No
True/False
Numeric
Fractions
Decimals
Negative
Sequence
Multiple Mark
Vote Multiple Mark
Rating Scale

This device complies with part 15 of the FCC Rules. Operation is subject to the following two conditions: (1) This device may not cause harmful interference, and (2) this device must accept any interference received, including interference that may cause undesired operation.

0 people did not find this helpful

Back To Top

Q6RF Participant Clicker

Q6-Complete4weba

  1. Menu/Power – press and hold on to power remote on/off. Press to view menu options: Help, Search, Sess. ID, User ID, Adjust Contrast, and Exit.
  2. Enter – press to submit commands from LCD menu choices.
  3. Directional Arrows – press to navigate between menu options, answer choices, and questions.
  4. Multi-function – serves as multi-function for Send/Change.
  5. Symbols – select to enter fraction, punctuation, etc.
  6. Delete – press to delete the last character.
  7. Q# – displays the current question number.
  8. Help Request  -indicates your requested help.
  9. Battery Power – displays battery charge.
  10. ID# – displays the remote ID number.
  11. Right/Wrong Feedback – displays check mark for correct answer, X for incorrect answer, and both check mark/X for response received.
  12. Shift – changes case options: ABC/Abc/abc/123/Superscript/Subscript.


Q6 Common Screen Displays

  • Searching for Session ID: Remote is searching for the host.
  • Ready: Remote has found the host and is ready for a question slide.
  • Power Save Mode: Remote is idle. Click RESUME, to reactivate.
  • Help: First available Menu option. With Help selected, press the menu select key MenuSelectKey to privately ask for help or scroll to “EXIT” and press MenuSelectKey.
  • Session ID Not Found: Remote cannot find the host. Re-enter the “Session ID.” Press MENU, scroll to “Enter Session ID,” click MenuSelectKey, enter the Session ID, and press SEARCH AGAIN.
  • Session ID Login Denied: User denied due to incorrect User ID, or a duplicate ID. Re-enter User ID. Press MENU, scroll to “Enter User ID,” click MenuSelectKey, re-enter the User ID, and press JOIN.
  • Enter User ID: The remote is asking for a Participant ID. See Remote Login for details.
  • Loading: Loading an Answer Key; may take a few moments.
  • Enter Activity ID: Requesting an Answer Key activity number. Prompt only appears when Multiple Answer Keys are being presented. See Answer Key for details.

Please Note: To send question text to Q6RF remotes click on the edit2Advanced Options button and check Send Question Text to Remotes. See Creating Slides for details.


Supports the Following Question Types:
Multiple Choice
Yes/No
True/False
Numeric
Sequence
Multiple Mark
Vote Multiple Mark
Rating Scale
Text Input
Text Response
Text Edit
Equation

This device complies with part 15 of the FCC Rules. Operation is subject to the following two conditions: (1) This device may not cause harmful interference, and (2) this device must accept any interference received, including interference that may cause undesired operation.

0 people did not find this helpful

Back To Top

Instructor Remotes

Q6iRF Instructor Remote

Q6i01-sm-UserGuide

  1. On/Off: Press and hold to turn remote on/off. Press to view men options: Enter Sess. ID, Enter User ID, and Backlight.
  2. Directional Arrows: Press to navigate between slides and press to select LCD menu choices.
  3. Full List: View all available actions.
  4. Pick: Randomly call on a participant.
  5.  Private LCD Graph: Display a response graph on the Instructor Remote’s LCD.
  6. Public Screen Graph: Display the response graph for everyone to view.
  7.  Re-pose Question: Re-pose the current question slide.
  8. Help Menu: Displays a list of participants who have requested help.
  9. New Q: Pose a spontaneous question.
  10. Space: Add a space when typing a question.
  11. Pick (Special): Select a participant at random from a specific group. Groups include answered correctly, not answered on, etc.
  12. Shift: Changes case options: ABC/ Abc/abc/123/Superscript/Subscript
  13. Symbols: Press to enter fraction, punctuation, etc.
  14. Delete: Press to delete the last character.


Please note: When using Q6 participant clickers, in order to send question text to Q6RF remotes click on the edit2 Advanced Options button and check Send Question Text to Remotes. See Creating Slides for details.


Q5RF Instructor Remote

q5 teacher rev

  1. Send send key – press to submit command.
  2. C [Clear] – press to clear names from the Help Request list.
  3. 3. Thumb pad – press right/left to navigate between slide sets, up/down for menu options, and “on-the-fly” question choices. Press the circle key (in the middle) to select an option, play Microsoft PowerPoint® animations, advance slides, exit the presentation, and show/hide correct responses on the response graph.
  4. ? [Help List] – displays list of participants who requested help on the LCD screen.
  5. Menu – view menu options such as entering Session ID and search again for host.
  6. True/Right and False/Wrong keys – not applicable using Qwizdom Actionpoint.
  7. New Q [-] – press to pose an “on-the-fly” question.
  8. Pick [.] – press to display/hide a random participant’s name on the computer screen.
  9. Private Graph graph 1 [0] – displays the results of participant responses as a graph on the LCD screen of the instructor’s remote.
  10. Public Graph graph 2[/] – displays the results of participant responses as a graph on the computer (projector, television screen, etc.) screen for everyone to view. Use the right/left controls on the thumb pad to scroll through the different graphs. Use the circle key (in middle of thumb pad) to show/hide correct responses.
  11. Show [7] – to show current scores and start game animations during game mode.
  12. Play [8] – not applicable.
  13. Fn (Function) – allows you to re-pose a question if you go back during to a previous slide during presentation. Note: previous answers will be overwritten.
  14. Power switch – turns remote on/off.
  15. Backlight – turns Backlight on/off. The “Enable Backlight” box in the Configuration Settings window needs to be checked to turn on the Backlight feature.

This device complies with part 15 of the FCC Rules. Operation is subject to the following two conditions: (1) This device may not cause harmful interference, and (2) this device must accept any interference received, including interference that may cause undesired operation.

0 people did not find this helpful

Back To Top

Instructor Remotes

Q6iRF Instructor Remote

Q6i01-sm-UserGuide

  1. On/Off: Press and hold to turn remote on/off. Press to view men options: Enter Sess. ID, Enter User ID, and Backlight.
  2. Directional Arrows: Press to navigate between slides and press  to select LCD menu choices.
  3. Full List: View all available actions including Play/Pause Media, pull up window shade and more.
  4. Pick: Randomly call on a participant.
  5. Private LCD Graph: Display a response graph on the Instructor Remote’s LCD.
  6. Public Screen Graph: Display the response graph for everyone to view.
  7. Re-pose Question: Re-pose the current question slide.
  8. Help Menu: Displays a list of participants who have requested help.
  9. New Q: Pose a spontaneous question.
  10. Space: Add a space when typing a question.
  11. Pick (Special): Select a participant at random from a specific group. Groups include answered correctly, not answered on, etc.
  12. Shift: Changes case options: ABC/ Abc/abc/123/Superscript/Subscript
  13. Symbols: Press to enter fraction, punctuation, etc.
  14. Delete: Press to delete the last character.

Please note: When using Q6 participant clickers, in order to send question text to Q6RF remotes click on the edit2 Advanced Options button and check Send Question Text to Remotes. See Creating Slides for details.


Q5RF Instructor Remote

q5 teacher rev

  1. Send send key – press to submit command.
  2. C [Clear] – press to clear names from the Help Request list.
  3. Thumb pad – press right/left to navigate between slide sets, up/down for menu options, and “on-the-fly” question choices. Press the circle key (in the middle) to select an option, play Microsoft PowerPoint® animations, advance slides, exit the presentation, and show/hide correct responses on the response graph.
  4. ? [Help List] – displays list of participants who requested help on the LCD screen.
  5. Menu – view menu options such as entering Session ID and search again for host.
  6. True/Right and False/Wrong – not applicable.
  7. New Q [-] – press to pose an “on-the-fly” question.
  8. Pick [.] – press to display/hide a random participant’s name on the computer screen.
  9. Private Graph graph 1 [0] – displays the results of participant responses as a graph on the LCD screen of the instructor’s remote.
  10. Public Graph graph 2[/] – displays the results of participant responses as a graph on the computer (projector, television screen, etc.) screen for everyone to view. Use the right/left controls on the thumb pad to scroll through the different graphs. Use the circle key (in middle of thumb pad) to show/hide correct responses.
  11. Show [7] – displays game animations.
  12. Play [8] – will plays videos in Connect only.
  13. Fn (Function) – allows you to re-pose a question if you go back during to a previous slide during presentation. Note: previous answers will be overwritten.
  14. Power switch – turns remote on/off.
  15.  Backlight – turns Backlight on/off. The “Enable Backlight” box in the Configuration Settings window needs to be checked to turn on the Backlight feature.

This device complies with part 15 of the FCC Rules. Operation is subject to the following two conditions: (1) This device may not cause harmful interference, and (2) this device must accept any interference received, including interference that may cause undesired operation.

0 people did not find this helpful

Back To Top

Q7RF Tablet

Tools Overview

TabletSM

Tablet Functions when presenting an activity using Qwizdom Mac Connect Software Suite. Q7 has limited annotation features when presenting Actionpoint activities. 


pick2_24 Pick – picks random participants

 Show Presentation – starts game animation

HelpNew24  Help Requests – privately displays list of participants who requested help

Question Type24 Insert Slide – makes a copy of the current slide and lets you pose a spontaneous question to participant remotes

NewStopwatch24 Timer – adds additional time to timer

StopQuestion24 Stop – stops the question being posed

PrivateResults24Private Graph – displays private graph of responses on tablet (See Response Graph for details.)

DisplayResults24 Public Graph – displays response graph to participants (see Response Graph for details)

Backlight24 LCD Backlight – turns backlight on or off

PenTool24 Pen – use to draw

 Highlighter – use to highlight

 Line – use to draw lines

Text – use to create text

  Insert Multimedia – inserts images, audio, and video files

 Window Shade – hides portion of displayed screen

Laser Pointer24Laser Pointer – displays laser dot when using the Pen

 Absolute Position Mouse – displays arrowhead when using the Pen and works as an absolute position mouse

 Keyboard – activates keyboard region

 New Slide – creates a blank slide

 Copy – copies selected object(s)

 Paste – pastes copied object(s)

  Undo – undo last action(s)

 Redo – redo previous action(s)

 Delete – deletes selected object(s)


 Volume Control


Quick Pose Controls:  Click an answer to spontaneously pose a numeric, multiple choice, yes/no, or rating scale question.

NumericT For Numeric question types

MultipleChoiceT For Multiple Choice question types

RateT For Rating question types

YesNoT For Yes/No or True/False question types

* Click Any to pose a survey question.

This device complies with part 15 of the FCC Rules. Operation is subject to the following two conditions: (1) This device may not cause harmful interference, and (2) this device must accept any interference received, including interference that may cause undesired operation.

Using the Pen

The Pen is used (with the Tablet) to write, draw, and control mouse movements.

T-PenRev

  • Pen Tip – same as a mouse cursor.
  • Left – click button-same as double-clicking with left button on the mouse.
  • Right – click button-same as the right-click button on the mouse.

Pen Actions

  • Press, Tap, Push Down with Pen Tip – activates Tablet icons, similar to left-clicking with mouse.
  • Double tap with Pen Tip – is similar to double-clicking with mouse.
  • Left-click – activates Tablet icons, similar to double-clicking with mouse.
  • Right-click – similar to right-clicking with the mouse.

Sleep Mode
The Pen goes into sleep mode after a minute of inactivity. Touching the pen to the Q7RF Tablet surface or pressing the Left/Right buttons on the pen will reactivate it.


0 people did not find this helpful

Back To Top

Q7RF Tablet

Tools Overview

TabletSM

pick2_24 Pick – picks random participants

HelpNew24  Help Requests – privately displays list of participants who requested help

Question Type24 Insert Slide – makes a copy of the current slide and lets you pose a spontaneous question to participant remotes

NewPoseQuestion24 Pose – re-poses current question slide

NewStopwatch24 Timer – adds additional time to timer

StopQuestion24 Stop – stops the question being posed

PrivateResults24Private Graph – displays private graph of responses on tablet (See Response Graph for details.)

DisplayResults24 Public Graph – displays response graph to participants (see Response Graph for details)

Backlight24 LCD Backlight – turns backlight on or off

PenTool24 Pen &Laser Pointer24Laser Pointer – can be used for annotation


Quick Pose Controls:  Click an answer to spontaneously pose a numeric, multiple choice, yes/no, or rating scale question.

NumericT For Numeric question types

MultipleChoiceT For Multiple Choice question types

RateT For Rating question types

YesNoT For Yes/No or True/False question types

* Click Any to pose a survey question.

This device complies with part 15 of the FCC Rules. Operation is subject to the following two conditions: (1) This device may not cause harmful interference, and (2) this device must accept any interference received, including interference that may cause undesired operation.

 Using the Pen

The Pen is used (with the Tablet) to write, draw, and control mouse movements.

T-PenRev

  • Pen Tip – same as a mouse cursor.
  • Left – click button-same as double-clicking with left button on the mouse.
  • Right – click button-same as the right-click button on the mouse.

Pen Actions

  • Press, Tap, Push Down with Pen Tip – activates Tablet icons, similar to left-clicking with mouse.
  • Double tap with Pen Tip – is similar to double-clicking with mouse.
  • Left-click – activates Tablet icons, similar to double-clicking with mouse.
  • Right-click – similar to right-clicking with the mouse.

Sleep Mode
The Pen goes into sleep mode after a minute of inactivity. Touching the pen to the Q7RF Tablet surface or pressing the Left/Right buttons on the pen will reactivate it.


Speaker Notes

Speaker notes allow you to view notes on the Q7 Tablet while in presentation mode.

1. In Live Editor, select a slide.
2. Go to the View menu and select Speaker Notes.
3. The Speaker Notes window appears.
SpeakerNotes-Crop
4. Click Insert at Root CInsertRootB. Root appears for you to enter text.
5. Enter text.
CInsertRootText
6. Click Insert CRoot to insert a subroot.
7. Enter text.
CRootText
8. When finished, close the window to save the information.

0 people did not find this helpful

Back To Top

Q7RF Tablet

Tools Overview

TabletSM

Tablet Functions when presenting an activity using Qwizdom Connect Software Suite. Q7 has limited annotation features when presenting Actionpoint activities. For details on using the Q7 tablet with Actionpoint software please see the Actionpoint User Guide.

NewPlay24 Media Control – play/ pause multimedia files

pick2_24 Pick – picks random participants

show2_24 Show Presentation – starts game animation

HelpNew24  Help Requests – privately displays list of participants who requested help

Question Type24 Insert Slide – makes a copy of the current slide and lets you pose a spontaneous question to participant remotes

NewPoseQuestion24 Pose – re-poses current question slide

NewStopwatch24 Timer – adds additional time to timer

StopQuestion24 Stop – stops the question being posed

PrivateResults24Private Graph – displays private graph of responses on tablet (See Response Graph for details.)

DisplayResults24 Public Graph – displays response graph to participants (see Response Graph for details)

Backlight24 LCD Backlight – turns backlight on or off

PenTool24 Pen – use to draw

BlueHighlighter24 Highlighter – use to highlight

LineTool24 Line – use to draw lines

TextTool24Text -use to create text

image24 Insert Multimedia – inserts images, audio, and video files

Window Shade24 Window Shade – hides portion of displayed screen

Laser Pointer24Laser Pointer – displays laser dot when using the Pen

pointerBLK24 Absolute Position Mouse – displays arrowhead when using the Pen and works as an absolute position mouse

Key24 Keyboard – activates keyboard region

New Blank Page24 New Slide – creates a blank slide

 Copy24 Copy – copies selected object(s)

Paste24 Paste – pastes copied object(s)

Undo Undo – undo last action(s)

Redo Redo – redo previous action(s)

Delete24 Delete – deletes selected object(s)

VolumeRev2 Volume Control


Quick Pose Controls: 
Click an answer to spontaneously pose a numeric, multiple choice, yes/no, or rating scale question.

NumericT For Numeric question types

MultipleChoiceT For Multiple Choice question types

RateT For Rating question types

YesNoT For Yes/No or True/False question types

* Click Any to pose a survey question.

This device complies with part 15 of the FCC Rules. Operation is subject to the following two conditions: (1) This device may not cause harmful interference, and (2) this device must accept any interference received, including interference that may cause undesired operation.

 Using the Pen

The Pen is used (with the Tablet) to write, draw, and control mouse movements.

T-PenRev

  • Pen Tip – same as a mouse cursor.
  • Left – click button-same as double-clicking with left button on the mouse.
  • Right – click button-same as the right-click button on the mouse.

Pen Actions

  • Press, Tap, Push Down with Pen Tip – activates Tablet icons, similar to left-clicking with mouse.
  • Double tap with Pen Tip – is similar to double-clicking with mouse.
  • Left-click – activates Tablet icons, similar to double-clicking with mouse.
  • Right-click – similar to right-clicking with the mouse.

Sleep Mode
The Pen goes into sleep mode after a minute of inactivity. Touching the pen to the Q7RF Tablet surface or pressing the Left/Right buttons on the pen will reactivate it.


Speaker Notes

Speaker notes allow you to view notes on the Q7 Tablet while in presentation mode.

1. In Live Editor, select a slide.
2. Go to the View menu and select Speaker Notes.
3. The Speaker Notes window appears.
SpeakerNotes-Crop
4. Click Insert at Root CInsertRootB. Root appears for you to enter text.
5. Enter text.
CInsertRootText
6. Click Insert CRoot to insert a subroot.
7. Enter text.
CRootText
8. When finished, close the window to save the information.

0 people did not find this helpful

Back To Top

Organizing Content

Content Manager is where all created, download and imported activities can be stored and organized. Click the Content tab; or click the Qwizdom Tools and select Content Manager to open.

Create a New Folder

  1. Click the NewFolder New Folder button.
  2. Enter a name for the folder and click OK.
  3. The folder appears in the Content Tree on the left.
  4. Drag and drop folders to reorganize.


Create a New Activity

  1. Click the AddActivity Add Live Editor Activity button.
  2. Enter a name for the activity and click OK.
  3. The activity appears in the Content Tree on the left.
  4. Drag and drop the activity into the desire location.
  5. Select the newly created activity and click the Edit Edit button to launch Live Editor. See Creating Slides for more information.


Create a New Answer Key

  1. Click the NewAnswerKey Add Answer Key button.
  2. Enter a name and click OK.
  3. The answer key appears in the Content Tree on the left.
  4. Drag and drop the activity into the desire location.
  5. Double-click the answer key file to launch the Answer Key window. See Answer Key for more information.

0 people did not find this helpful

Back To Top